Marbled Autumn Leaf Butter Cookies
Marbled Autumn Leaf Butter Cookies
Marbled Autumn Leaf Butter Cookies capture everything cozy about fall in one tender, crisp bite. Their swirling reds, oranges, and golds look like tiny stained-glass leaves plucked from an October forest. One glance at the platter and you can almost smell cinnamon and feel the crunch of fallen leaves underfoot. Trust me, you’re going to love this edible celebration of the season.
The Seasonal Charm of Marbled Autumn Leaf Butter Cookies
There is something magical about cookies that mirror the changing leaves outside your window. Marbled Autumn Leaf Butter Cookies bring together rich butter flavor and eye-catching color swirls that make every batch feel like a handcrafted gift. The delicate crunch gives way to a melt-in-your-mouth center that keeps you reaching for just one more.
The aroma of vanilla and butter fills the kitchen as the colors swirl together, creating anticipation before the first bite. Each cookie feels like a tiny masterpiece you can hold in your palm.
A Storied Tradition of Shaped Butter Cookies
Decorative butter cookies have graced holiday tables for generations, especially across European baking traditions where intricate shapes signal celebration. Leaf motifs in particular pay homage to harvest festivals and the natural beauty of the season. Bakers have long used simple doughs and natural colorings to echo the landscape, creating edible art that tells a story.
Today, gel food colorings let us recreate that same reverence for nature with even brighter, more consistent results in our own Marbled Autumn Leaf Butter Cookies. Butter cookies like these connect us to a timeless craft that honors both patience and creativity.
Why Bakers Love This Marbled Autumn Leaf Butter Cookies Recipe
This recipe earns its place in your permanent file because it delivers stunning results without complicated techniques. You do not need fancy equipment or rare ingredients to produce bakery-worthy cookies that draw gasps from guests. Every batch bakes evenly and holds its shape beautifully, which means your leaf outlines stay crisp and defined.
The dough is forgiving, the colors are endlessly customizable, and the final platter always looks like you spent hours more than you actually did. That combination makes this Marbled Autumn Leaf Butter Cookies recipe a total game-changer for busy bakers who still want a wow factor.
Versatile: These cookies fit effortlessly into Halloween parties, Thanksgiving dessert boards, or cozy weekend baking sessions with family.
Budget-Friendly: Basic ingredients like butter and sugar keep costs low while still producing cookies that look like they came from a boutique bakery.
Quick and Easy: From mixing to baking, the entire process moves swiftly, so you can enjoy warm cookies without a long wait.
Customizable: Swap the leaf cutters for acorns or pumpkins, and adjust the color palette to match any autumn theme you imagine.
Crowd-Pleasing: Children adore the bright colors, and adults appreciate the classic, not-too-sweet butter flavor.
Make-Ahead Friendly: The dough rests well in the refrigerator, so you can prep it today and bake tomorrow without losing any freshness.
Great for Leftovers: Stored in an airtight tin, these cookies stay crisp and lovely for several days, making them ideal for gifting.
Insider Tips for Flawless Marbling
Achieving that perfect autumn swirl is easier than you think when you keep a few professional tricks in mind. Temperature and gentle handling make all the difference between muddy colors and a vivid marbled masterpiece. Softened butter is essential for a smooth dough that accepts color evenly.
Patience during assembly rewards you with Marbled Autumn Leaf Butter Cookies that look like they were painted by an autumn breeze. Work slowly when blending the colors, and trust the process even if the slab looks abstract before cutting.
- Start with truly softened butter. If it is too cold, the dough will crack; too warm, and the cookies will spread and lose their delicate shape.
- Use gel food coloring sparingly. A tiny dab delivers intense hue without adding excess moisture that could alter the dough texture.
- Roll gently and avoid overworking. Too much folding will blend the colors into a single muddled tone rather than distinct veins of red, orange, yellow, and brown.
- Chill the marbled slab for ten minutes before cutting if the kitchen is warm. Firmer dough pops out of cutters cleanly and holds fine vein details.
- Score veins with the back of a small knife immediately after cutting, before the dough softens on the tray.
Essential Tools for Cookie Success
You only need a few reliable kitchen companions to bring these leaves to life. Gathering them before you begin keeps the process of making Marbled Autumn Leaf Butter Cookies smooth and enjoyable. Each tool plays a specific role in turning simple dough into edible autumn art.
A clean countertop or table gives you plenty of space to lay out the parchment and arrange your colored dough patches. Good lighting helps too, especially when you are scoring fine vein details on each leaf.
Mixing bowl: A medium bowl gives you room to cream butter and sugar without splattering.
Rolling pin: Essential for fusing the colored dough logs into an even 4–5 mm slab.
Leaf-shaped cookie cutters: Maple and oak shapes capture the seasonal spirit and create crisp silhouettes.
Parchment paper: Provides a nonstick surface for assembling colors and rolling without sticking.
Small knife: The back of the blade scores delicate vein lines that elevate each cookie from pretty to breathtaking.
Baking sheet: A lined tray ensures even heat and easy release after baking.
Ingredients You’ll Need for Marbled Autumn Leaf Butter Cookies
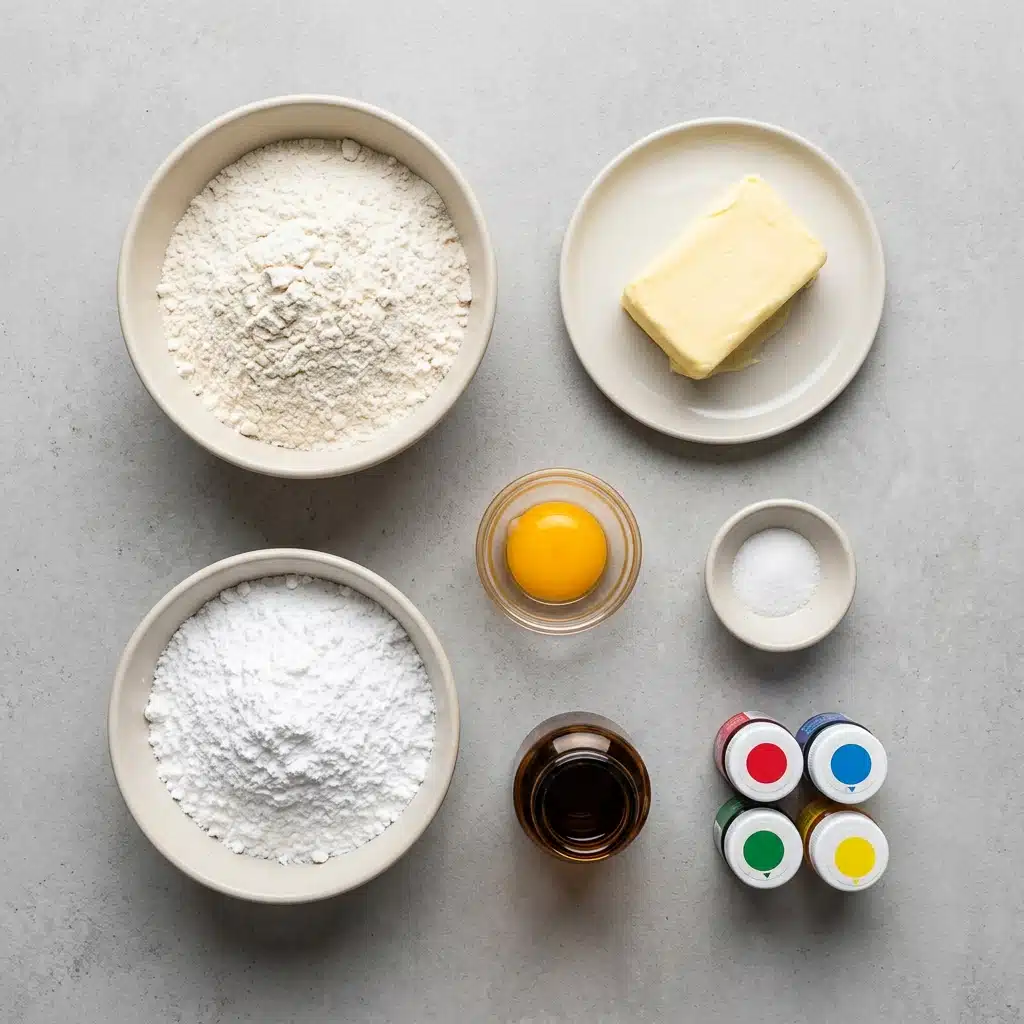
Every ingredient in this recipe pulls its weight to create tender, flavorful cookies with brilliant color. The dough comes together quickly and relies on quality basics rather than a long shopping list. Here is exactly what you will need to make your own Marbled Autumn Leaf Butter Cookies.
Measure your flour accurately for the best texture, and make sure your butter is truly at room temperature before you begin. These small details make the difference between good cookies and unforgettable ones.
- All-purpose flour: 250 g. This forms the structure of the cookie, giving it that delicate snap without toughness.
- Unsalted butter: 125 g, softened at room temperature. It provides richness and helps create the tender crumb that butter cookies are famous for.
- Powdered sugar: 90 g. It dissolves smoothly into the butter, lending subtle sweetness and a fine, meltaway texture.
- Egg yolk: 1 yolk, or 1 medium egg if preferred. It binds the dough gently while adding a lovely golden hue.
- Fine salt: 1 pinch. A whisper of salt sharpens the sweetness and balances the rich butter flavor.
- Vanilla extract: 1 tsp. This warm, aromatic note rounds out the dough and makes the kitchen smell incredible.
- Gel food colorings: Red, orange, yellow, and brown, or cocoa powder for the brown portion. These transform plain dough into a vibrant autumn canvas.
Step-by-Step Guide to Marbled Autumn Leaf Butter Cookies
This is where the magic happens. Follow each stage carefully, and you will soon have a tray of stunning Marbled Autumn Leaf Butter Cookies ready for the oven. The process rewards a gentle touch and a little patience.
- Make the dough: In a mixing bowl, cream the softened butter with powdered sugar and salt until smooth. Mix in the egg yolk and vanilla extract, then fold in the flour just until combined into a soft dough. Take care not to overmix, which keeps the texture tender and light.
- Color the portions: Divide the dough into smaller sections and tint each with autumn food colors (red, orange, yellow, brown, and leave one neutral). Gel colorings give the most vivid results without thinning the dough.
- Assemble the colors: Shape each colored dough into small logs or patches and place them side-by-side in alternating colors on a sheet of parchment paper. This patchwork sets the stage for the beautiful swirl.
- Roll and marble: Roll over the dough with a rolling pin to fuse the colors together, fold slightly, and roll again to about 4–5 mm thickness to create a natural swirl pattern. The gentle folding mimics the organic veins of real leaves.
- Cut the shapes: Stamp out cookies using leaf-shaped cookie cutters (maple and oak leaves). Press firmly and wiggle slightly for clean edges that capture every lobe and point.
- Add details: Transfer cutouts to a lined baking sheet and gently score leaf vein lines on top using the back of a small knife. These delicate grooves catch the light and add lifelike dimension.
- Bake: Bake at 160°C (320°F) for 10 to 12 minutes, keeping the tops light to preserve the vibrant fall colors. Let cool completely on the tray before handling, as the warm cookies are fragile until they set.
As the tray emerges from the oven, the colors will look slightly muted but still beautifully distinct. Let the cookies rest undisturbed so they can crisp into delicate, flavorful Marbled Autumn Leaf Butter Cookies.
Common Pitfalls and How to Avoid Them
Even simple butter cookies can stumble if a few details go overlooked. The good news is that every mistake has an easy fix, so you can bake with confidence. Keep these pointers in mind for a flawless batch of Marbled Autumn Leaf Butter Cookies.
Watching the oven closely during the final minutes helps you catch the perfect moment before any hint of browning steals the show. It is a small habit that protects all the vibrant work you put into marbling.
- Over-creaming the butter can introduce too much air, causing the cookies to puff and lose their flat leaf shape. Stop when the mixture looks smooth and cohesive, not fluffy.
- Adding too much gel color can make the dough sticky and hard to roll. Start with a toothpick-sized amount and knead thoroughly before adding more.
- Skipping the cooling step after baking leads to broken leaves. The cookies firm up as they cool on the tray, so patience truly pays off here.
- Rolling the marbled dough too thin creates fragile cookies that brown too quickly. Stick to 4–5 mm for even baking and sturdy leaves.
Nutrition Facts and Baking Schedule
Here is a quick look at what you can expect from each serving, along with the time investment needed. These values are estimates, but they help you plan your baking day.
Because the active time is short, you can easily fit this project into a weekday evening or a lazy Sunday morning. The quick turnaround makes Marbled Autumn Leaf Butter Cookies an ideal last-minute contribution to any autumn gathering.
Servings: 24 cookies
Calories per serving: approximately 85 calories
Note: These are approximate values.
Prep Time: 25 minutes
Cook Time: 12 minutes
Total Time: 37 minutes
Final Thoughts on Marbled Autumn Leaf Butter Cookies
Baking these cookies is like pressing pause on a busy autumn afternoon to create something beautiful. The colors, the shapes, and that perfect butter crunch come together in a treat that feels both nostalgic and new. Share them with neighbors, tuck them into lunchboxes, or simply enjoy one with tea while the leaves fall outside.
However you share them, these Marbled Autumn Leaf Butter Cookies bring a little extra warmth to the season. This one’s a total game-changer, and it’s worth every bite.
PrintMarbled Autumn Leaf Butter Cookies
Marbled Autumn Leaf Butter Cookies capture everything cozy about fall in one tender, crisp bite. Their swirling reds, oranges, and golds look like tiny stained-glass leaves plucked from an October forest.
- Prep Time: 25 minutes
- Cook Time: 12 minutes
- Total Time: 37 minutes
- Yield: 24 cookies
- Category: Dessert
- Method: Baking
- Cuisine: European
Ingredients
- 250 g all-purpose flour125 g unsalted butter (softened at room temperature) 90 g powdered sugar 1 egg yolk (or 1 medium egg)1 pinch fine salt1 tsp vanilla extractGel food colorings: red
- orange
- yellow
- and brown (or cocoa powder)
Instructions
- Make the dough: In a mixing bowl
- cream the softened butter with powdered sugar and salt until smooth. Mix in the egg yolk and vanilla extract
- then fold in the flour just until combined into a soft dough.Color the portions: Divide the dough into smaller sections and tint each with autumn food colors (red, orange, yellow, brown, and leave one neutral). Assemble the colors: Shape each colored dough into small logs or patches and place them side-by-side in alternating colors on a sheet of parchment paper. Roll and marble: Roll over the dough with a rolling pin to fuse the colors together
- fold slightly
- and roll again to about 4–5 mm thickness to create a natural swirl pattern. Cut the shapes: Stamp out cookies using leaf-shaped cookie cutters (maple and oak leaves). Add details: Transfer cutouts to a lined baking sheet and gently score leaf vein lines on top using the back of a small knife. Bake: Bake at 160°C (320°F) for 10 to 12 minutes
- keeping the tops light to preserve the vibrant fall colors. Let cool completely on the tray before handling.
Notes
- Start with truly softened butter; too cold causes cracking, too warm causes spreading.
- Use gel food coloring sparingly to avoid adding excess moisture.
- Roll gently and avoid overworking to prevent muddying colors.
- Chill marbled slab 10 minutes before cutting if kitchen is warm.
- Score veins immediately after cutting before dough softens.
- Do not over-cream butter to avoid puffed cookies that lose shape.
- Cool completely on tray after baking to prevent breakage.
- Maintain 4–5 mm thickness to prevent over-browning and fragility.
Nutrition
- Serving Size: 1 cookie
- Calories: 85