Cheeseburger Tortilla Cups
Cheeseburger Tortilla Cups
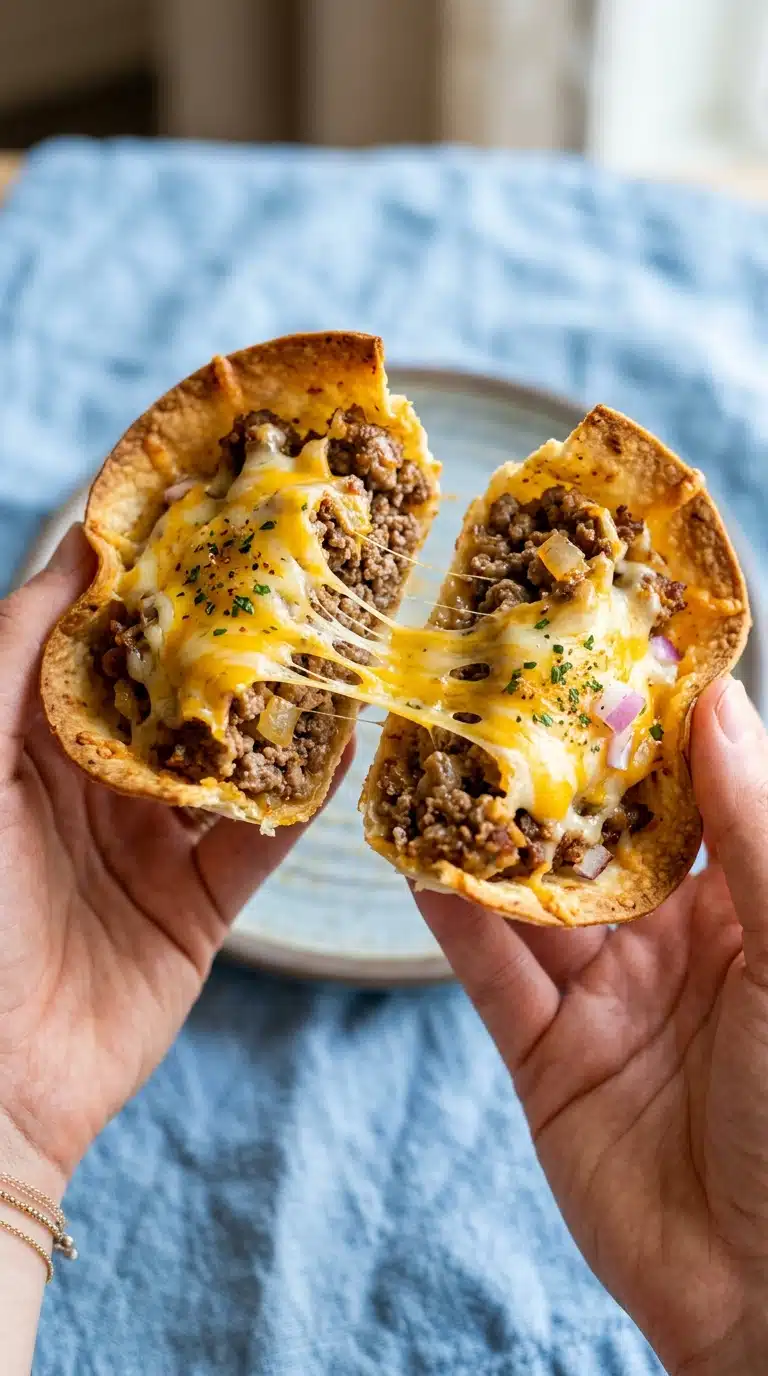
Cheeseburger Tortilla Cups pack every craveable flavor of a backyard cookout into a crispy, handheld bite. Imagine golden tortilla edges giving way to juicy seasoned beef, smoky bacon, and molten cheddar, all cooled by crunchy lettuce and tangy pickles. A final drizzle of burger sauce ties the whole experience together in a way that feels both nostalgic and brand new.
The Appeal & Burger Heritage of Cheeseburger Tortilla Cups
There is something undeniably fun about food you can eat with your hands. These cups deliver the full cheeseburger experience without the need for a bun, which means no squished bread and no lost toppings. The ruffled tortilla edges bake into delicate, shattering pleats that hold the savory filling like an edible bowl.
The concept draws on two beloved traditions. The American cheeseburger has been a diner staple since the 1920s, while folded tortilla dishes trace their roots through Mexican and Tex-Mex kitchens. Marrying the two creates a playful fusion that respects both origins. It is comfort food without borders, and trust me, you’re going to love this.
Why This Recipe Is a Total Game-Changer
This dish proves that weeknight dinners and party spreads can share the same spotlight. It comes together with minimal fuss and delivers maximum flavor every single time.
Versatile: Serve these cups as a game-day snack, a weeknight dinner, or a fun kids’ lunch that breaks the routine.
Budget-Friendly: Ground beef, tortillas, and cheddar are affordable staples that stretch across eight generous servings without breaking the bank.
Quick and Easy: From skillet to oven to table, the whole process moves fast and uses only a handful of familiar ingredients.
Customizable: Swap the cheese, change the protein, or adjust the toppings to match whatever you have in the fridge.
Crowd-Pleasing: The familiar cheeseburger flavor profile wins over picky eaters and adventurous foodies alike.
Make-Ahead Friendly: You can brown the beef earlier in the day and assemble just before baking, which keeps hosting stress low.
Great for Leftovers: Any extra cups reheat beautifully for a next-day lunch that feels anything but repetitive.
Pro Tips & Essential Kitchen Gear
A little insider knowledge goes a long way toward achieving perfectly crisp, restaurant-quality results. Keep these pointers in mind before you preheat the oven.
- Do not skip draining the grease. Excess fat from the beef will pool in the bottom of the cups and turn the tortillas soft instead of crisp.
- Press tortillas gently but firmly. You want the folds to stay open so they create a cavity, but avoid tearing the delicate surface.
- Add cold toppings after baking. Lettuce, pickles, and sauce should hit the warm cups just before serving so they stay fresh and vibrant.
- Use a cookie scoop for even filling. A medium scoop portions the ground beef quickly and ensures every cup is equally satisfying.
You do not need a mountain of gadgets to pull this off. A standard 12-cup muffin tin is absolutely essential for shaping the tortillas into neat, round vessels. A large nonstick skillet gives you plenty of room to brown the ground beef evenly without crowding. A sturdy wooden spoon or spatula helps break the meat into fine, tender crumbles that nestle perfectly inside each cup.
What Goes Into Cheeseburger Tortilla Cups
Every ingredient in this lineup plays a specific role in building that classic cheeseburger balance. You will taste savory depth, smoky richness, creamy melt, and bright crunch in every single bite.
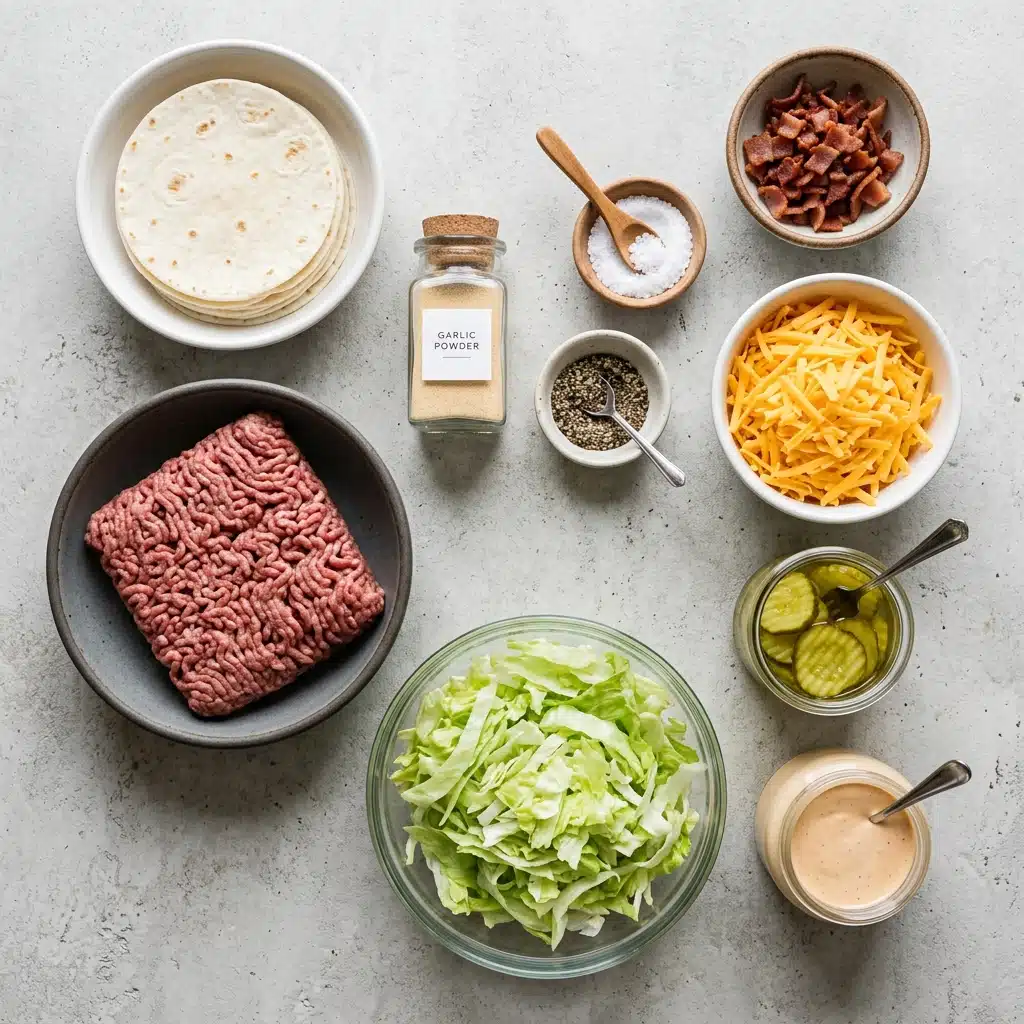
- Mini flour tortillas: 8 small flour tortillas serve as the edible vessel, baking into crisp, ruffled cups that hold all the delicious fillings.
- Ground beef: 1 pound (450g) of lean ground beef provides the hearty, protein-rich base that carries the garlic, salt, and pepper.
- Garlic powder: 1 teaspoon of garlic powder infuses the meat with mellow, aromatic depth without the risk of burning raw garlic.
- Salt: 1/2 teaspoon of fine salt seasons the beef and enhances every other flavor in the finished cup.
- Black pepper: 1/2 teaspoon of freshly cracked black pepper adds a gentle kick and classic diner-style seasoning.
- Shredded cheddar cheese: 1 1/2 cups of shredded cheddar cheese melt into a gooey, golden blanket that seals the beef and bacon together.
- Crispy bacon bits: 1/2 cup of real bacon crumbles contributes a smoky, salty crunch that echoes a fully loaded bacon cheeseburger.
- Crinkle-cut dill pickle slices: 1/3 cup of drained dill pickle chips deliver the signature tangy snap that cuts through the richness.
- Shredded iceberg lettuce: 1 cup of finely shredded iceberg lettuce adds a cool, watery crunch just before serving.
- Burger sauce (special sauce): 1/4 cup of creamy burger sauce drizzled on top replicates that secret-drizzle magic you find at classic burger stands.
Smart Substitutions & Star Ingredients
Whether you are accommodating dietary needs or simply cleaning out the pantry, this recipe forgives swaps with grace.
- Mini flour tortillas: Small soft taco shells or street-taco size wraps work just as well if you adjust the tuck slightly.
- Ground beef: Ground turkey or plant-based crumbles make an easy protein swap while keeping the same savory seasonings.
- Shredded cheddar cheese: Try a Monterey Jack or mild Colby blend for a different melt and mellow flavor.
- Crispy bacon bits: Crushed crispy fried onions offer a similar savory crunch for anyone avoiding pork.
- Burger sauce: Thousand Island dressing or a simple mix of mayonnaise, ketchup, and sweet relish creates an excellent stand-in.
Two ingredients deserve special attention because they define the final character of the dish.
Shredded cheddar cheese: This is the glue that holds the spirit of a cheeseburger together. As it bakes, the fat separates slightly and toasts against the beef, creating lacy, frico-like edges that taste like the best part of a diner patty melt.
Crinkle-cut dill pickle slices: Those ridges are not just for looks. They trap little pockets of burger sauce in every fold, ensuring that tangy dill flavor hits your palate in the very first bite. If you want to understand the backbone of this handheld meal, it helps to respect your flour tortillas and the pickles that wake them up.
How to Make Cheeseburger Tortilla Cups
The journey from raw ingredients to hot, crispy cups is straightforward and deeply satisfying. Follow these five essential moves and you will have a platter worth fighting over.
- Brown the Beef: In a skillet over medium heat, cook the ground beef with garlic powder, salt, and black pepper until fully browned. Drain excess grease. Breaking the meat into fine crumbles ensures every bite is tender and seasoned throughout. Once the beef is no longer pink, tilt the pan and spoon away any extra fat so the cups stay crisp and never greasy.
- Form the Cups: Lightly grease a standard muffin tin. Press and tuck one mini flour tortilla into each muffin cup to form a ruffled cup shape. A light coat of oil or cooking spray keeps the tortillas from sticking and helps them crisp beautifully. Use your fingers to gently fold the edges, creating rustic pleats that hold the filling like an edible bowl.
- Fill & Layer: Spoon a generous amount of cooked beef into each tortilla cup. Top with crispy bacon pieces and a generous layer of shredded cheddar cheese. Pack the beef loosely so air can circulate and the cheese melts evenly over every peak and valley. The bacon adds a smoky crunch that plays perfectly against the savory beef.
- Bake: Bake in a preheated oven at 190°C (375°F) for 10–12 minutes until the tortilla edges are deeply golden and crispy, and the cheese is bubbly and melted. Keep an eye on the oven during the final two minutes, because the tortilla rims can go from golden to dark quickly. That bubbly, bronzed cheese is your cue that the cups are ready to come out.
- Garnish & Serve: Remove from the tin onto a serving board. Top each cup with shredded iceberg lettuce, dill pickle slices, and a spoonful of burger sauce drizzled over the top. Let the cups cool for just a minute so the lettuce stays perky and the sauce does not slide off. Arrange them on a platter and watch them disappear before you even set down the napkins.
Common Pitfalls & How to Avoid Them
Even simple recipes have a few trip wires. Here is how to sidestep the most common mistakes and guarantee success.
- Soggy bottoms: Failing to drain the beef leaves excess grease that soaks the tortilla. Always tilt the pan and remove that liquid gold before filling the cups.
- Torn tortillas: Overstuffing the cups or using too large a tortilla stresses the dough. Choose true mini sizes and fill with a moderate hand.
- Wilted lettuce: Baking lettuce is a recipe for sad, limp greens. Reserve all cold toppings for the final garnish stage.
- Sticking disasters: Forgetting to grease the muffin tin means you will leave half your cup behind. A quick mist of cooking spray saves the day.
Nutrition, Timing & Tasty Twists
These cups strike a satisfying balance between indulgence and portion control. Here is what you can expect from a single serving.
Servings: 8 cups
Calories per serving: approximately 280 kcal
Note: These are approximate values.
Timing is everything when hunger strikes.
Prep Time: 15 minutes
Cook Time: 15 minutes
Total Time: 30 minutes
Once you master the base, the fun really begins. Try swapping cheddar for pepper jack if you crave a little heat. Finely diced raw onion sprinkled over the beef before baking adds a classic burger-joint bite. A thin slice of fresh tomato tucked under the lettuce brings juicy sweetness to the party. For a smoky Southwest spin, stir a pinch of chipotle powder into the beef as it cooks. You can even drizzle spicy mayo instead of burger sauce for a kicked-up finish that still feels right at home.
FAQ’s
1. Can I make these ahead of time?
You can brown the beef and even bake the empty tortilla shells a few hours early. Store them separately at room temperature, then fill and bake for five minutes to re-crisp just before serving.
2. Can I freeze Cheeseburger Tortilla Cups?
Freezing is not ideal because the lettuce and sauce will not survive thawing. However, you can freeze the baked beef-filled cups without toppings and reheat them in a hot oven until crisp.
3. What size muffin tin should I use?
A standard 12-cup muffin tin works perfectly for mini flour tortillas. The wells are deep enough to create a true cup shape without folding too aggressively.
4. Can I use corn tortillas instead?
Corn tortillas are less flexible and tend to crack when folded into cups. If you must use them, warm them first to make them pliable.
5. How do I keep the tortillas from getting soggy?
Drain the beef thoroughly and avoid overfilling. Baking at a high enough temperature drives off moisture and toasts the tortilla edges.
6. Is there a vegetarian version?
Absolutely. Swap the ground beef for seasoned plant-based crumbles and omit the bacon bits. The rest of the recipe remains exactly the same.
7. Can I cook the beef in advance?
Yes, cooked beef keeps beautifully in the refrigerator for up to three days. Reheat it gently before spooning it into the raw tortilla cups.
8. What if I do not have burger sauce?
Whisk together equal parts mayonnaise and ketchup with a spoonful of sweet relish. It mirrors that classic special-sauce flavor in seconds.
9. How do I reheat leftovers?
Place cold cups on a baking sheet and warm them in a 180°C (350°F) oven for about eight minutes. Add fresh lettuce, pickles, and sauce after reheating.
10. Can I double the recipe?
Doubling is simple. Use two muffin tins or bake in batches. The assembly process scales up effortlessly for larger crowds.
Conclusion
Cheeseburger Tortilla Cups bring joy to the table in the most deliciously practical way possible. They capture everything you adore about a classic burger and transform it into a crispy, shareable masterpiece. Gather your ingredients, preheat that oven, and treat yourself to a bite that is worth every moment.
PrintCheeseburger Tortilla Cups
Cheeseburger Tortilla Cups pack every craveable flavor of a backyard cookout into a crispy, handheld bite with golden tortilla edges, juicy seasoned beef, smoky bacon, and molten cheddar.
- Prep Time: 15 minutes
- Cook Time: 15 minutes
- Total Time: 30 minutes
- Yield: 8 cups
- Category: Dinner
- Method: Bake
- Cuisine: American, Tex-Mex
Ingredients
- Base & Filling:Mini flour tortillas Ground beef Seasonings: garlic powder
- salt
- black pepper Shredded cheddar cheese Crispy bacon bits Toppings & Sauce:Crinkle-cut dill pickle slices Shredded iceberg lettuce Burger sauce (special sauce)
Instructions
- Brown the Beef: In a skillet over medium heat
- cook the ground beef with garlic powder
- salt
- and black pepper until fully browned. Drain excess grease. Form the Cups: Lightly grease a standard muffin tin. Press and tuck one mini flour tortilla into each muffin cup to form a ruffled cup shape. Fill & Layer: Spoon a generous amount of cooked beef into each tortilla cup. Top with crispy bacon pieces and a generous layer of shredded cheddar cheese. Bake: Bake in a preheated oven at 190°C (375°F) for 10–12 minutes until the tortilla edges are deeply golden and crispy
- and the cheese is bubbly and melted. Garnish & Serve: Remove from the tin onto a serving board. Top each cup with shredded iceberg lettuce
- dill pickle slices
- and a spoonful of burger sauce drizzled over the top.
Notes
- Do not skip draining the grease; excess fat will make the tortillas soggy.
- Press tortillas gently but firmly so the folds stay open to create a cavity without tearing.
- Add cold toppings such as lettuce, pickles, and sauce after baking so they stay fresh and vibrant.
- Use a cookie scoop for even filling.
- Do not overstuff the cups to avoid torn tortillas.
- Grease the muffin tin well to prevent sticking.
Nutrition
- Serving Size: 1 cup
- Calories: approximately 280 kcal