Graveyard Dirt Cups
Graveyard Dirt Cups
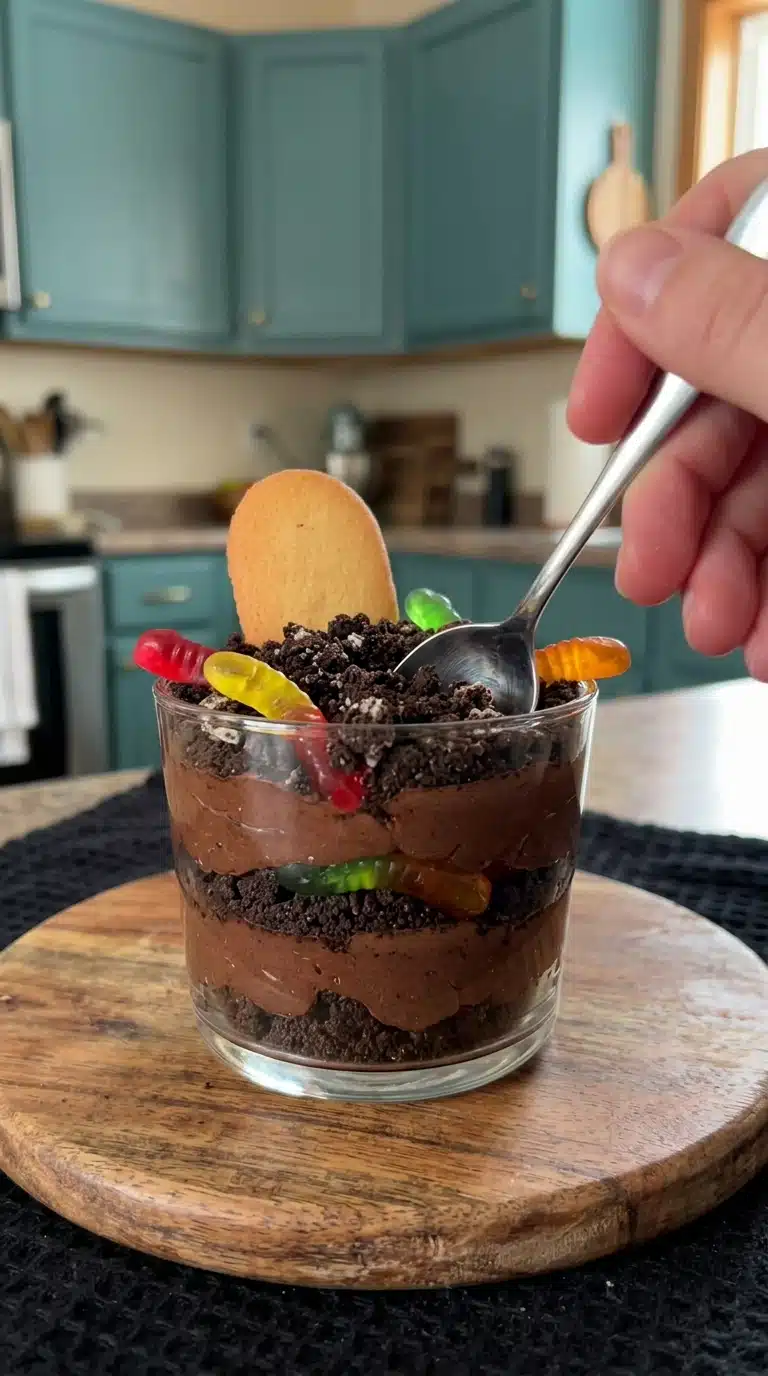
Graveyard Dirt Cups are the ultimate no-bake Halloween treat that transforms simple pantry staples into a spooky, edible cemetery. These decadent chocolate cups layer rich pudding with crunchy cookie crumbs to mimic dark soil, while gummy worms and cookie tombstones add playful character. Trust me, you’re going to love how easily these come together without ever turning on the oven.
Why Graveyard Dirt Cups Are a Hauntingly Good Treat
There’s something delightfully mischievous about serving up a cup of “dirt” that tastes like chocolate heaven. These Graveyard Dirt Cups deliver that nostalgic childhood thrill with minimal effort and maximum flavor impact. The contrast between the silky pudding mousse and the crunchy cookie soil creates a textural playground that keeps every bite interesting and satisfying.
Versatile: Perfect for Halloween parties, classroom treats, or macabre movie nights any time of year.
Budget-Friendly: Uses affordable store-bought ingredients that won’t haunt your wallet.
Quick and Easy: No oven required, just mix, layer, and chill.
Customizable: Swap cookie types or candy shapes to match any theme or holiday.
Crowd-Pleasing: Kids and adults alike dig into these with equal enthusiasm.
Make-Ahead Friendly: Prepare them the night before your event for stress-free entertaining.
Great for Leftovers: The cups keep well in the fridge, tasting even better as the flavors meld.
The Spooky History Behind This Classic Treat
The tradition of “dirt cake” or “dirt dessert” emerged in American home kitchens during the 1980s, when instant pudding and whipped toppings became pantry staples. Graveyard Dirt Cups evolved as a Halloween-specific variation, adding the theatrical elements of tombstones and worms to the original concept. This playful presentation taps into our cultural fascination with friendly frights and edible crafts that blur the line between decoration and dessert.
Pro Tips and Essential Tools for Success
Creating these cups requires minimal equipment, but the right tools ensure your cemetery looks professionally spooky. Gather these essentials before you begin digging into the recipe.
Mixing Bowls: A large bowl gives you room to whisk the pudding vigorously without splashing milk everywhere.
Whisk: Essential for incorporating air into the pudding base for that light, mousse-like texture.
Rolling Pin or Food Processor: For crushing the chocolate sandwich cookies into convincing soil-like crumbs.
Clear Plastic Cups: Transparency showcases the layered “strata” of your edible earth and displays the decorations.
Offset Spatula or Spoon: Helps spread layers neatly without smudging the inside of the cup sides.
For the smoothest results, chill your mixing bowl before folding in the whipped topping. This keeps the mixture light and prevents deflating the airy texture you worked hard to create.
Gathering Your Graveyard Dirt Cups Ingredients
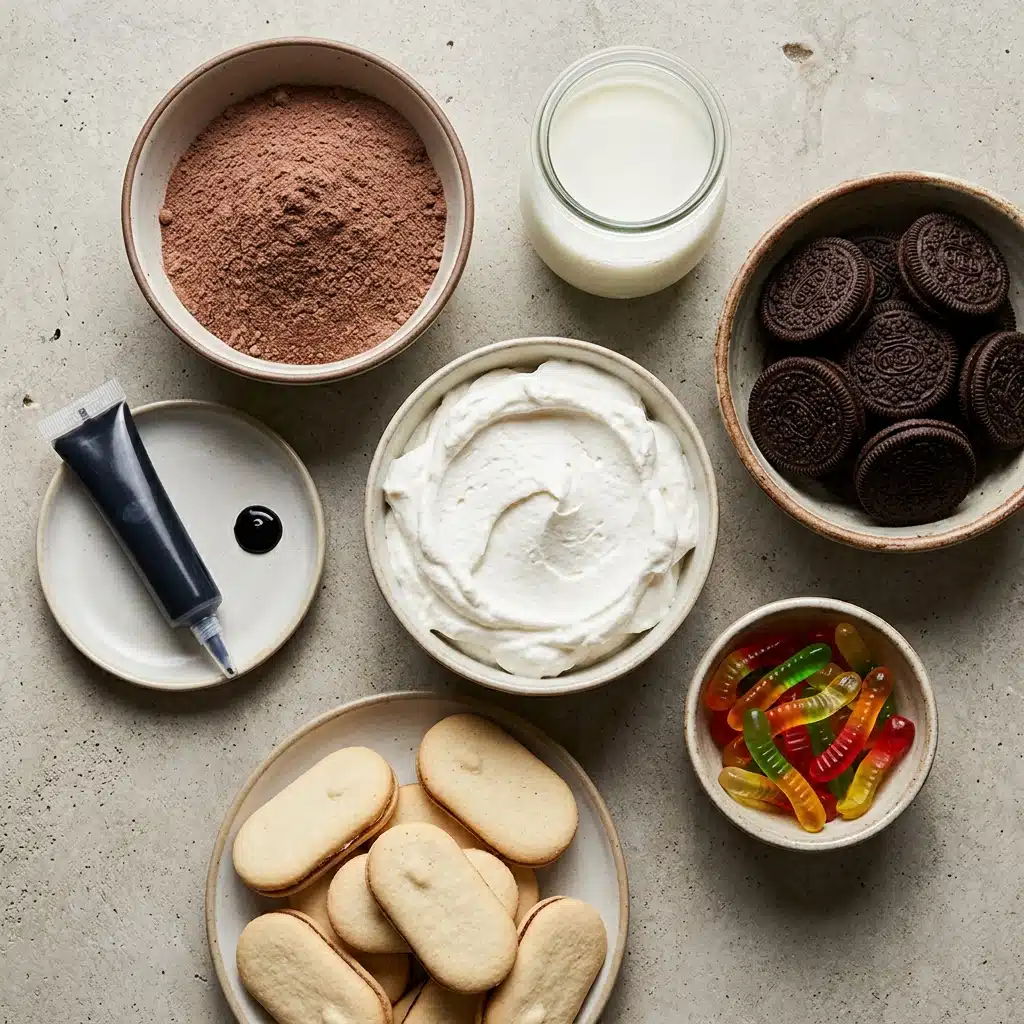
Quality matters even in simple desserts. Choose full-fat milk for the richest pudding, and fresh cookies for the best crunch. Instant pudding relies on modified starches to thicken without cooking, making it perfect for this no-bake treat.
- Instant Chocolate Pudding Mix: One 3.9 oz package provides the chocolatey foundation that sets quickly.
- Cold Whole Milk: Two cups create the perfect consistency when whisked with the pudding powder.
- Chocolate Sandwich Cookies: One 14 oz package, crushed into fine dark crumbs to mimic potting soil.
- Whipped Topping: Eight ounces of thawed whipped cream adds airy lightness to the pudding base.
- Gummy Worms: Twelve to sixteen chewy crawlers for that classic emerging-from-the-dirt effect.
- Oval Sandwich Cookies: Four to six cookies like Milano serve as edible tombstones.
- Black Decorating Gel: Optional for writing “RIP” epitaphs on your cookie grave markers.
Smart Swaps and Spotlight Ingredients
Instant Chocolate Pudding Mix: You can use chocolate mousse mix if you prefer an airier texture, though the classic instant pudding provides that nostalgic flavor we crave.
Cold Whole Milk: Two percent milk works in a pinch, though the pudding will be slightly less rich and creamy than when using whole milk.
Chocolate Sandwich Cookies: Any chocolate cookie with creamy filling works, including store-brand alternatives that crush just as easily.
Whipped Topping: Freshly whipped heavy cream sweetened with powdered sugar substitutes beautifully for a more natural option.
Gummy Worms: Gummy spiders or Halloween-themed candy corn work for variation, or omit for a more sophisticated look.
Chocolate Sandwich Cookies: These provide both the dark color and the textural contrast that makes this dessert sing. The cream filling adds extra richness to the crumb mixture while helping the crumbs clump slightly like real soil.
Building Your Graveyard Dirt Cups Step by Step
Follow these precise steps to construct your edible cemetery without a hitch. The dirt cake technique has been delighting families for decades with its simple layering method.
- Whisk the Pudding Base: In a large bowl, whisk together the instant chocolate pudding mix and cold milk for 2 minutes until smooth. Let sit for 5 minutes to thicken.
- Fold the Cream: Gently fold the thawed whipped topping into the chocolate pudding until fully combined, light, and velvety.
- Crush the Cookies: Place the chocolate sandwich cookies into a zip-top bag and crush with a rolling pin (or pulse in a food processor) until fine, dark soil crumbs form.
- Assemble the Layers: In clear individual cups, alternate layers of crushed cookie crumbs and chocolate pudding, finishing with a generous layer of cookie crumbs on top.
- Decorate & Chill: Write “RIP” on the tombstone cookies using decorating gel and press one into the top of each cup. Arrange gummy worms emerging from the cookie dirt. Chill in the refrigerator for at least 1 hour before serving cold.
Burying Common Mistakes Before They Happen
Even simple no-bake desserts have pitfalls that can turn your graveyard into a mess. Watch for these common traps to ensure your Graveyard Dirt Cups turn out perfectly every single time.
- Soggy Crumbs: Don’t assemble these treats too far in advance. The cookie crumbs can absorb moisture from the pudding and lose their satisfying crunch after 24 hours.
- Runny Pudding: Skipping the 5-minute rest period results in a loose mixture that won’t hold distinct layers and will cause your tombstones to tilt.
- Deflated Cream: Stirring too vigorously when folding in the whipped topping removes air and creates a dense, heavy texture rather than a light mousse.
- Falling Tombstones: Press the cookie tombstones deep enough into the pudding layer so they stand upright against the cup wall, using the crumbs as support.
Nutrition Facts and Preparation Timeline
Servings: 4 to 6 cups / Calories per serving: Approximately 420 / Note: These are approximate values.
Prep Time: 15 minutes / Cook Time: 0 minutes / Total Time: 1 hour 15 minutes (including chilling)
Variations to Try:
– Pumpkin Patch: Use vanilla pudding tinted orange and pumpkin-shaped candies instead of worms for an autumn harvest theme.
– Dinosaur Dig: Swap gummy worms for dinosaur-shaped candies and use chocolate chip cookie crumbs for a prehistoric twist.
– Floral Garden: Layer with vanilla pudding and use gummy flowers for a cheerful springtime version.
FAQ’s
Can I make Graveyard Dirt Cups ahead of time?
Yes, prepare them up to 24 hours in advance, though add the tombstones and worms just before serving to prevent softening.How long do they last in the refrigerator?
They stay fresh for up to 3 days when covered, though the cookie crumbs soften over time.Can I use homemade pudding instead of instant?
Absolutely, though you’ll need to cool it completely before folding in the whipped topping to prevent melting.What size cups work best?
Clear plastic or glass cups holding 8 to 12 ounces showcase the layers beautifully.Can I make this in a large trifle bowl instead of individual cups?
Yes, layer it as a graveyard cake and add multiple tombstones for a centerpiece effect.Are there dairy-free options?
Use almond milk with instant pudding and coconut whipped topping for a lactose-free version.Why is my pudding lumpy?
You likely didn’t whisk long enough. Instant pudding needs vigorous whisking for the full 2 minutes to dissolve completely.Can I freeze these?
Freezing isn’t recommended as the whipped topping can separate and become grainy upon thawing.What if I don’t have decorating gel?
Melted chocolate chips piped through a corner-cut bag work perfectly for writing on the tombstones.Can I use double-stuffed cookies?
Yes, though they may require more crushing to achieve the fine “dirt” texture due to extra filling.
Conclusion
Graveyard Dirt Cups bring out the playful spirit in every baker, whether you’re crafting them with little monsters or serving them at grown-up gatherings. The combination of creamy chocolate and crunchy cookie soil satisfies every sweet tooth while the whimsical presentation sparks joy. Dig in and enjoy every spooky, delicious bite.
PrintGraveyard Dirt Cups
Graveyard Dirt Cups are the ultimate no-bake Halloween treat that transforms simple pantry staples into a spooky, edible cemetery. These decadent chocolate cups layer rich pudding with crunchy cookie crumbs to mimic dark soil, while gummy worms and cookie tombstones add playful character.
- Prep Time: 15 minutes
- Cook Time: 0 minutes
- Total Time: 1 hour 15 minutes
- Yield: 4 to 6 cups
- Category: Dessert
- Method: No-bake
- Cuisine: American
Ingredients
- 1 package (3.9 oz / 110 g) instant chocolate pudding mix
- 2 cups (480 ml) cold whole milk
- 1 package (approx. 14 oz / 400 g) chocolate sandwich cookies (Oreos), crushed into fine “dirt”
- 8 oz (225 g) whipped topping (or whipped cream), thawed
- 12–16 gummy worms
- 4–6 oval or rectangular sandwich cookies (such as Milano cookies) for tombstones
- Optional: Black decorating gel or melted chocolate for writing on tombstones
Instructions
- Whisk the Pudding Base: In a large bowl, whisk together the instant chocolate pudding mix and cold milk for 2 minutes until smooth. Let sit for 5 minutes to thicken.
- Fold the Cream: Gently fold the thawed whipped topping into the chocolate pudding until fully combined, light, and velvety.
- Crush the Cookies: Place the chocolate sandwich cookies into a zip-top bag and crush with a rolling pin (or pulse in a food processor) until fine, dark soil crumbs form.
- Assemble the Layers: In clear individual cups, alternate layers of crushed cookie crumbs and chocolate pudding, finishing with a generous layer of cookie crumbs on top.
- Decorate & Chill: Write “RIP” on the tombstone cookies using decorating gel and press one into the top of each cup. Arrange gummy worms emerging from the cookie dirt. Chill in the refrigerator for at least 1 hour before serving cold.
Notes
- Do not assemble more than 24 hours in advance to prevent soggy crumbs.
- Allow pudding to rest for 5 minutes after whisking to ensure proper thickening.
- Fold whipped topping gently to avoid deflating the mixture.
- Press tombstone cookies deep into the pudding layer so they stand upright.
- Add tombstones and gummy worms just before serving to prevent softening.
Nutrition
- Serving Size: 1 cup
- Calories: Approximately 420