Crispy Parmesan Chicken Cutlets
Crispy Parmesan Chicken Cutlets
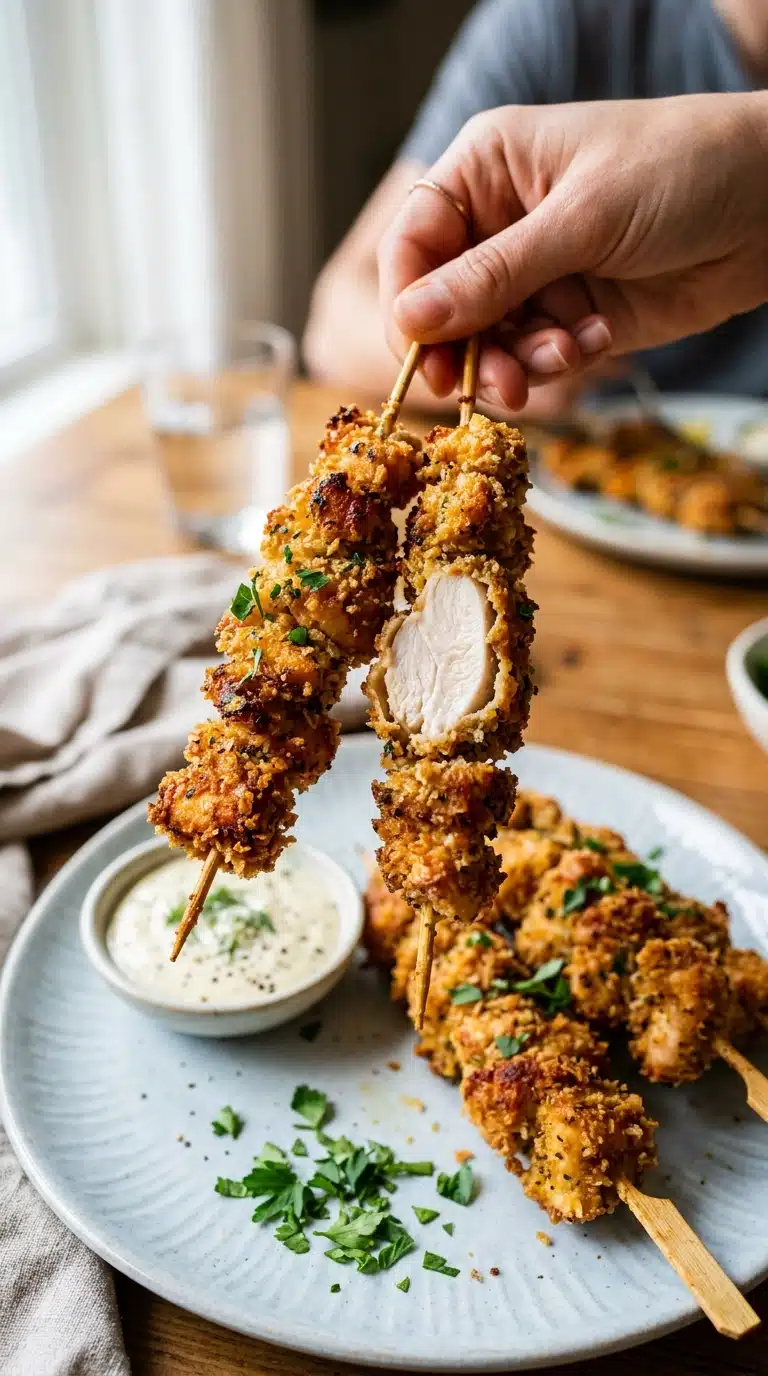
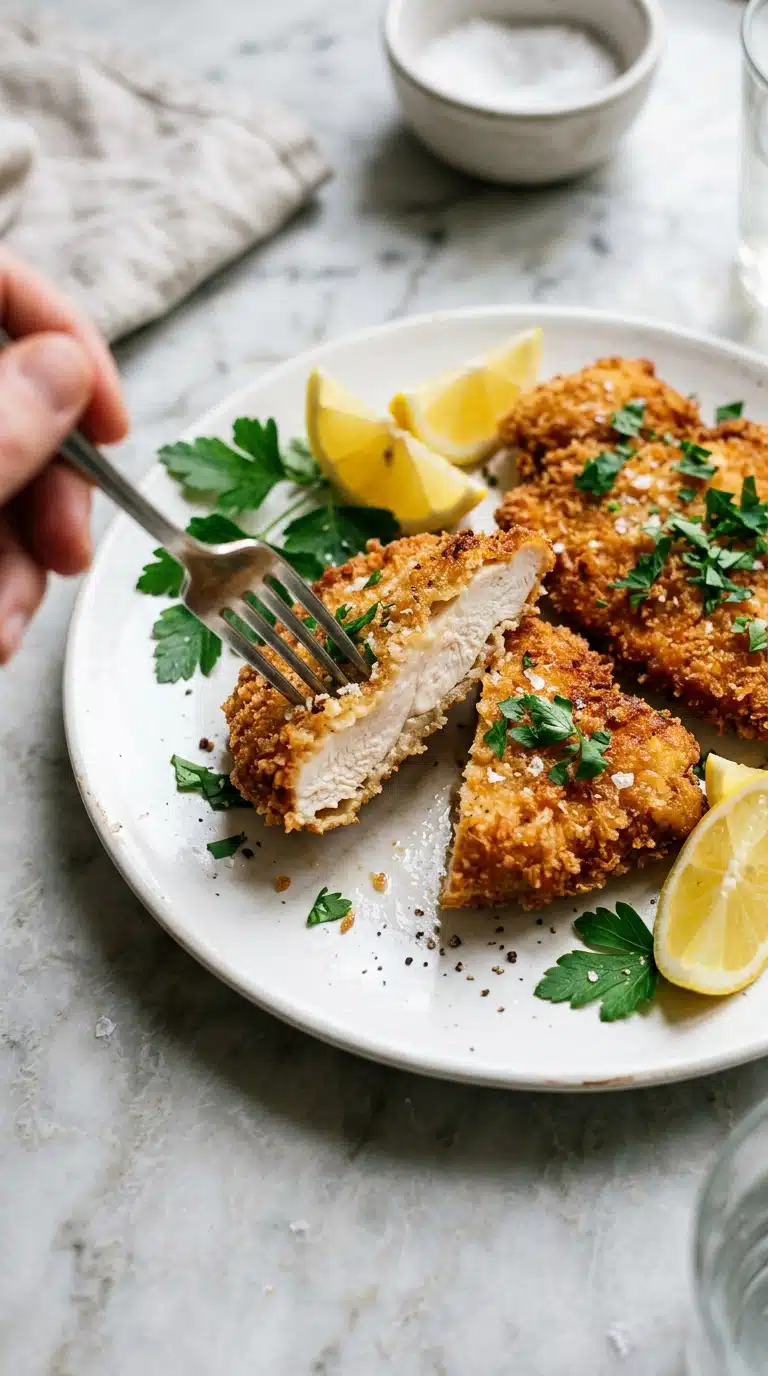
Crispy Parmesan Chicken Cutlets deliver that satisfying crunch you crave without the hassle of deep frying. The combination of panko and parmesan creates a golden crust that shatters beautifully with each bite. Trust me, you’re going to love how simple yet impressive this dish turns out.
Why Crispy Parmesan Chicken Cutlets Belong in Your Kitchen
There’s something magical about the contrast between a shatteringly crisp exterior and tender, juicy meat inside. These cutlets achieve that perfect textural balance through a clever baking method that mimics fried perfection. The aroma of toasted parmesan and Italian herbs will fill your kitchen with pure comfort.
The Cultural Roots of Crispy Parmesan Chicken Cutlets
This dish draws inspiration from the beloved Milanese preparations of Northern Italy. While traditional recipes often involve pan-frying, this baked version honors the same flavors while fitting modern busy lifestyles. The technique represents how Italian immigrants adapted their cooking to American kitchens, creating something both authentic and accessible.
Seven Reasons Crispy Parmesan Chicken Cutlets Work Every Time
Understanding the science behind the crunch helps ensure success every single time. The triple-threat coating of flour, egg, and panko creates layers of texture that stay crisp even after baking.
Versatile: Serve these cutlets over pasta, atop fresh salads, or tucked into warm sandwiches for endless meal possibilities. They adapt beautifully to whatever sides you have on hand.
Budget-Friendly: Using just two chicken breasts stretched into four portions makes this an economical choice for feeding the whole family. Pantry staples like flour and eggs keep costs low while delivering restaurant-quality results.
Quick and Easy: From start to finish, dinner lands on the table in under forty minutes with minimal cleanup required. This one’s a total game-changer for weeknight cooking.
Customizable: Swap the Italian seasoning for smoked paprika or add a pinch of cayenne to the breadcrumb mixture for personalized heat. The base recipe welcomes your favorite flavor combinations.
Crowd-Pleasing: Even picky eaters devour these golden cutlets, making them perfect for family dinners or casual entertaining. The familiar flavors comfort without boring sophisticated palates.
Make-Ahead Friendly: Prepare the cutlets through the breading stage and refrigerate them on the rack for up to two hours before baking. This flexibility helps streamline your dinner routine significantly.
Great for Leftovers: Cold cutlets make excellent sandwich fillings or salad toppers the next day, maintaining their flavor beautifully. Simply reheat in a hot oven to restore that crisp texture.
Mastering Crispy Parmesan Chicken Cutlets: Expert Advice and Tools
Success lies in the details, and a few insider tricks elevate these cutlets from good to unforgettable. Understanding your ingredients and equipment makes all the difference in achieving that perfect crunch.
Don’t skip the rack: Elevating the cutlets allows hot air to circulate underneath, ensuring the bottom gets just as crispy as the top. This method eliminates the soggy underside common in baked breaded meats.
Press, don’t just coat: When applying the panko mixture, press firmly so the crumbs adhere deeply into the surface. This creates a thick, substantial crust that won’t flake off during cooking.
Check temperature early: Use an instant-read thermometer to verify the internal temperature reaches 165°F without overcooking. Learn more about safe poultry temperatures at USDA poultry guidelines.
Meat mallet: A heavy rolling pin or meat mallet helps achieve that even half-inch thickness crucial for uniform cooking. Consistent thickness prevents dry edges while ensuring the center cooks through properly.
Three shallow bowls: Standard soup plates or pie dishes work perfectly for setting up your dredging station. Having dedicated containers prevents cross-contamination and keeps the process organized.
Wire rack: A cooling rack set inside a rimmed baking sheet elevates the cutlets for all-around crisping. Look for oven-safe racks that fit your sheet pans snugly.
Ingredients for Crispy Parmesan Chicken Cutlets
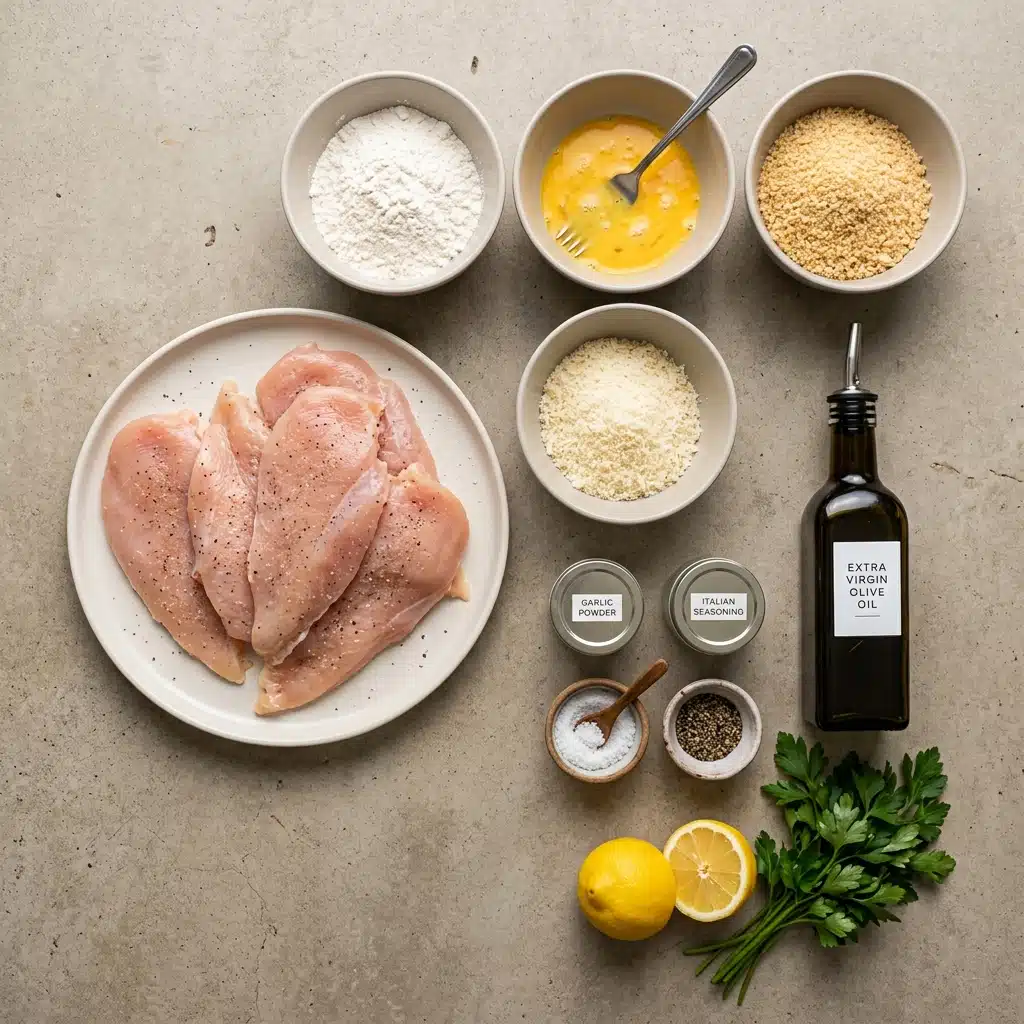
Quality ingredients shine in this simple preparation, so choose the best you can find. Each component plays a crucial role in building flavor and texture.
1. 2 large chicken breasts, sliced in half horizontally into 4 thin cutlets: The foundation of the dish, pounded thin for quick, even cooking.
2. ½ cup all-purpose flour: Creates the first layer that helps the egg adhere to the meat.
3. 2 eggs, beaten: Acts as the binding agent that holds the breadcrumb coating in place.
4. 1 cup panko breadcrumbs: Japanese-style breadcrumbs that create an airier, crunchier crust than traditional breadcrumbs.
5. ¾ cup freshly grated parmesan: Adds savory depth and helps the coating brown beautifully in the oven.
6. 1 tsp garlic powder: Provides consistent allium flavor throughout the crust without burning.
7. 1 tsp Italian seasoning: A blend of dried herbs that evokes Mediterranean sunshine and complements the cheese.
8. ½ tsp salt and ¼ tsp black pepper: Essential seasonings that enhance the natural flavor of the chicken.
9. 3 tbsp olive oil (or cooking spray): Promotes browning and crisping without deep-frying.
10. Lemon wedges and chopped parsley, to serve: Bright, fresh finishes that cut through the richness.
Smart Substitutions and Spotlight Ingredients
Flexibility makes this recipe a keeper, but certain ingredients deserve special attention for best results. Discover why panko creates superior crunch at cooking reference.
All-purpose flour: Substitute with gluten-free flour blend or cornstarch for dietary needs.
Panko breadcrumbs: Regular breadcrumbs work in a pinch, though the texture will be denser. Crushed cornflakes offer similar crunch.
Parmesan: Pecorino Romano provides a sharper, saltier alternative with excellent melting properties.
Italian seasoning: Create your own blend with dried basil, oregano, and thyme.
Panko: These flaky Japanese breadcrumbs create superior crispiness compared to fine breadcrumbs because they absorb less oil and maintain structure. Their jagged edges create more surface area for browning.
Parmesan: Freshly grated cheese melts and incorporates better than pre-grated varieties, which often contain anti-caking agents. The aged, nutty flavor permeates every bite of the crust.
Step-by-Step Guide to Crispy Parmesan Chicken Cutlets
Follow these precise steps to achieve bakery-quality results in your own kitchen. The method builds layers of texture through a systematic approach.
Preheat the oven to 425°F (220°C). Line a tray with parchment and place a rack on top. This high temperature ensures the coating browns quickly while the chicken stays juicy. The rack elevation prevents the bottom from steaming against the pan.
Pound the cutlets to an even ½ inch (1.5 cm) thickness and season with salt and pepper. Uniform thickness guarantees even cooking throughout each piece. Gentle pounding also tenderizes the meat for a more pleasant texture.
Set up 3 shallow bowls: flour, beaten eggs, and panko mixed with parmesan, garlic powder, and Italian seasoning. This classic dredging station creates the triple-layer coating that adheres beautifully. Arrange the bowls left to right in the order you’ll use them for efficiency.
Dredge each cutlet in flour, dip in egg, then press firmly into the panko mix. The flour gives the egg something to grip, while the egg binds the breadcrumbs to the meat. Pressing firmly ensures the coating stays put during baking.
Place on the rack and drizzle or spray with olive oil. The light fat coating helps the panko toast to golden perfection. A spray bottle works well for even distribution without excess oil.
Bake 18 to 20 minutes, flipping halfway, until golden and 165°F (74°C) inside. Flipping ensures both sides develop equal color and crunch. Use an instant-read thermometer inserted into the thickest part to verify doneness.
Finish with parsley and a squeeze of lemon. The bright acidity cuts through the richness of the cheese and chicken. Fresh herbs add color and a hint of freshness to the finished dish.
Common Pitfalls and How to Avoid Them
Even simple recipes have potential stumbling blocks, but forewarned is forearmed. Watch for these common issues to ensure success.
Soggy bottom: Always use a rack; baking directly on parchment traps steam and moisture. The elevated position allows hot air to circulate underneath.
Breading falling off: Ensure you shake off excess flour before egg dipping, and press the panko firmly into the meat. Patience during coating pays dividends in adherence.
Uneven cooking: Take time to pound the cutlets to consistent thickness. Thick sections remain raw while thin edges overcook if left uneven.
Burnt cheese: If the parmesan browns too quickly, tent loosely with foil after the first ten minutes. The cutlets will continue cooking while protecting the crust.
Nutrition Facts, Timing and Variations
Understanding the nutritional profile and timing helps you plan your meal effectively. Small variations keep the recipe fresh for repeat performances.
Servings: 4 / Calories per serving: Approximately 320 / Note: These are approximate values.
Prep Time: 15 minutes / Cook Time: 20 minutes / Total Time: 35 minutes
Spicy Version: Add cayenne pepper to the panko mixture and serve with hot honey.
Herb-Crusted: Mix fresh chopped rosemary and thyme into the breadcrumbs for an aromatic twist.
Gluten-Free: Replace flour with rice flour and ensure your panko is certified gluten-free.
Lemon-Pepper: Increase black pepper to one teaspoon and add extra lemon zest to the coating.
FAQ’s and Conclusion
Can I make these ahead of time?
Yes, bread the cutlets and refrigerate them uncovered on the rack for up to two hours before baking. This actually helps the coating adhere better.
Why use panko instead of regular breadcrumbs?
Panko’s larger, flakier structure creates more air pockets, resulting in a lighter, crunchier texture that stays crisp longer.
Can I freeze these cutlets?
Absolutely. Freeze breaded but unbaked cutlets on a sheet pan, then transfer to freezer bags. Bake from frozen, adding five to seven minutes to the cooking time.
Do I need to flip them during baking?
Yes, flipping halfway ensures both sides develop that desirable golden crust and prevents the bottom from becoming soggy.
Can I use chicken thighs instead?
While the recipe specifies breast meat, thighs would work but require longer cooking and won’t achieve the same thin, even cutlet texture.
How do I know when they’re done?
The internal temperature should reach 165°F, and the juices should run clear when pierced with a knife. The coating will be deep golden brown.
Can I pan-fry these instead?
Certainly, though you’ll need more oil. Cook three to four minutes per side over medium heat until golden and cooked through.
What sides pair best?
Simple pasta with olive oil, crisp green salads, or roasted vegetables complement the rich cutlets without competing for attention.
Why did my coating get soggy?
Usually caused by overcrowding the pan or skipping the wire rack. Ensure adequate space between cutlets for air circulation.
Is freshly grated parmesan necessary?
Pre-grated works in a pinch, but freshly grated melts better and lacks the cellulose powder that can inhibit browning.
These Crispy Parmesan Chicken Cutlets represent the perfect intersection of comfort and convenience. The golden, crunchy exterior gives way to tender meat, creating a satisfying bite that works for both Tuesday night dinners and weekend gatherings. Once you master this technique, you’ll find yourself returning to it again and again. It’s worth every bite.
PrintCrispy Parmesan Chicken Cutlets
Crispy Parmesan Chicken Cutlets deliver that satisfying crunch without deep frying. The combination of panko and parmesan creates a golden crust that shatters beautifully with each bite.
- Prep Time: 15 minutes
- Cook Time: 20 minutes
- Total Time: 35 minutes
- Yield: 4 servings
- Category: Main Course
- Method: Baking
- Cuisine: Italian-American
- Diet: Low Lactose
Ingredients
- 2 large chicken breasts, sliced in half horizontally into 4 thin cutlets
- ½ cup all-purpose flour
- 2 eggs, beaten
- 1 cup panko breadcrumbs
- ¾ cup freshly grated parmesan
- 1 tsp garlic powder
- 1 tsp Italian seasoning
- ½ tsp salt and ¼ tsp black pepper
- 3 tbsp olive oil (or cooking spray)
- Lemon wedges and chopped parsley, to serve
Instructions
- Preheat the oven to 425°F (220°C). Line a tray with parchment and place a rack on top.
- Pound the cutlets to an even ½ inch (1.5 cm) thickness and season with salt and pepper.
- Set up 3 shallow bowls: flour, beaten eggs, and panko mixed with parmesan, garlic powder, and Italian seasoning.
- Dredge each cutlet in flour, dip in egg, then press firmly into the panko mix.
- Place on the rack and drizzle or spray with olive oil.
- Bake 18 to 20 minutes, flipping halfway, until golden and 165°F (74°C) inside.
- Finish with parsley and a squeeze of lemon.
Notes
- Don’t skip the rack: elevating the cutlets allows hot air to circulate underneath for even crisping.
- Press, don’t just coat: press the panko firmly so crumbs adhere deeply.
- Check temperature early: use an instant-read thermometer to verify 165°F without overcooking.
- Make-ahead friendly: bread cutlets and refrigerate uncovered on the rack for up to 2 hours before baking.
- Freeze breaded but unbaked cutlets on a sheet pan, then transfer to freezer bags; bake from frozen adding 5-7 minutes.
Nutrition
- Serving Size: 1 cutlet
- Calories: 320