Pineapple Dream Dessert
Pineapple Dream Dessert
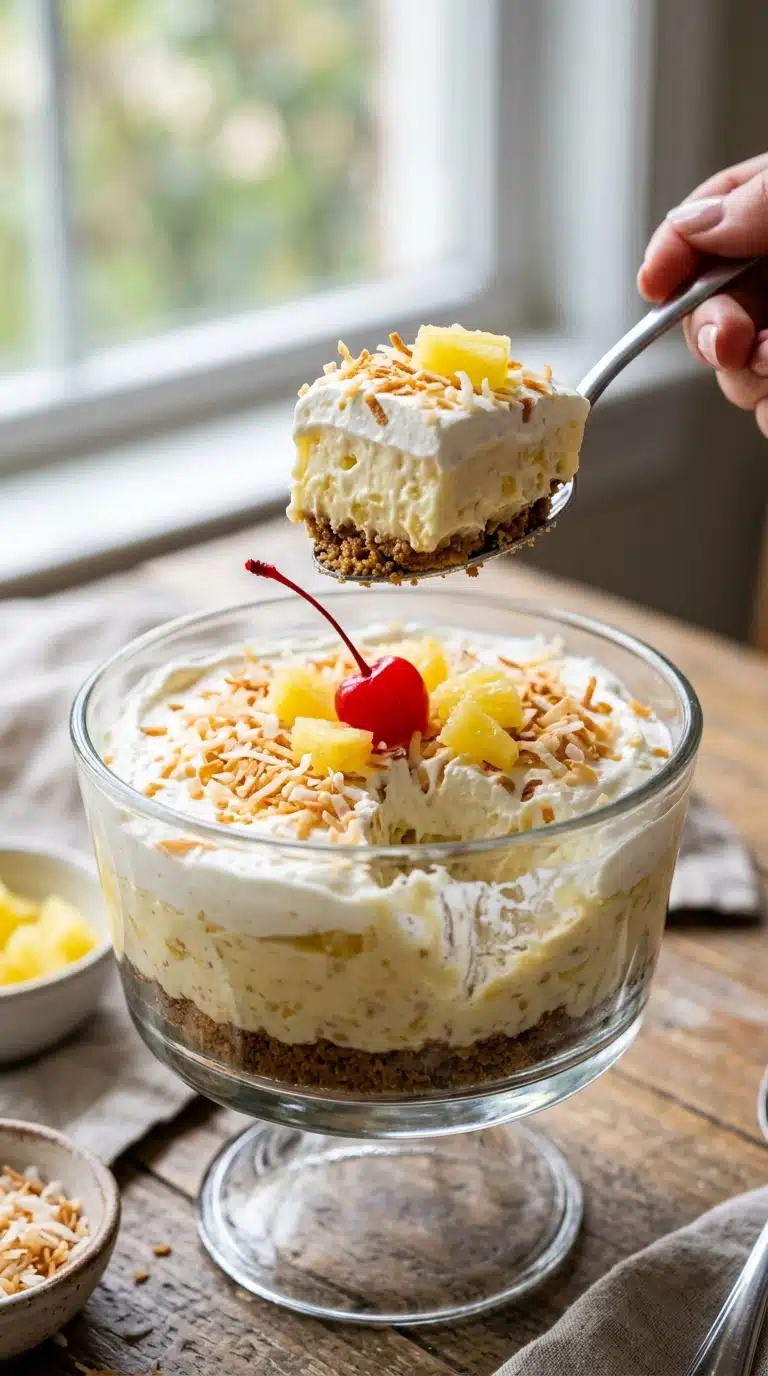
Pineapple Dream Dessert is the kind of no-bake treat that instantly transports you to sunnier days with its tropical sweetness and cloud-like texture. This creamy confection layers a buttery graham cracker crust beneath a fluffy pineapple-studded filling, creating a harmony of crunch and silk in every bite. Trust me, you’re going to love how effortlessly this comes together.
The Creamy Appeal and Retro Roots of Pineapple Dream Dessert
This dessert carries the unmistakable charm of mid-century American potluck culture. It emerged during an era when home cooks embraced convenience foods like whipped topping and canned fruit, transforming them into elegant desserts that could feed a crowd. The combination of tangy pineapple and rich cream cheese creates a flavor profile that feels both nostalgic and timeless.
You’ll find variations of this recipe tucked into church cookbooks and handwritten on index cards across the South and Midwest. The graham cracker crust provides a sweet, crunchy foundation that contrasts beautifully with the airy filling. Unlike heavy baked cheesecakes, this Pineapple Dream Dessert offers a lighter, more refreshing finish that doesn’t weigh you down after dinner.
The magic lies in its texture contrast. The firm, sweet crust provides the perfect foundation for the airy, mousse-like filling that melts on your tongue. It’s the kind of recipe that gets passed down through generations because it simply works.
Why This Pineapple Dream Dessert Works Every Time
This dessert checks every box for the perfect make-ahead treat. It requires no special skills or equipment, yet delivers impressive results that taste like they came from a boutique bakery.
Versatile: This dessert adapts beautifully to any season, whether you’re serving it at summer barbecues or holiday cookie exchanges.
Budget-Friendly: Using pantry staples like canned pineapple and cream cheese keeps costs low without sacrificing flavor.
Quick and Easy: No oven required means you won’t heat up the kitchen during warm weather.
Customizable: The basic formula welcomes creative toppings and flavor twists.
Crowd-Pleasing: The sweet-tangy balance appeals to both kids and adults at any gathering.
Make-Ahead Friendly: Prepare it the day before your event for optimal texture and convenience.
Great for Leftovers: The crust stays crisp and the filling remains creamy for days when properly stored.
Expert Tips and Essential Tools
Success with this no-bake dessert requires attention to moisture control and gentle folding techniques. Drain that pineapple thoroughly, or you’ll end up with a soggy bottom that no one wants to eat. Use a rubber spatula for folding to maintain the airy structure of your whipped topping.
8×8-inch baking dish: This square pan creates the perfect thickness for clean slicing and serving.
Electric mixer: A handheld or stand mixer ensures your cream cheese becomes perfectly smooth without lumps.
Rubber spatula: Essential for gently folding ingredients without deflating the whipped topping.
Fine-mesh strainer: Helps squeeze every last drop of liquid from your crushed pineapple.
Measuring cups and spoons: Accuracy matters when balancing the sweet crust against the tangy filling.
Gathering Your Ingredients
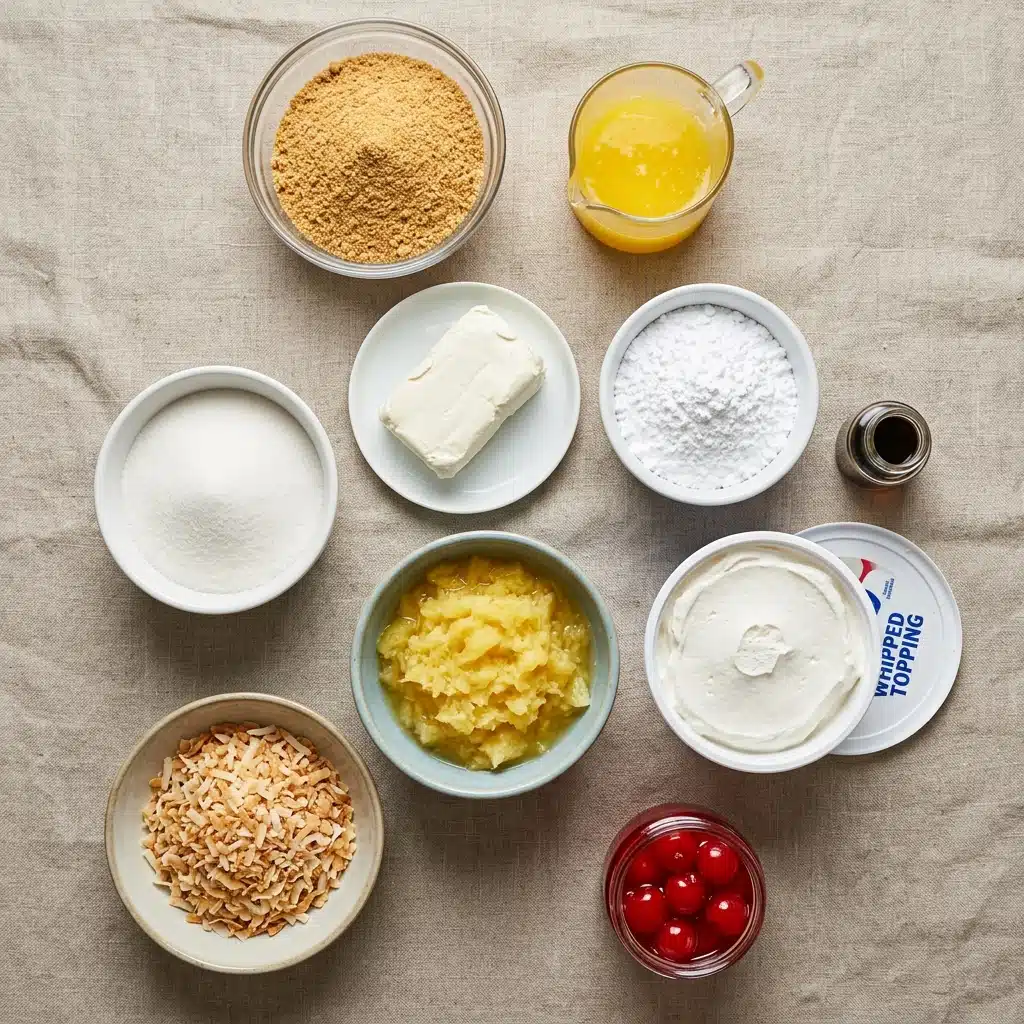
Quality matters when working with simple components. Choose full-fat cream cheese for the richest texture, and make sure your whipped topping is fully thawed for easy folding. Each ingredient plays a crucial role in creating that signature dreamy consistency.
Graham cracker crumbs: 1½ cups form the sweet, crunchy foundation of your crust.
Melted butter: 6 tablespoons bind the crumbs together and create a firm base when chilled.
Sugar: 2 tablespoons add subtle sweetness to balance the buttery crackers.
Cream cheese: 8 ounces (225 g), softened, provides the tangy richness that defines the filling.
Powdered sugar: ½ cup sweetens the cream cheese without adding grittiness.
Vanilla extract: 1 teaspoon enhances the tropical notes with warm depth.
Crushed pineapple: 1 can (20 oz), very well drained, delivers bright acidity and fruity texture.
Whipped topping: 1 tub (8 oz), thawed, creates the light, mousse-like body of the dessert.
Extra whipped topping: For covering the finished dessert with decorative swirls.
Toasted coconut: Adds nutty crunch and visual appeal as a garnish.
Maraschino cherries: Provide pops of color and classic dessert nostalgia on top.
Smart Substitutions and Star Ingredients
Even with a short ingredient list, you have flexibility to adapt this recipe to your pantry or dietary needs. Here are tested alternatives that maintain the dessert’s essential character.
Graham cracker crumbs: Vanilla wafers or digestive biscuits make excellent alternatives for the crust base.
Cream cheese: Neufchâtel cheese offers a lighter option with similar tang and texture.
Whipped topping: Homemade whipped cream works beautifully if stabilized with a touch of gelatin.
Crushed pineapple: Well-drained canned mandarin oranges or peaches can substitute for a different fruit profile.
Cream cheese: This tangy foundation provides structure and richness that balances the sweet pineapple perfectly. Ensure your cream cheese is fully softened to avoid lumps.
Crushed pineapple: The star of the show, delivering tropical brightness and moisture control challenges that make this dessert distinctive.
Assembling Your Pineapple Dream Dessert Step by Step
Follow these precise steps to create your tropical masterpiece. Work gently when folding to preserve the airy texture that makes this dessert special.
Mix the graham crumbs, melted butter and sugar. Press firmly into the bottom of an 8×8-inch dish and chill for 10 minutes. Use the bottom of a measuring cup to press the mixture evenly, creating a compact layer that won’t crumble when sliced.
Beat the cream cheese, powdered sugar and vanilla until smooth. Ensure your cream cheese is fully softened to room temperature to avoid lumps in your filling.
Fold in the drained pineapple, then gently fold in the whipped topping until fluffy. Use a light hand and lift from the bottom of the bowl to maintain the volume of the whipped topping.
Spread the filling over the crust and smooth the top. An offset spatula works perfectly for creating an even layer that reaches all corners of the dish.
Cover the dessert with more whipped topping, then add coconut and cherries. Arrange the garnishes while the dessert is still fresh so they adhere properly to the creamy surface.
Chill for at least 4 hours, then slice and serve cold. This resting period allows the flavors to meld and the filling to set firm enough for clean cuts.
What to Avoid for Perfect Results
Even simple desserts have pitfalls that can derail your success. Watch out for these common mistakes that could turn your dream into a disappointment.
Soggy crust: If you don’t drain the pineapple thoroughly, excess moisture will seep into the graham cracker base. Press the crumbs firmly and chill adequately before adding the filling.
Lumpy filling: Cold cream cheese won’t blend smoothly with the powdered sugar. Always soften it completely before beating.
Deflated texture: Over-folding or stirring vigorously will knock the air out of your whipped topping. Fold gently just until combined.
Warm slices: Attempting to cut the dessert before the full 4-hour chill results in messy, runny squares. Patience yields perfect portions.
Nutrition Facts and Preparation Time
Servings: 9 generous squares / Calories per serving: Approximately 285 / Note: These are approximate values based on standard ingredient brands.
Prep Time: 20 minutes / Cook Time: None / Total Time: 4 hours 20 minutes (including chilling)
Variations and FAQ’s
Try these creative twists on the classic formula. For a citrus burst, add lemon zest to the cream cheese mixture. Chocolate lovers can mix mini chocolate chips into the filling or drizzle the top with melted chocolate. For a nutty variation, press chopped pecans into the crust mixture before chilling.
1. Can I use fresh pineapple instead of canned?
Fresh pineapple contains enzymes that can break down the cream cheese and whipped topping, resulting in a watery texture. Canned pineapple has been heated during processing, which neutralizes these enzymes, making it the safer choice for this dessert.
2. How long does Pineapple Dream Dessert last in the refrigerator?
Stored covered in the refrigerator, this dessert maintains its texture and flavor for up to 3 days. Keep it away from strong-smelling foods to prevent flavor absorption.
3. Can I freeze this dessert?
Freezing is not recommended as the whipped topping can separate and become grainy upon thawing, and the crust may become soggy from condensation.
4. Why is my filling runny?
Excess moisture from insufficiently drained pineapple is the usual culprit. Next time, drain the pineapple in a fine-mesh sieve for at least 10 minutes, pressing gently to remove liquid.
5. Can I make this in a different size pan?
A 9×9-inch pan will yield thinner bars, while a 9×13-inch pan will create very thin layers. Stick to the 8×8-inch size for the ideal crust-to-filling ratio.
6. Is there a way to make this less sweet?
Reduce the powdered sugar to ⅓ cup and use unsweetened coconut for the topping. The natural sweetness of the pineapple will still carry the dessert.
7. Can I prepare the crust ahead of time?
Yes, you can prepare and chill the crust up to 24 hours in advance. Cover it tightly with plastic wrap to prevent it from absorbing refrigerator odors.
8. What if I don’t have an electric mixer?
You can beat the cream cheese mixture by hand using a wooden spoon, but ensure the cream cheese is very soft and expect to work vigorously for several minutes to achieve smoothness.
9. Can I use light cream cheese?
Light cream cheese works but may result in a slightly less rich filling. Do not use fat-free cream cheese as it will not set properly and lacks the necessary richness.
10. How do I toast coconut for the topping?
Spread sweetened flaked coconut on a baking sheet and bake at 325°F for 5-10 minutes, stirring occasionally, until golden brown. Cool completely before garnishing your Pineapple Dream Dessert.
Conclusion
Pineapple Dream Dessert represents everything wonderful about heritage baking, simple ingredients, and shared moments around the table. Whether you’re introducing this classic to a new generation or rediscovering a childhood favorite, the combination of buttery crust and cloud-like pineapple filling never fails to delight. Make it for your next gathering and watch faces light up with that first creamy, tropical bite. It’s worth every minute of chilling time.
PrintPineapple Dream Dessert
A no-bake tropical dessert layering a buttery graham cracker crust with a fluffy pineapple-studded cream cheese filling, finished with whipped topping, toasted coconut, and maraschino cherries.
- Prep Time: 20 minutes
- Cook Time: None
- Total Time: 4 hours 20 minutes
- Yield: 9 generous squares
- Category: Dessert
- Method: No-bake
- Cuisine: American
- Diet: Vegetarian
Ingredients
- Crust: 1½ cups graham cracker crumbs, 6 tbsp melted butter, 2 tbsp sugar
- Filling: 8 oz (225 g) cream cheese, softened; ½ cup powdered sugar; 1 tsp vanilla extract; 1 can (20 oz) crushed pineapple, very well drained; 1 tub (8 oz) whipped topping, thawed
- Topping: extra whipped topping, toasted coconut, maraschino cherries
Instructions
- Mix the graham crumbs, melted butter and sugar. Press firmly into the bottom of an 8×8-inch dish and chill for 10 minutes.
- Beat the cream cheese, powdered sugar and vanilla until smooth.
- Fold in the drained pineapple, then gently fold in the whipped topping until fluffy.
- Spread the filling over the crust and smooth the top.
- Cover the dessert with more whipped topping, then add coconut and cherries.
- Chill for at least 4 hours, then slice and serve cold.
Notes
- Drain the pineapple thoroughly to prevent a soggy crust.
- Use a rubber spatula and fold gently to maintain the airy texture of the whipped topping.
- Ensure cream cheese is fully softened to room temperature to avoid lumps.
- Press the crust firmly and chill adequately before adding the filling.
- Chill the finished dessert for the full 4 hours before slicing for clean cuts.
- Store covered in the refrigerator for up to 3 days; freezing is not recommended.
Nutrition
- Serving Size: 1 square
- Calories: 285