Crispy Cheese-Stuffed Chicken Pops
Crispy Cheese-Stuffed Chicken Pops
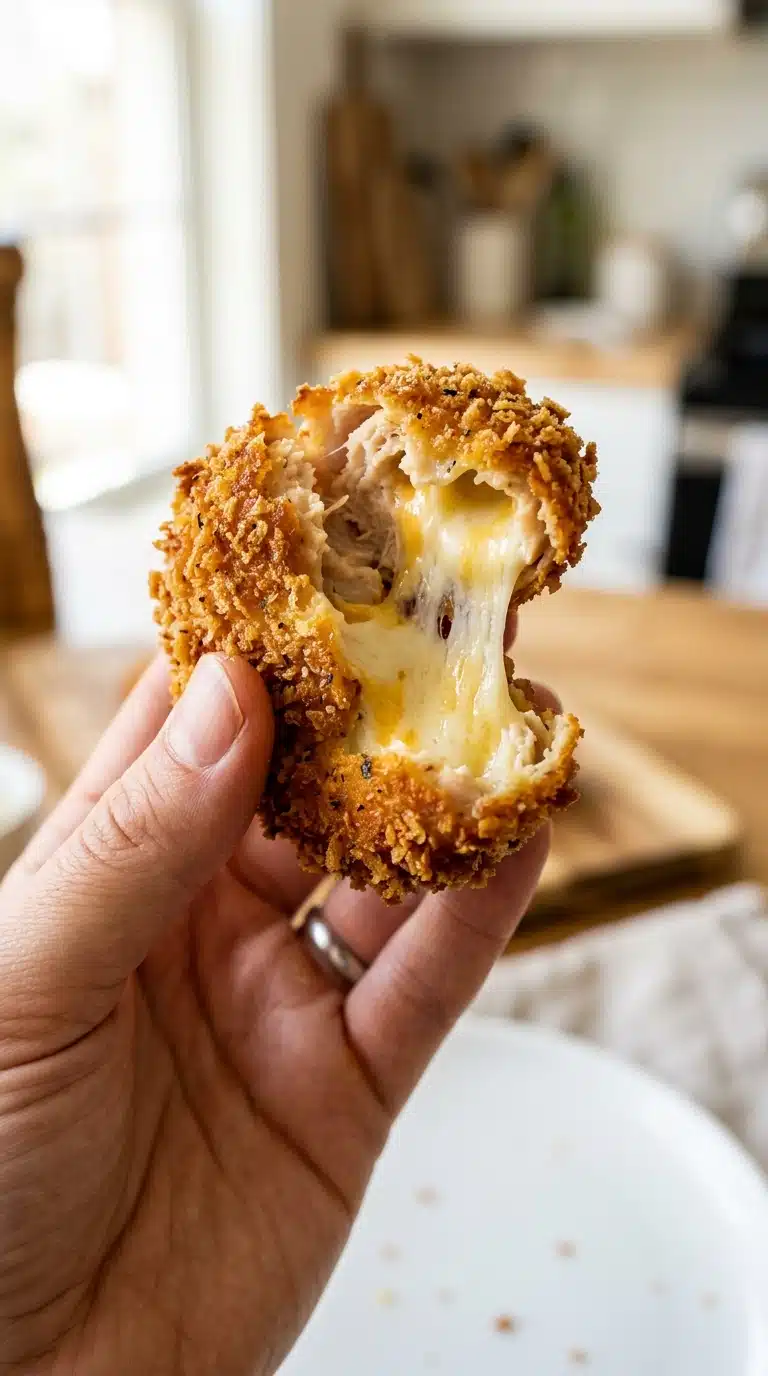
Crispy Cheese-Stuffed Chicken Pops are the ultimate handheld comfort food that brings together golden crunch and molten cheese in every single bite. Imagine sinking your teeth into a perfectly fried shell only to discover a river of gooey mozzarella waiting inside. These savory lollipops of joy transform humble chicken into something truly spectacular. Trust me, you’re going to love this.
The Irresistible Appeal and Story Behind Crispy Cheese-Stuffed Chicken Pops
These irresistible bites capture everything we love about comfort food fusion. The concept draws inspiration from Italian arancini and American corn dogs, creating a hybrid that feels both familiar and exciting. Street food vendors and home cooks alike have embraced the chicken pop trend for its playful presentation and intense flavor payoff.
Historically, wrapping proteins around cheese dates back centuries across many cultures. From cordon bleu to chicken kiev, that magical moment of cutting into meat to find melted dairy has always captivated diners. These pops modernize that tradition into portable, party-friendly form.
Why Crispy Cheese-Stuffed Chicken Pops Work Every Time
There’s a beautiful science to why these Crispy Cheese-Stuffed Chicken Pops succeed so reliably. The combination of minced chicken and strategic seasoning creates a tight seal that prevents cheese leakage while maximizing flavor.
Versatile: Serve them as appetizers, game-day snacks, or even a fun dinner alongside a crisp salad.
Budget-Friendly: Using just two chicken portions and basic pantry staples keeps costs low while feeding a crowd.
Quick and Easy: From chopping board to table in under an hour, this recipe respects your schedule.
Customizable: Adjust the spices or cheese cube size to match your mood or dietary needs.
Crowd-Pleasing: Kids and adults alike can’t resist that cheese pull moment.
Make-Ahead Friendly: Prep and freeze them raw, then fry straight from frozen when guests arrive.
Great for Leftovers: Reheat in the oven to restore that crunch for tomorrow’s lunch.
Pro Tips and Kitchen Essentials
Success with these cheese bombs requires attention to texture and temperature. The minced chicken must be fine enough to seal properly, and your oil needs to stay consistent for that perfect golden coat.
Invest in a good instant-read thermometer to check oil temperature without guesswork. Keep your hands slightly damp when shaping to prevent the chicken from sticking to your palms. Work with cold chicken straight from the fridge, as the cooler temperature helps the mixture hold together during assembly.
Sharp Chef’s Knife: Essential for achieving that fine mince texture that binds around the cheese. A dull blade will tear rather than cut the meat.
Deep Skillet or Dutch Oven: Provides the depth needed for even oil circulation and prevents splattering during frying.
Wooden Paddle Skewers: These flat skewers provide stability and a convenient handle for eating without utensils.
Tongs or Spider Strainer: Perfect for turning and retrieving the pops from hot oil safely.
The Complete Ingredient Guide for Crispy Cheese-Stuffed Chicken Pops
Every component in this recipe plays a crucial role in creating that signature crunch and gooey center. Quality matters here, especially with the cheese and breadcrumbs.
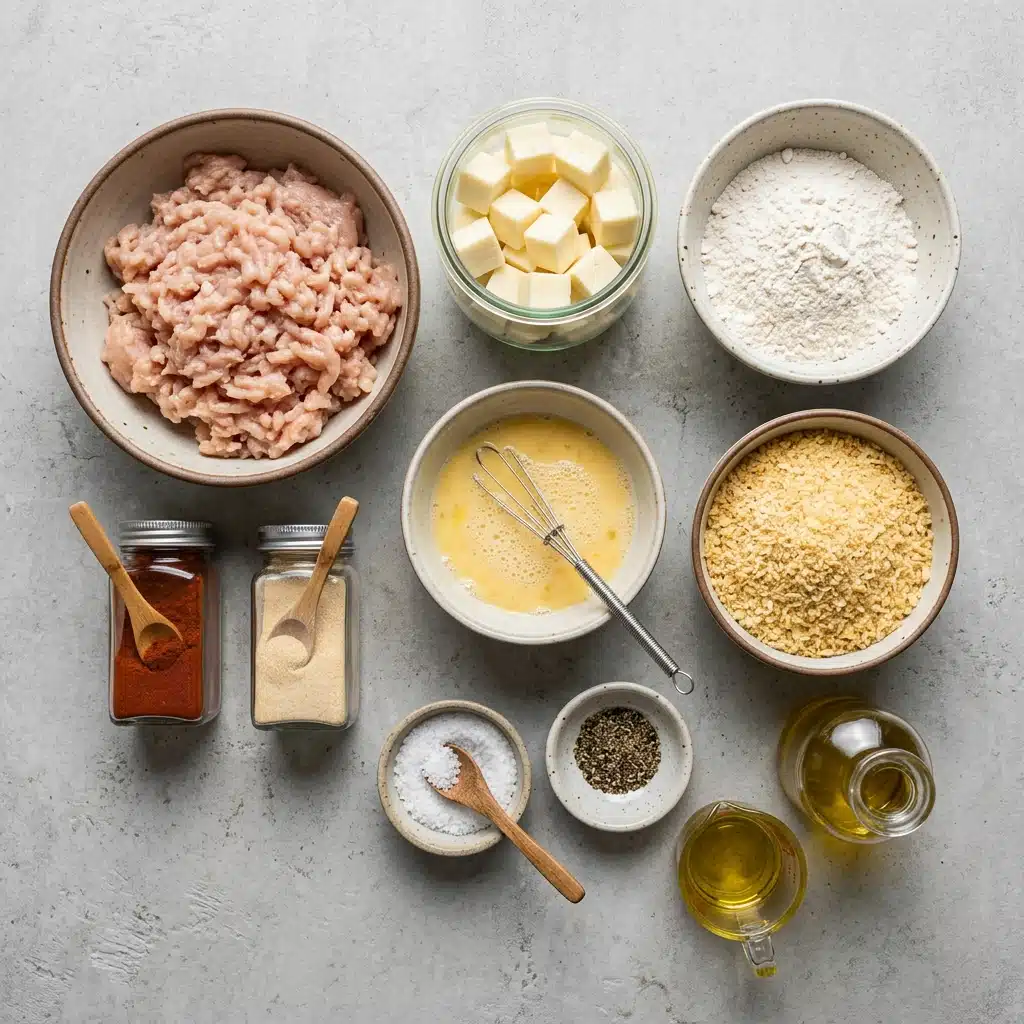
2 boneless, skinless chicken portions: The foundation of our pops, minced finely to create a moldable protein wrapper that cooks quickly and evenly.
1 block of low-moisture mozzarella or melting cheese (cut into thick cubes): The star of the show, providing that Instagram-worthy cheese pull when hot. Low-moisture prevents soggy centers.
1 tsp smoked paprika: Adds a subtle smoky depth and beautiful color to the chicken exterior.
1 tsp garlic powder: Infuses the meat with savory aromatics without the moisture of fresh garlic.
Salt and black pepper, to taste: Essential seasonings that wake up all the other flavors in the mixture.
All-purpose flour (for coating): Creates the first layer of adhesion, helping the egg stick to the chicken surface.
2 large eggs (whisked): Acts as the binding agent between flour and breadcrumbs, creating a sturdy armor.
Panko breadcrumbs (for maximum crunch): These Japanese-style breadcrumbs create an airier, crunchier coating than standard breadcrumbs.
Wooden paddle skewers & toothpicks: The skewers serve as handles, while toothpicks secure the shape during frying.
Cooking oil (for deep-frying): Neutral oil with a high smoke point ensures crispy results without burnt flavors.
Smart Substitutions and Star Ingredients
While the original recipe shines brightest, you can adjust based on what you have available.
Low-moisture mozzarella: If your block seems moist, pat the cubes dry with paper towels before stuffing to ensure a tight seal and prevent steam from softening the crust.
Panko breadcrumbs: If your crumbs seem fine rather than flaky, use a lighter hand when pressing them onto the chicken to maintain that airy texture.
Smoked paprika: Adjust the amount based on your preference for smoky intensity, keeping the teaspoon measurement as your baseline.
Wooden paddle skewers: If using shorter skewers, insert them carefully to avoid poking through the cheese center.
Mozzarella: This cheese reigns supreme for its neutral flavor and supreme stretchability. It melts without becoming greasy or rubbery.
Panko: The jagged, flaky structure of these breadcrumbs creates more surface area than traditional crumbs, resulting in that distinctive shattering crunch.
Cooking Your Crispy Cheese-Stuffed Chicken Pops
Now for the main event. Follow these steps precisely for golden, gooey perfection. Setting up a standard breading station makes the process seamless.
Prep the Meat: Finely mince the raw chicken breasts on a cutting board using a sharp knife until a minced meat texture forms. Take your time here, as uniform, fine pieces will adhere better around the cheese and cook more evenly than chunky bits.
Season: Add the paprika, garlic powder, salt, and pepper directly to the minced chicken. Mix and press firmly by hand until well combined and cohesive. This manual pressing activates the proteins in the chicken, helping the mixture become sticky enough to seal completely around the cheese cubes.
Stuff & Shape: Take a handful of the seasoned chicken mixture, flatten it into a small patty in your palm, and place a cheese cube in the center. Wrap the chicken tightly around the cheese to completely seal it inside an oval ball. Ensure no cheese peeks through, as exposed dairy will leak into the hot oil and cause splattering.
Insert Skewers: Slide a flat wooden paddle skewer into the base and secure the top with a toothpick to hold the shape during coating. The toothpick acts like a temporary stitch, keeping the chicken compact until the crust sets in the fryer.
Breading (Standard Breading Station): Dredge each chicken pop thoroughly in flour. Dip into the whisked eggs until completely coated. Roll in panko breadcrumbs, pressing gently so the crumbs adhere. This three-layer system creates a moisture barrier that keeps the chicken juicy while the exterior turns golden.
Fry: Heat oil in a deep skillet over medium heat. Fry the chicken pops until golden-brown and crispy, turning occasionally to ensure even cooking. Maintain the oil temperature steady, as fluctuations will result in greasy or undercooked pops.
Drain & Serve: Transfer to a paper towel-lined plate to drain excess oil, remove the top toothpick, and pull apart while piping hot for the ultimate cheese stretch. Serve immediately while the centers are still molten and the coating crackles with each bite.
Pitfalls to Avoid When Frying
Even simple recipes have traps for the unwary. Keep these common issues in mind.
- Cheese leakage: If your chicken mince isn’t fine enough or pressed firmly, the cheese will escape during frying. Ensure a complete seal with no gaps.
- Soggy coating: Frying in oil that’s not hot enough causes the breading to absorb grease rather than crisp. Test with a breadcrumb first; it should sizzle immediately.
- Uneven cooking: Crowding the pan drops the oil temperature drastically. Fry in batches with plenty of space between each pop.
- Raw centers: If the exterior browns too quickly while the inside stays pink, your oil is too hot. Reduce heat and finish in a warm oven if needed.
Nutrition Facts and Timing
Plan your kitchen time wisely to serve these at their peak.
Prep Time: 25 minutes
Cook Time: 15 minutes
Total Time: 40 minutes
Servings: 4 generous portions
Calories per serving: 380
Note: These are approximate values.
FAQ’s
How do I prevent the cheese from leaking out?
Ensure you mince the chicken finely and press the mixture firmly when sealing around the cheese cube. Any gaps will allow molten cheese to escape into the oil.
Can I bake these instead of frying?
While frying produces the crispiest results, you can bake them at 400°F for 20-25 minutes, though the texture will be less crunchy than the traditional method.
What oil is best for frying Crispy Cheese-Stuffed Chicken Pops?
Use a neutral oil with a high smoke point like vegetable, canola, or peanut oil. Avoid olive oil as it can impart strong flavors and smoke at lower temperatures.
How do I know when the oil is ready?
Drop a single panko breadcrumb into the oil. If it sizzles and turns golden within 30 seconds, the oil is perfect for frying your chicken pops.
Can I make these ahead of time?
Yes, prepare through the breading step and freeze on a baking sheet. Once solid, transfer to a freezer bag and fry directly from frozen, adding a few extra minutes to the cook time.
Why did my breading fall off?
The egg wash might not have coated completely, or you skipped the flour dredge. The flour-to-egg-to-panko sequence is essential for adhesion.
What dipping sauces work best?
Marinara, ranch, or honey mustard complement these perfectly. The acidity cuts through the richness of the fried cheese and chicken.
Can I use pre-ground chicken?
Pre-ground chicken often contains additives and has a different texture. Hand-mincing gives you better control over the consistency needed for sealing.
How do I store leftovers?
Refrigerate in an airtight container for up to three days. Reheat in a 375°F oven to restore crispness, avoiding the microwave which makes them soggy.
Can I use different cheese?
Yes, any good melting cheese works, but avoid aged hard cheeses that separate when heated. Ensure whatever you use is low-moisture and cut into thick cubes.
Conclusion
Crispy Cheese-Stuffed Chicken Pops deliver that rare combination of playful presentation and serious flavor that makes any meal feel like a celebration. The contrast between the shattering panko crust and the molten cheese center creates a textural experience that’s simply unforgettable. Whether you’re hosting a party or treating your family to something special, this recipe promises satisfaction in every bite. It’s worth every moment of preparation when you see those golden globes disappear from the serving plate.
PrintCrispy Cheese-Stuffed Chicken Pops
The ultimate handheld comfort food combining golden crunch and molten mozzarella in every bite.
- Prep Time: 25 minutes
- Cook Time: 15 minutes
- Total Time: 40 minutes
- Yield: 4 generous portions
- Category: Appetizer
- Method: Deep-Frying
- Cuisine: Fusion
Ingredients
- 2 boneless
- skinless chicken breasts 1 block of low-moisture mozzarella or melting cheese (cut into thick cubes) 1 tsp smoked paprika 1 tsp garlic powder Salt and black pepper
- to taste All-purpose flour (for coating) 2 large eggs (whisked) Panko breadcrumbs (for maximum crunch) Wooden paddle skewers & toothpicks Cooking oil (for deep-frying)
Instructions
- Prep the Meat: Finely mince the raw chicken breasts on a cutting board using a sharp knife until a minced meat texture forms. Season: Add the paprika
- garlic powder
- salt
- and pepper directly to the minced chicken. Mix and press firmly by hand until well combined and cohesive. Stuff & Shape: Take a handful of the seasoned chicken mixture
- flatten it into a small patty in your palm
- and place a cheese cube in the center. Wrap the chicken tightly around the cheese to completely seal it inside an oval ball. Insert Skewers: Slide a flat wooden paddle skewer into the base and secure the top with a toothpick to hold the shape during coating. Breading (Standard Breading Station):Dredge each chicken pop thoroughly in flour. Dip into the whisked eggs until completely coated. Roll in panko breadcrumbs
- pressing gently so the crumbs adhere. Fry: Heat oil in a deep skillet over medium heat. Fry the chicken pops until golden-brown and crispy
- turning occasionally to ensure even cooking. Drain & Serve: Transfer to a paper towel-lined plate to drain excess oil
- remove the top toothpick
- and pull apart while piping hot for the ultimate cheese stretch.
Notes
- Use an instant-read thermometer to maintain steady oil temperature.
- Keep hands slightly damp when shaping to prevent sticking.
- Work with cold chicken straight from the fridge for better binding.
- Pat mozzarella dry before stuffing if it seems moist.
- Fry in batches to avoid crowding, which drops oil temperature.
- If exteriors brown too quickly while centers are raw, reduce heat and finish in a warm oven.
- Reheat leftovers in a 375°F oven; avoid the microwave to prevent sogginess.
- Prep through breading and freeze raw, then fry straight from frozen when needed.
Nutrition
- Calories: 380