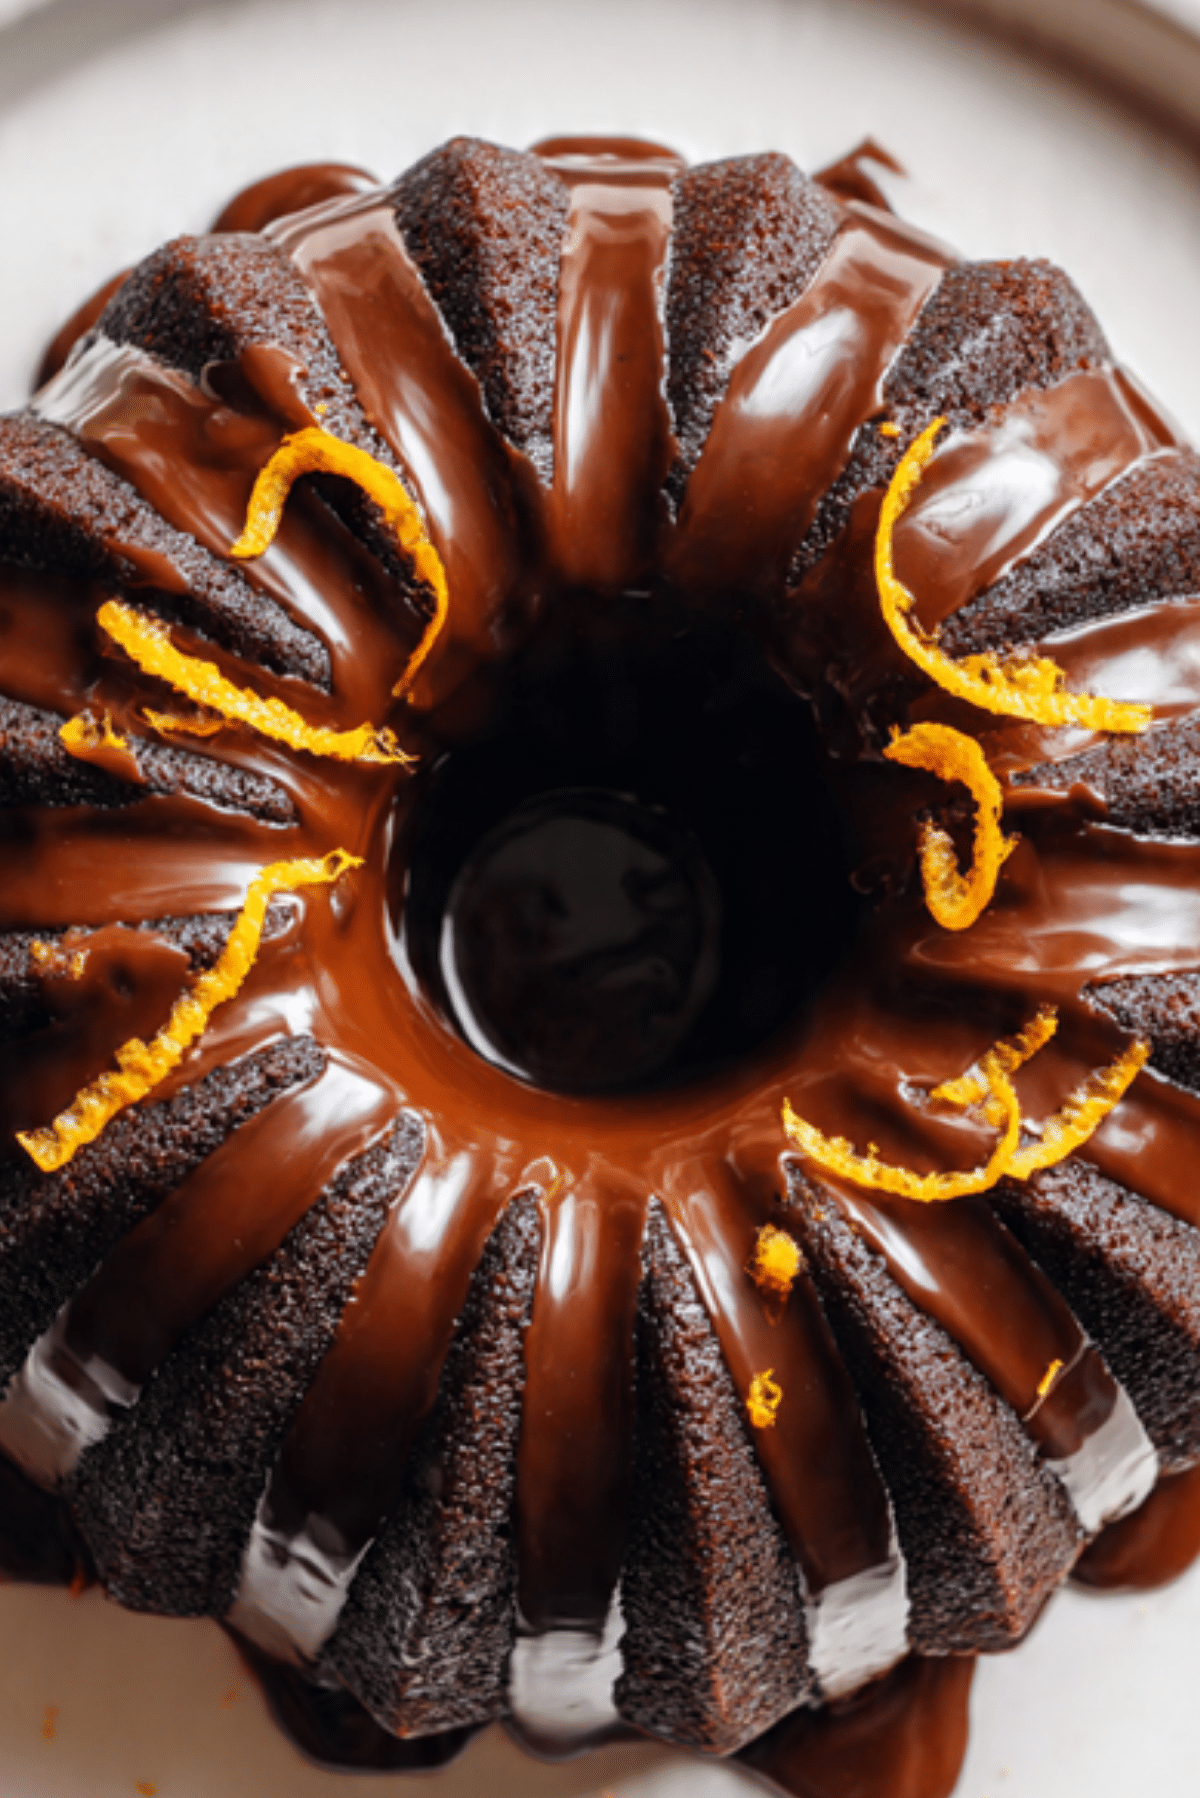
Chocolate Orange Bundt Cake
There is a timeless elegance in a perfectly baked bundt cake, especially when it carries the classic combination of deep cocoa and bright citrus. This Chocolate Orange Bundt Cake is a sophisticated dessert that manages to be both refreshing and incredibly indulgent at the same time. Trust me, you’re going to love this because the orange zest cuts through the richness of the dark chocolate in a way that is absolutely addictive. This one’s a total game-changer for your holiday table or a cozy Sunday afternoon and let me tell you, it’s worth every bite.
The Perfect Marriage of Cocoa and Citrus
The pairing of chocolate and orange is one of those culinary matches that just feels right, often evoking memories of festive treats and gourmet confections. In this recipe, we use fresh orange juice and plenty of zest to ensure that the citrus note is not just an afterthought but a primary star of the show. The result is a moist, dense crumb that stays fresh for days and provides a sensory experience that starts with a bright aroma and ends with a lingering chocolate finish.
The Architectural Beauty of the Bundt
Bundt cakes originated from the desire to recreate traditional European brioche-style cakes using a specialized fluted pan that ensures even baking for heavy batters. While the shape is iconic, the addition of orange is a modern twist that elevates the cake from a simple tea-time snack to a centerpiece-worthy dessert. It represents a bridge between old-world baking techniques and the vibrant, bold flavors favored in contemporary kitchens, making it a hit for bakers who love a bit of drama on the plate.
Why This Citrus Cake Stands Out
Baking this cake is a joy because the aroma that fills your home is better than any candle you could buy.
Versatile: You can serve this plain for breakfast or dress it up with a ganache for a formal dinner.
Budget-Friendly: It relies on basic baking staples like flour, sugar, and cocoa powder with a few fresh oranges.
Quick and Easy: Once you mix the batter and pour it into the pan, the oven does all the difficult work for you.
Customizable: Feel free to add chocolate chips or chopped nuts to the batter for extra texture.
Crowd-Pleasing: The striking shape of a bundt cake always impresses guests before they even take a bite.
Make-Ahead Friendly: This cake actually tastes better the second day as the orange oil seeps into the chocolate.
Great for Leftovers: It toasts beautifully and pairs wonderfully with a cup of coffee the next morning.
Expert Secrets for Bundt Success
Getting a cake out of a detailed bundt pan can be nerve-wracking, but these tips will make it effortless.
- Grease every nook and cranny of your pan with melted shortening or a specialized baking spray containing flour.
- Use fresh oranges rather than bottled juice to get the essential oils from the zest which provide the most flavor.
- Allow the cake to cool in the pan for exactly ten minutes before attempting to invert it onto a wire rack.
- Sift your cocoa powder before adding it to the batter to ensure there are no bitter lumps in your finished cake.
Essential Tools for a Flawless Bake
Having the right gear ensures that your cake looks as good as it tastes.
10-Cup Bundt Pan: A heavy-duty aluminum pan provides the best heat distribution and most defined ridges.
Microplane Zester: This is the best tool for getting just the orange zest without any of the bitter white pith.
Fine Mesh Sieve: Essential for sifting your dry ingredients to keep the crumb light and even.
Whisk and Spatula: For properly incorporating the wet and dry ingredients without overworking the gluten.
Wire Cooling Rack: Allows air to circulate around the cake so the bottom doesn’t become soggy as it cools.
The Harmony of Dark Chocolate and Fresh Orange
Each ingredient plays a specific role in creating the moist and flavorful profile of this dessert.
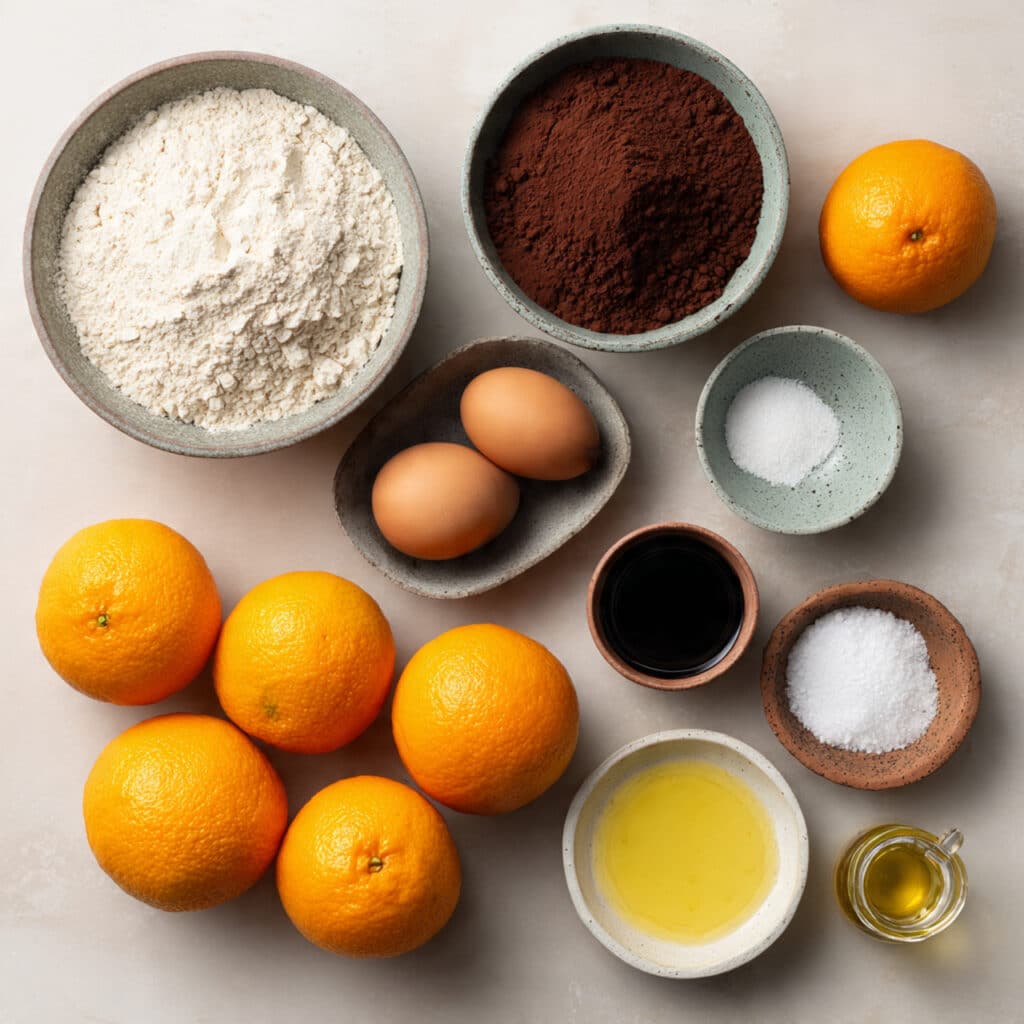
- All-Purpose Flour: 320 grams of flour to provide the sturdy structure needed for the tall bundt shape.
- Unsweetened Cocoa Powder: 60 grams of high-quality cocoa for a deep and chocolatey base.
- Granulated Sugar: 400 grams to balance the bitterness of the cocoa and the acidity of the orange.
- Baking Powder: 2 teaspoons to give the cake its necessary lift and airy texture.
- Fresh Orange Zest: 2 tablespoons of zest to provide that signature citrus punch.
- Large Eggs: 4 eggs at room temperature to help with emulsification and richness.
- Vegetable Oil: 240 milliliters of oil to ensure the cake stays incredibly moist for several days.
- Fresh Orange Juice: 180 milliliters to add liquid and natural sweetness to the batter.
- Vanilla Extract: 1 teaspoon to round out the flavors and add a hint of floral sweetness.
Flexible Ingredient Substitutions
If you are missing a few items, you can easily adapt the recipe with these alternatives.
Vegetable Oil: Melted coconut oil or light olive oil.
Fresh Orange Juice: A mixture of lemon juice and water if you want a sharper citrus profile.
All-Purpose Flour: A 1:1 gluten-free baking flour blend for those with dietary restrictions.
Spotlight on Key Ingredients
Orange Zest: This is where the majority of the orange flavor lives, providing an aromatic intensity that juice alone cannot achieve.
Cocoa Powder: Using a Dutch-processed cocoa will result in a darker color and a smoother chocolate taste that pairs beautifully with fruit.
Entering the Baking Journey
Follow these steps for a cake that is as reliable as it is delicious.
- Preheat Your Equipment: Set your oven to 175 degrees Celsius and meticulously grease and flour your bundt pan.
- Combine Ingredients: Whisk together the flour, cocoa, baking powder, and sugar in one large bowl until well blended.
- Prepare Your Cooking Vessel: Ensure the pan is evenly coated so the cake slides out perfectly after baking.
- Assemble the Dish: Mix the eggs, oil, orange juice, zest, and vanilla, then slowly stir in the dry ingredients.
- Cook to Perfection: Pour the batter into the prepared pan and bake for about 50 to 60 minutes or until a skewer comes out clean.
- Finishing Touches: Let the cake rest for ten minutes, then flip it onto a rack and allow it to cool completely.
- Serve and Enjoy: Slice the cake along the ridges of the bundt for perfectly portioned pieces.
A Balance of Richness and Zing
The first thing you will notice is the incredible moisture in each slice, followed closely by the dual impact of dark chocolate and bright orange. The texture is dense enough to be satisfying but has a soft crumb that makes it feel light on the palate. As the flavors develop, the sweetness of the sugar is perfectly countered by the slight tang of the citrus, creating a sophisticated finish.
Success Strategies for the Home Kitchen
- Always use room temperature eggs to ensure they incorporate smoothly into the oil and juice mixture.
- Tap the filled bundt pan firmly on the counter a few times before baking to release any trapped air bubbles.
- If you want a more intense orange flavor, rub the orange zest into the sugar with your fingers before mixing.
Common Mistakes to Avoid
- Over-greasing the Pan: Too much butter or oil can cause the exterior of the cake to become greasy rather than crisp.
- Opening the Oven Door Too Early: This can cause the cake to lose its height and result in a sunken middle.
- Using Old Baking Powder: If your leavening agent is expired, the heavy batter will not rise and the cake will be leaden.
Nutritional Facts
Servings: 12
Calories per serving: 410
Note: These are approximate values.
Timing Your Masterpiece
Prep Time: 20 minutes
Cook Time: 55 minutes
Total Time: 75 minutes
Make-Ahead and Storage Tips
This cake is an excellent candidate for making a day in advance because the orange flavors intensify over time. Wrap the cooled cake tightly in plastic wrap and store it at room temperature for up to three days. For longer storage, you can freeze individual slices wrapped in foil for up to a month, making it a great option for quick treats later on.
Creative Serving Suggestions
A simple dusting of powdered sugar is often all this cake needs to look beautiful. However, if you want something more indulgent, a dollop of lightly sweetened whipped cream or a scoop of vanilla bean ice cream on the side is spectacular.
Leftover Transformation Ideas
Leftover slices can be cubed and used as a base for a chocolate orange trifle with layers of custard and fruit. You can also lightly fry a slice in a pan with a little butter for a warm, crispy dessert topped with honey.
Additional Baking Wisdom
When zesting your oranges, make sure to stop as soon as you reach the white part of the skin, as the pith is quite bitter. If your orange juice isn’t very sweet, you can add a tablespoon of honey to the liquid mixture for a bit of extra depth.
Making It a Showstopper
To really wow your guests, create a simple glaze by mixing powdered sugar with a little orange juice and drizzling it over the cooled cake. Top the wet glaze with thin strips of candied orange peel or dark chocolate shavings for a professional bakery look.
Variations to Try
- Chocolate Chip Blast: Fold in 100 grams of semi-sweet chocolate chips for extra pockets of melted chocolate.
- Spiced Orange: Add half a teaspoon of ground cinnamon and a pinch of cloves for a warm, autumnal feel.
- Nutty Crunch: Stir in 50 grams of toasted, chopped hazelnuts or walnuts for a different texture.
- Grand Finale: Brush the warm cake with an orange simple syrup for an even moister and more intense citrus experience.
FAQ’s
1. Why did my cake stick to the pan?
This is usually due to the pan not being greased thoroughly enough or the cake being left in the pan too long after baking.
2. Can I use a regular cake pan instead of a bundt?
Yes, but you will need to adjust the baking time as a standard 9-inch round pan will bake faster than a deep bundt pan.
3. What kind of chocolate is best?
A high-quality unsweetened cocoa powder is best for the cake batter, while a dark chocolate bar is great for a glaze.
4. Can I make this vegan?
You can substitute the eggs with flax eggs and ensure your chocolate is dairy-free, though the texture will be slightly different.
5. My cake is dry, what happened?
Over-baking is the most common cause of a dry cake, so start checking for doneness about five minutes before the timer goes off.
6. Do I have to use fresh oranges?
Fresh is highly recommended because the zest provides most of the flavor which bottled juice simply lacks.
7. How do I know when the cake is done?
Insert a long wooden skewer into the thickest part of the cake; it should come out clean or with just a few moist crumbs.
8. Can I add nuts to this recipe?
Yes, chopped pecans or walnuts are a fantastic addition to the chocolate orange flavor profile.
9. How do I store the cake?
Keep it in an airtight container at room temperature to maintain its moisture levels.
10. Can I use blood oranges?
Absolutely, blood oranges provide a beautiful color and a slightly more berry-like citrus flavor.
Conclusion
This Chocolate Orange Bundt Cake is the perfect way to bring a touch of elegance to your kitchen without any unnecessary stress. The combination of rich cocoa and vibrant citrus is a crowd-pleaser that never goes out of style. I really hope you enjoy making this stunning cake and sharing it with the people you love, so go ahead and give this recipe a try today.
PrintChocolate Orange Bundt Cake
A rich and moist chocolate bundt cake infused with fresh orange zest and juice, finished with a beautiful fluted shape.
Ingredients
- 320g All-purpose flour
- 60g Unsweetened cocoa powder
- 400g Granulated sugar
- 2 tsp Baking powder
- 2 tbsp Fresh orange zest
- 4 Large eggs
- 240ml Vegetable oil
- 180ml Fresh orange juice
- 1 tsp Vanilla extract
Instructions
- Preheat oven to 175°C and thoroughly grease and flour a 10-cup bundt pan.
- In a large bowl, whisk together the flour, cocoa powder, sugar, and baking powder.
- In another bowl, beat the eggs with the oil, orange juice, zest, and vanilla extract until well combined.
- Gradually add the dry ingredients to the wet ingredients, stirring until just combined and smooth.
- Pour the batter into the prepared bundt pan and tap it on the counter to remove air bubbles.
- Bake for 50 to 60 minutes, or until a skewer inserted into the center comes out clean.
- Cool in the pan for 10 minutes before inverting onto a wire rack to cool completely.
Notes
- Grease the pan very carefully to prevent sticking in the ridges.
- Use room temperature eggs for better emulsification.
- Sift the cocoa powder to avoid any lumps in the batter.