Western Hash Brown Omelet
There’s something special about slicing into a thick, golden Western Hash Brown Omelet and watching the melted cheese and tender vegetables peek out from a crispy potato shell. It’s the kind of breakfast that feels like a full-on meal, hearty and satisfying, without being overly fussy. Whether you’re planning a cozy weekend brunch or just need something filling to kick-start your day, this one’s got your back.
Why This Hearty Breakfast is Always a Good Idea
You know how some dishes are just meant to be shared? This is one of them. With its golden crust and savory interior, it brings big diner energy right into your kitchen. But here’s the best part—it’s way easier to make than it looks.
A Homestyle Twist on a Classic Diner Favorite
This dish takes its cue from the classic Western omelet—typically packed with peppers, onions, and cheese—and wraps it all in a crisp layer of hash browns. Think of it as your favorite skillet breakfast, but in one tidy, sliceable form. Inspired by diner breakfasts and brunch spots, it delivers the comfort of home cooking with a touch of flair.
What Makes This Recipe a Keeper
This one never disappoints, and here’s why:
Versatile: Add or swap veggies, cheeses, or even make it spicy.
Budget-Friendly: A few pantry staples go a long way here.
Quick and Easy: All cooked in one pan, ready in under an hour.
Customizable: Great way to use leftover veggies or mix in your favorites.
Crowd-Pleasing: Feeds a group, looks impressive, and tastes even better.
Make-Ahead Friendly: Can be assembled and baked later.
Great for Leftovers: Reheats like a dream—crispy and flavorful every time.
Pro Tips for Golden Crispy Edges and Fluffy Centers
Want that wow factor every time? Here’s what I’ve learned:
- Squeeze out excess water from shredded potatoes for max crispiness.
- Use a well-oiled nonstick skillet or cast-iron pan for easy flipping.
- Don’t skimp on seasoning the potato or egg mixture.
- Let the omelet rest a few minutes before slicing to hold its shape.
- Use pre-shredded potatoes to save time without sacrificing texture.
Tools That Make It Easy
Not much needed to make this shine—just a few kitchen basics:
Large Nonstick or Cast-Iron Skillet: For cooking the hash browns evenly and flipping with ease.
Mixing Bowls: For combining the egg filling and potato mix.
Box Grater or Food Processor: If shredding fresh potatoes.
Rubber Spatula: Helps with folding and flipping without breaking the crust.
Sharp Knife: For clean slices after it’s cooked.
Ingredients You Will Need For This Golden Breakfast Favorite
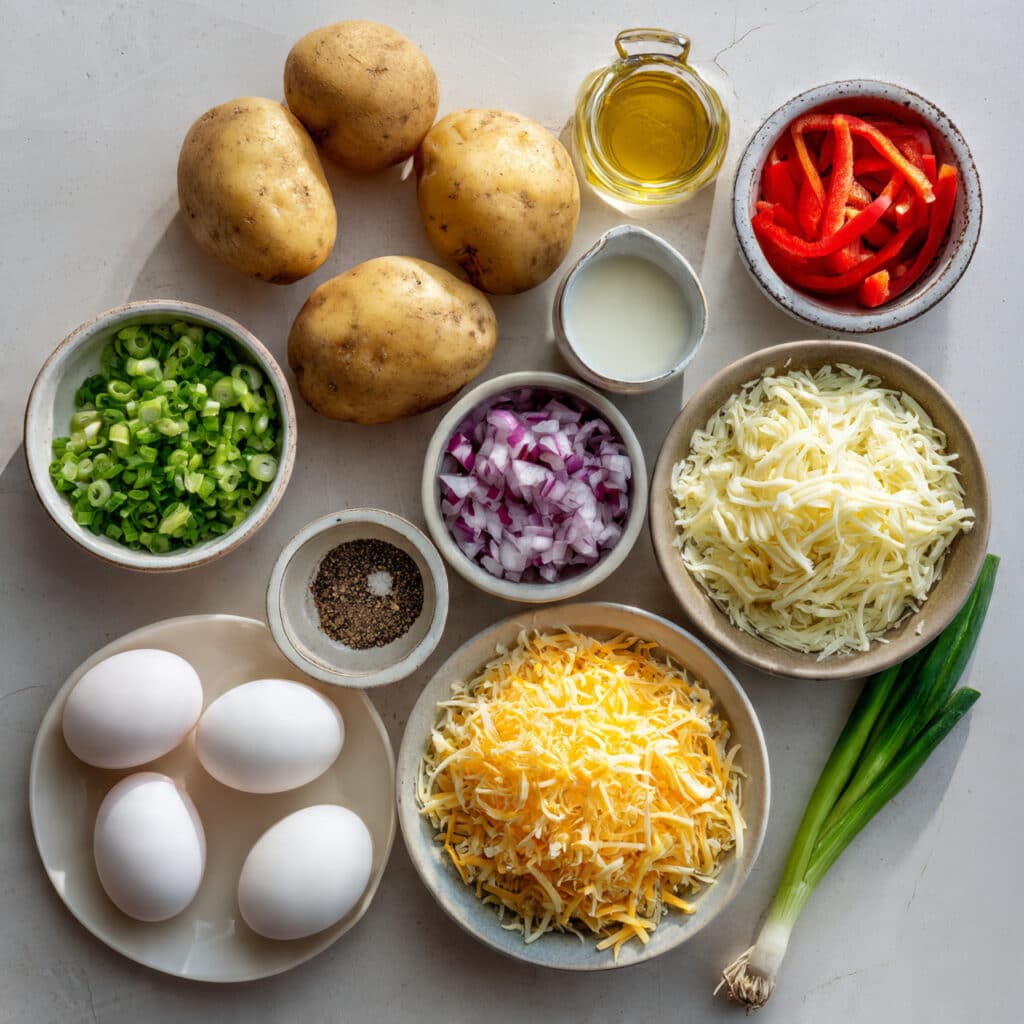
Every bite of this omelet is a perfect mix of savory and crisp. Here’s what you’ll need:
- Russet Potatoes: 3 medium, peeled and grated. They’re the crispy base and top layer.
- Eggs: 5 large. Whisked to hold the filling together and add richness.
- Bell Pepper: 1 medium (any color), diced. Adds sweetness and crunch.
- Red Onion: 1 small, finely chopped. Brings a touch of sharpness and color.
- Shredded Cheddar Cheese: 1 cup. Melts perfectly and gives that classic Western omelet taste.
- Milk: 1/4 cup. Helps make the egg filling fluffier.
- Salt: 1 teaspoon. Essential seasoning.
- Black Pepper: 1/2 teaspoon. Adds a little heat and depth.
- Garlic Powder (Optional): 1/2 teaspoon. Boosts flavor in the potato crust.
- Green Onions: 2 tablespoons, chopped. For garnish and fresh bite.
- Olive Oil or Butter: 2 tablespoons. For cooking and crisping the potatoes.
Ingredient Substitutions That Work Like a Charm
Here’s how you can switch things up:
Russet Potatoes: Use frozen shredded hash browns, thawed and dried.
Bell Pepper: Try poblano, roasted red pepper, or diced tomatoes.
Red Onion: Yellow onion or shallots.
Cheddar Cheese: Pepper jack, Monterey jack, or Swiss.
Milk: Almond milk, cream, or even sour cream.
The Two Star Ingredients That Make This Dish Shine
Russet Potatoes: Their starchiness makes them crisp up beautifully and hold the structure of the omelet.
Cheddar Cheese: Sharp, melty, and rich—this adds the flavor punch that makes it unforgettable.
Now Let’s Get Cooking – Step-by-Step
Here’s how you’ll bring this savory breakfast masterpiece to life:
- Preheat Your Equipment:
Heat your oven to 375°F (190°C). Place a large oven-safe skillet over medium heat with a drizzle of oil. - Combine Ingredients:
In one bowl, mix shredded potatoes, salt, pepper, garlic powder, and half the olive oil. In another, beat the eggs with milk, cheese, peppers, and onions. - Prepare Your Cooking Vessel:
Press half the potato mixture into the bottom of the skillet, flattening to form a crust. Cook until golden, about 5–7 minutes. - Assemble the Dish:
Pour the egg mixture over the cooked crust. Top with the remaining potato mixture, pressing lightly to form a top layer. - Cook to Perfection:
Transfer the skillet to the oven and bake for 20–25 minutes until the eggs are set and the top is crisp. Broil for 2 minutes for extra golden color. - Finishing Touches:
Let the omelet cool slightly. Slice into wedges and sprinkle with green onions. - Serve and Enjoy:
Serve warm with hot sauce, salsa, or a dollop of sour cream on the side.
Texture and Flavor in Every Slice
You’ll get crispy edges, tender veggie bits, melty cheese, and a soft, satisfying egg layer in every bite. The contrast of crunchy potatoes and smooth eggs is what makes this dish pop—and it smells just as good as it tastes.
Cooking Tips to Keep it Foolproof
- Use a heavy-bottomed skillet for even browning.
- Let the potato crust cook until golden before adding filling.
- Add hot sauce or smoked paprika to the egg mix for extra flavor.
- Slice with a sharp knife for clean presentation.
Common Mistakes to Avoid
- Wet Potatoes: Always squeeze out moisture or the crust won’t crisp.
- Undercooked Center: Bake until the eggs are fully set in the middle.
- Flipping Too Early: Let the bottom crust form before layering.
- Overcrowded Filling: Keep the filling balanced so it holds together.
Nutritional Snapshot
Servings: 6
Calories per serving: 290
Note: These values are approximate.
How Much Time You’ll Need
Prep Time: 15 minutes
Cook Time: 30 minutes
Total Time: 45 minutes
Make-Ahead & Storage Game Plan
You can prepare and refrigerate the omelet mixture or crust a few hours ahead. Once baked, store slices in the fridge for up to 4 days. Reheat in a skillet or oven to restore the crisp. It also freezes well—wrap individual portions tightly and reheat in the oven.
Best Ways to Serve It Up
Serve with a side of avocado, roasted tomatoes, or mixed greens. Add a drizzle of hot sauce or sour cream for extra kick. It also pairs beautifully with toast or fruit salad for a full brunch spread.
Fun Leftover Ideas
- Breakfast wrap: Slice and roll into a tortilla.
- Savory sandwich: Stack it between bread with greens and mustard.
- Power bowl: Serve with quinoa, greens, and tahini sauce.
Final Tips for Success
- Use pre-shredded potatoes to save time.
- Let it cool slightly before slicing—it helps it firm up.
- Don’t be afraid to get creative with fillings.
Make It Stand Out on the Plate
Cut into wedges and stack slightly on a platter. Garnish with a handful of chopped herbs and a drizzle of sauce. Serve on a bright plate to contrast the golden hash browns.
Fun Twists to Try Next Time
- Spicy Southwest: Add jalapeños and taco seasoning to the egg mix.
- Mushroom Lover’s: Sautéed mushrooms and Swiss cheese inside.
- Greek-Inspired: Spinach, feta, and cherry tomatoes.
- Vegan Option: Use plant-based eggs and dairy-free cheese.
- Loaded Veggie: Add broccoli, zucchini, and carrots.
FAQ’s
1. Can I use frozen hash browns?
Yes, just thaw them completely and squeeze dry.
2. What if I don’t have an oven-safe skillet?
Use a regular skillet and transfer to a baking dish for the oven.
3. Can I make it dairy-free?
Yes, use dairy-free cheese and plant milk.
4. How do I flip the omelet without it falling apart?
Don’t flip! Bake it instead—it sets beautifully in the oven.
5. Can I add meat to the filling?
Yes, cooked chicken or turkey sausage work great.
6. How do I know when it’s done?
Eggs should be set and top lightly golden.
7. Can I make individual servings?
Yes, use a muffin tin and reduce the baking time.
8. Can I freeze leftovers?
Yes, freeze slices individually and reheat in the oven.
9. What toppings go well with it?
Hot sauce, sour cream, chopped herbs, or salsa.
10. Can I make it ahead of time?
Absolutely. Assemble and refrigerate, then bake fresh when ready.
Conclusion
The Western Hash Brown Omelet brings together all the breakfast classics in one crispy, cheesy, flavor-packed dish. It’s everything you love about a hearty breakfast, tucked into a golden crust and bursting with personality. Trust me, once you try it, this one’s going straight to the top of your weekend brunch list.
PrintWestern Hash Brown Omelet

This Western Hash Brown Omelet layers crispy golden potatoes with a savory mix of eggs, bell peppers, onions, and melted cheese. A sliceable, satisfying breakfast that’s packed with flavor and great for sharing.
Ingredients
- 3 medium Russet potatoes, peeled and grated
- 5 large eggs
- 1 medium bell pepper, diced
- 1 small red onion, chopped
- 1 cup shredded Cheddar cheese
- 1/4 cup milk
- 1 teaspoon salt
- 1/2 teaspoon black pepper
- 1/2 teaspoon garlic powder (optional)
- 2 tablespoons olive oil or butter
- 2 tablespoons chopped green onions
Instructions
- Preheat oven to 375°F (190°C). Heat a large oven-safe skillet over medium heat with a drizzle of oil.
- Mix shredded potatoes with half the olive oil, garlic powder, salt, and pepper. Press half into the skillet and cook 5–7 minutes until golden.
- Whisk eggs with milk, cheese, bell pepper, and onion in a bowl.
- Pour egg mixture over the cooked potato crust. Top with remaining shredded potatoes and press gently.
- Transfer skillet to oven. Bake for 20–25 minutes until eggs are set. Broil 2 minutes to crisp the top if desired.
- Let rest for a few minutes. Slice into wedges and garnish with chopped green onions.
Notes
- Use frozen hash browns if you’re short on time—just thaw and squeeze dry.
- Customize with other vegetables or spices to suit your taste.
- Let it rest before slicing to help it hold shape better.