Triple Chocolate Brownies
There is a legendary status that comes with a truly great brownie, and when you combine three distinct types of chocolate into one pan, you are entering the hall of fame of home baking. These triple chocolate brownies are designed for those moments when a standard chocolate treat simply will not cut it. We are talking about a deep, dark base infused with molten pockets of milk and white chocolate that create a mosaic of flavor in every single square.
The Ultimate Chocolate Experience for True Connoisseurs
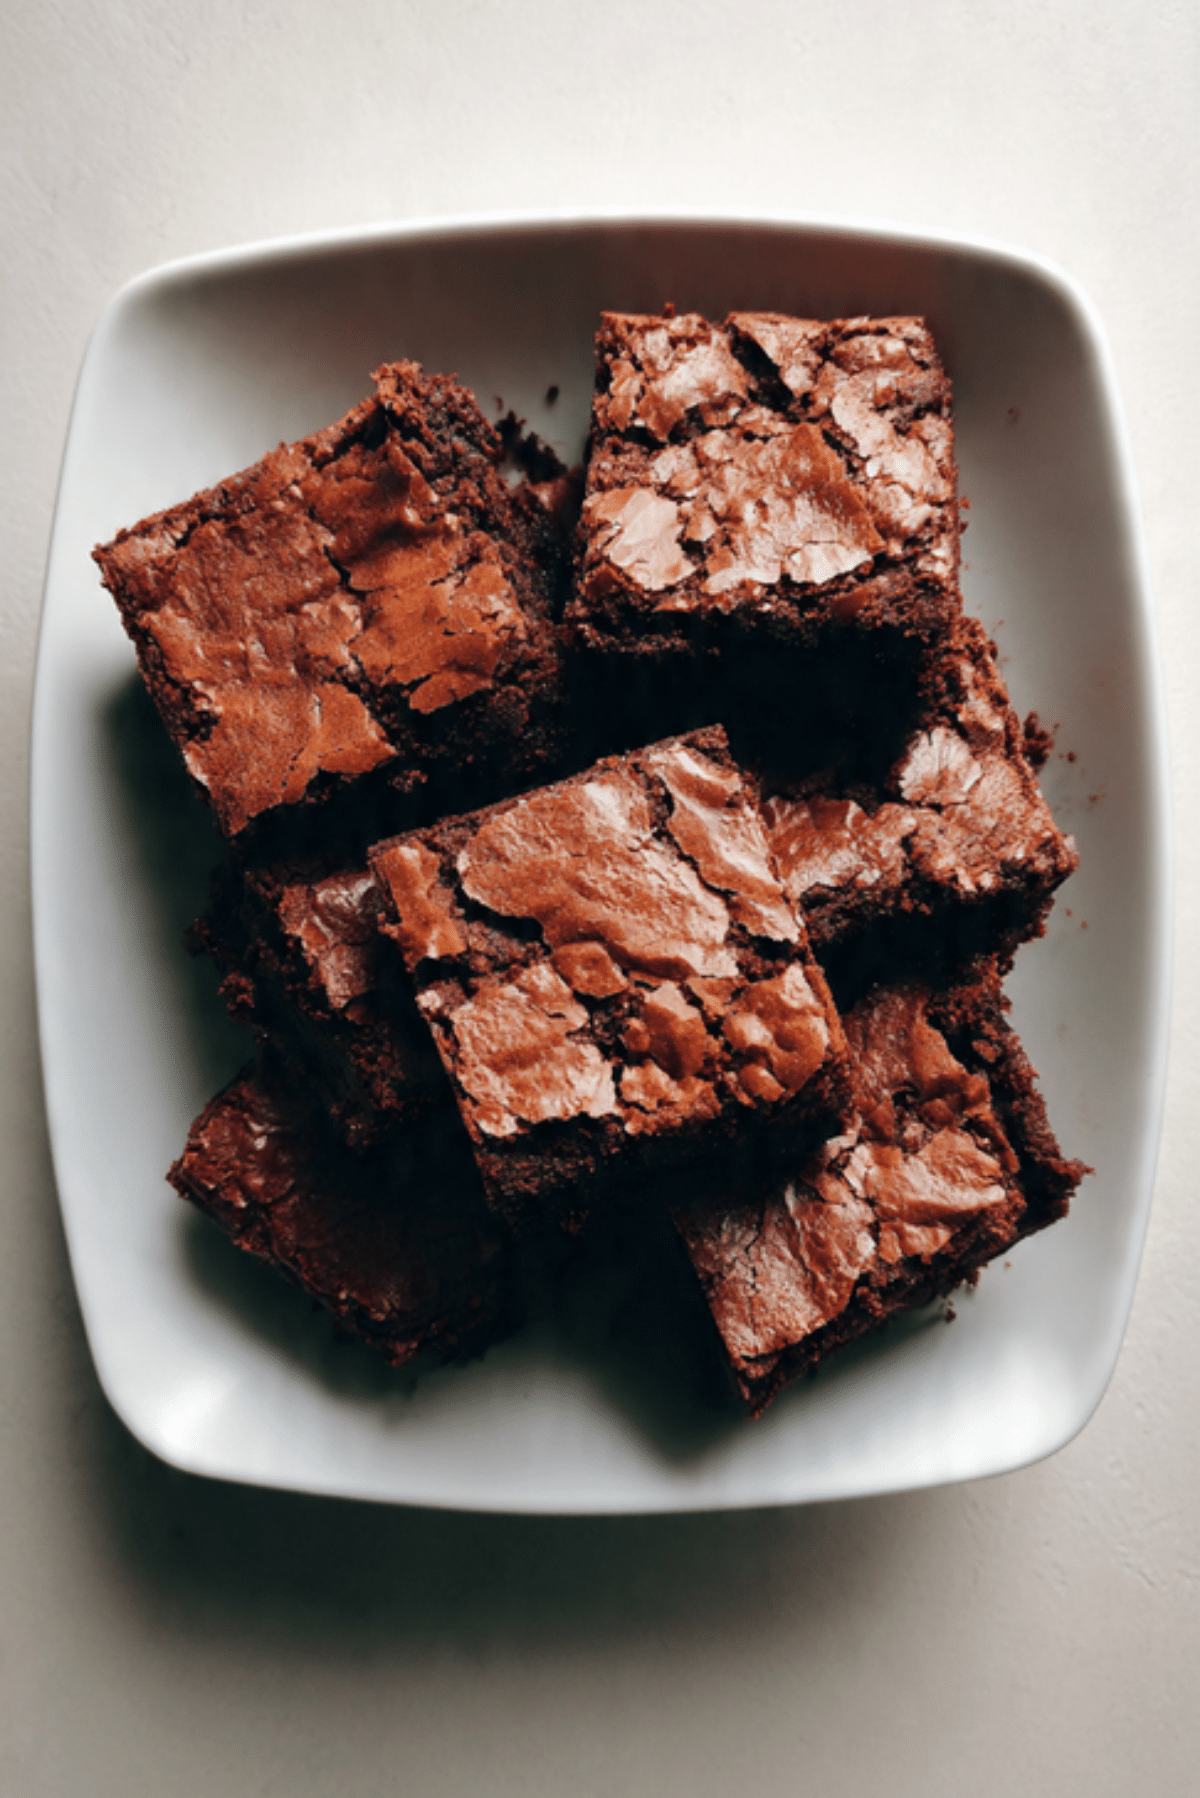
When these brownies emerge from the oven, the surface has that iconic thin, crackly top that shatters like delicate parchment under your fork. The interior remains incredibly dense and fudgy, almost like a cross between a cake and a truffle. Trust me, you’re going to love this because it offers a complexity of sweetness and cocoa depth that you just cannot find in a boxed mix.
A Brief History of the Decadent Brownie Evolution
The brownie has traveled a long way since its invention in Chicago in the late 1800s, originally created as a portable dessert for ladies attending the World’s Columbian Exposition. Over the decades, bakers began experimenting with the “triple” concept to heighten the luxury of the dish. By incorporating dark, milk, and white chocolate, this recipe pays homage to that spirit of culinary excess while maintaining the classic chewy structure that has made the brownie a global favorite for over a century.
Why This Recipe is a Total Game Changer
If you are looking for the definitive brownie recipe to impress your friends or satisfy a serious craving, this is the only one you will ever need. Let me tell you, it’s worth every bite, and here is why it stands out as the ultimate crowd pleaser.
Versatile: These brownies are just as home at a casual backyard barbecue as they are plated with a reduction of berries for a formal dinner.
Budget-Friendly: While it uses three types of chocolate, you can use standard baking bars or chips to keep costs down without sacrificing that rich profile.
Quick and Easy: The batter comes together in one large bowl, meaning you spend less time cleaning up and more time enjoying the aroma of baking cocoa.
Customizable: You can easily fold in sea salt, espresso powder, or even dried cherries to put your own unique spin on the triple chocolate theme.
Crowd-Pleasing: I have never seen a tray of these last more than ten minutes at a gathering, as the visual appeal of the mixed chocolate chunks is irresistible.
Make-Ahead Friendly: These actually taste even better the second day as the flavors have more time to marry and the fudgy texture sets perfectly.
Great for Leftovers: They freeze exceptionally well, allowing you to have a gourmet treat ready to go at a moment’s notice.
Insider Secrets for the Fudgiest Texture
The secret to achieving that professional fudgy texture is to avoid over-beating the batter once you add the flour. You want to fold the ingredients together just until the streaks of white disappear, which keeps the crumb dense rather than airy and cake like. Another pro tip is to use high quality butter and melt it slowly with the dark chocolate to create a glossy, stable emulsion that carries the flavor of the cocoa to every corner of the pan.
Essential Tools for Baking Success
To ensure your brownies come out of the pan perfectly every time, make sure you have these specific tools prepared.
8-inch Square Baking Pan: This size provides the perfect thickness for a brownie that is chewy on the outside and soft in the middle.
Parchment Paper: Always line your pan with a sling of parchment to make lifting the entire block of brownies out of the pan a breeze.
Silicone Spatula: This is the best tool for folding in the chocolate chunks gently without crushing the delicate air bubbles in the batter.
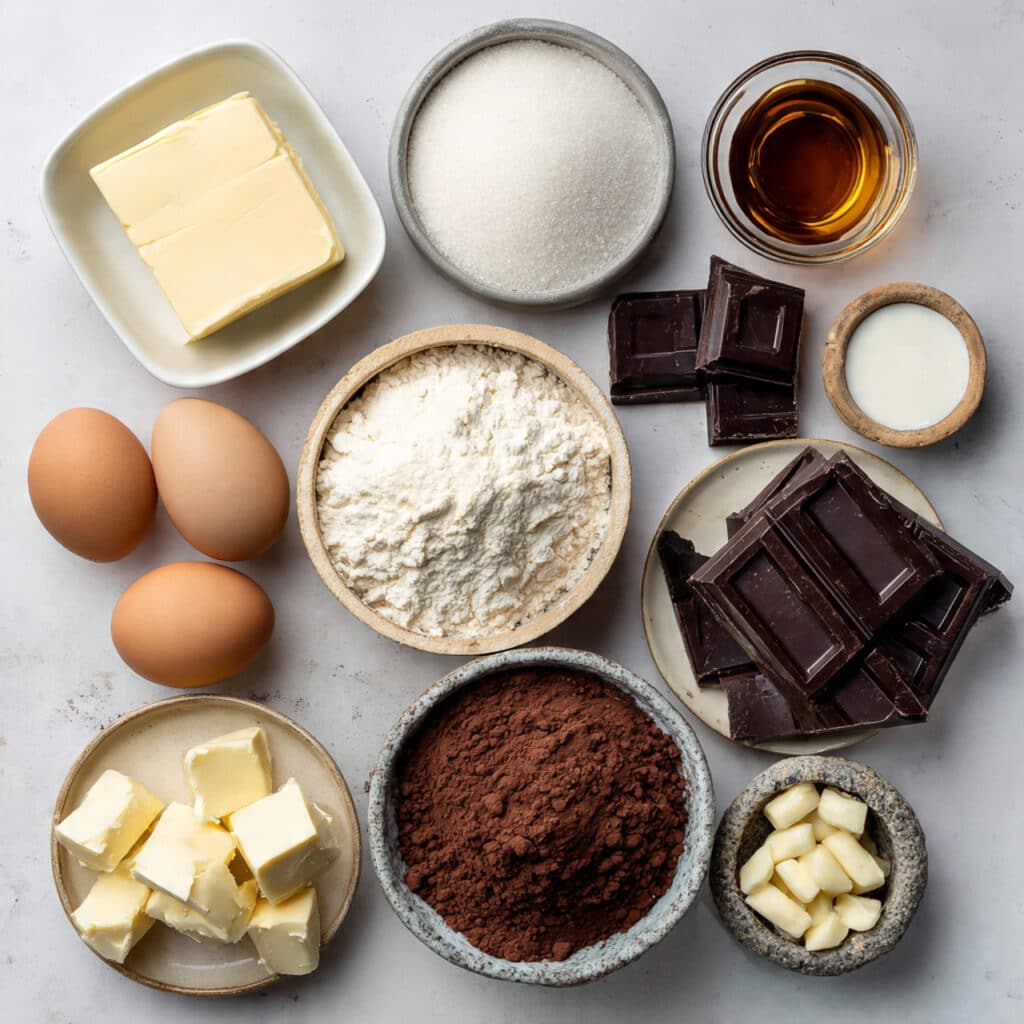
Everything You Need for Triple Chocolate Harmony
The balance of these three chocolates creates a symphony of sweetness and bitterness that defines the triple chocolate experience.
- Unsalted Butter: 175 grams, melted to provide a rich and silky base for the batter.
- Dark Chocolate: 200 grams, used as the main base to provide a sophisticated and deep cocoa foundation.
- Granulated Sugar: 250 grams, which creates that beautiful crackly top and balances the dark cocoa.
- Large Eggs: 3 whole eggs, providing the structure and moisture needed for a chewy result.
- All Purpose Flour: 100 grams, just enough to hold everything together while keeping the center fudgy.
- Cocoa Powder: 30 grams, sifted to add an extra layer of chocolate intensity.
- Milk Chocolate Chunks: 100 grams, which melt into creamy pockets of sweetness throughout the brownie.
- White Chocolate Chunks: 100 grams, providing a visual and flavor contrast that cuts through the dark base.
- Vanilla Extract: 1 teaspoon, an essential aromatic that brings out the best in the chocolate.
- Salt: 1/2 teaspoon, the crucial ingredient that prevents the sugar from becoming overwhelming.
Smart Ingredient Substitutions
If you are missing a specific type of chocolate or want to adjust for what you have on hand, these swaps will still yield a fantastic result.
Milk Chocolate Chunks: Semi sweet chocolate chips or even chopped toffee bits for a different sweetness.
Dark Chocolate: You can use a very dark cocoa powder and extra butter if you do not have a solid bar for melting.
All Purpose Flour: A gluten free measure for measure flour works remarkably well in this high fat recipe.
Granulated Sugar: Half white sugar and half brown sugar for a slightly more moist and chewy texture.
Spotlighting the Star Ingredients
Dark Chocolate Base: This is the soul of the brownie, dictating the overall intensity and ensuring the dessert is not just sweet, but truly flavorful.
White Chocolate Chunks: These act as little jewels of creaminess, offering a distinct vanilla forward flavor that pops against the dark batter.
Stepping Into the Kitchen
Let us walk through the process of creating these chocolate masterpieces, focusing on that perfect bake time.
- Preheat Your Equipment: Set your oven to 350 degrees and line your baking pan with parchment paper, leaving an overhang on the sides.
- Combine Ingredients: Melt the butter and dark chocolate together over low heat until completely smooth and glossy.
- Prepare Your Cooking Vessel: Whisk the eggs and sugar together in a large bowl until the mixture is pale and slightly frothy.
- Assemble the Dish: Slowly pour the chocolate mixture into the eggs, then fold in the flour, cocoa powder, and salt.
- Cook to Perfection: Stir in the milk and white chocolate chunks, pour into the pan, and bake for 25 to 30 minutes.
- Finishing Touches: Resist the urge to cut them immediately, let them cool completely in the pan to allow the fudgy center to set.
- Serve and Enjoy: Lift from the pan using the parchment paper and slice into generous squares for the ultimate chocolate hit.
Texture and Flavor Development
As the brownies cool, the melted chocolate chunks begin to firm up slightly, creating a satisfying bite that alternates between soft cake and solid chocolate. The bitterness of the dark chocolate base is perfectly punctuated by the milky sweetness of the inclusions, creating a dynamic flavor profile that changes with every mouthful.
Cooking Tips and Tricks
- For the cleanest cuts, chill the brownies in the fridge for an hour before slicing with a sharp, warm knife.
- Do not overbake, a toothpick inserted into the center should come out with a few moist crumbs attached, not completely clean.
- Use a high quality vanilla extract, as the alcohol in the extract actually helps to carry the cocoa flavors to your taste buds.
Common Pitfalls to Avoid
- Using Cold Eggs: Make sure your eggs are at room temperature so they incorporate smoothly into the warm chocolate.
- Over mixing: Stop stirring as soon as the flour is gone to keep the brownies from becoming tough or bread like.
- Skipping the Cooling: Cutting while hot will cause the brownies to crumble and lose their fudgy identity.
Nutrition Facts
Servings: 16
Calories per serving: 285
Note: These are approximate values.
Timing Your Treat
Prep Time: 15 minutes
Cook Time: 30 minutes
Total Time: 45 minutes
Storage and Make Ahead Advice
These brownies stay fresh in an airtight container for up to five days at room temperature. For longer storage, you can wrap individual squares in plastic wrap and freeze them for up to three months. Simply thaw at room temperature for an hour before eating.
Creative Serving Suggestions
Serve a warm brownie with a drizzle of warm fudge sauce and a sprinkle of crushed hazelnuts for a restaurant style dessert. They also pair wonderfully with a glass of cold milk or a strong cup of black coffee to balance the richness.
Giving Your Leftovers New Life
Leftover brownie edges are perfect for crumbling into a homemade vanilla milkshake or using as a base for an ice cream cake crust.
Final Touches for Flavor
A light sprinkle of flaky sea salt on top of the batter before baking can elevate the entire dish, highlighting the differences between the three types of chocolate.
Making it a Visual Masterpiece
Ensure you sprinkle a few extra white and milk chocolate chunks on top of the batter before it goes into the oven so they are visible on the finished crust.
Variations to Try
- Mocha Triple Chocolate: Add two teaspoons of instant espresso powder to the flour mixture.
- Salted Caramel: Drizzle caramel sauce between layers of the batter before baking.
- Peppermint Crunch: Swap the white chocolate for crushed peppermint candies during the holidays.
FAQ’s
- Can I use margarine instead of butter?
Butter is highly recommended for the best flavor and texture, as margarine contains more water which can affect the chewiness. - What kind of cocoa powder is best?
Dutch processed cocoa powder offers a smoother, darker result that works perfectly with the triple chocolate theme. - Why did my brownies come out dry?
They were likely left in the oven too long, try checking them five minutes earlier next time. - Can I use chocolate chips instead of chunks?
Yes, chips work perfectly fine, though chunks provide larger pockets of melted chocolate. - How do I get the shiny crackly top?
The key is whisking the sugar and eggs together thoroughly until the sugar is mostly dissolved before adding the fat. - Can I add nuts to this recipe?
Absolutely, walnuts or pecans are a classic addition that pairs beautifully with the chocolate trio. - What if I don’t have white chocolate?
You can just use more milk or dark chocolate, but you will lose that specific flavor contrast. - Should I use a metal or glass pan?
Metal pans are generally better for brownies as they conduct heat more efficiently and create better edges. - Can I make these in a larger pan?
You can, but they will be much thinner and will require a shorter baking time. - Why did the chocolate chunks sink to the bottom?
The batter for these brownies is quite thick, so sinking is rarely an issue, but you can toss chunks in a little flour if you are worried.
Conclusion
The Triple Chocolate Brownie is the ultimate expression of chocolate love. By taking the time to layer these different flavors, you are creating a dessert that is far more than the sum of its parts. It is a reliable, indulgent, and deeply satisfying recipe that will quickly become a favorite for any occasion.
PrintTriple Chocolate Brownies
An indulgent, fudgy brownie featuring a dark chocolate base loaded with milk and white chocolate chunks for the ultimate chocolate experience.
Ingredients
- 175 grams Unsalted Butter
- 200 grams Dark Chocolate (70% cocoa)
- 250 grams Granulated Sugar
- 3 Large Eggs
- 100 grams All Purpose Flour
- 30 grams Cocoa Powder
- 100 grams Milk Chocolate Chunks
- 100 grams White Chocolate Chunks
- 1 teaspoon Vanilla Extract
- 1/2 teaspoon Salt
Instructions
- Preheat your oven to 350 degrees Fahrenheit and line an 8-inch square baking pan with parchment paper.
- Melt the butter and dark chocolate together in a bowl over a pot of simmering water until smooth.
- In a large bowl, whisk the eggs and sugar until pale and slightly thickened.
- Gently fold the melted chocolate mixture into the egg mixture until combined.
- Sift in the flour, cocoa powder, and salt, then fold gently with a spatula.
- Stir in the milk and white chocolate chunks.
- Pour the batter into the prepared pan and bake for 25 to 30 minutes.
- Allow the brownies to cool completely in the pan before slicing into squares.
Notes
- Avoid over-mixing once the flour is added to maintain a fudgy texture.
- The brownies are done when a toothpick comes out with moist crumbs, not liquid batter.
- For best results, use room temperature eggs.