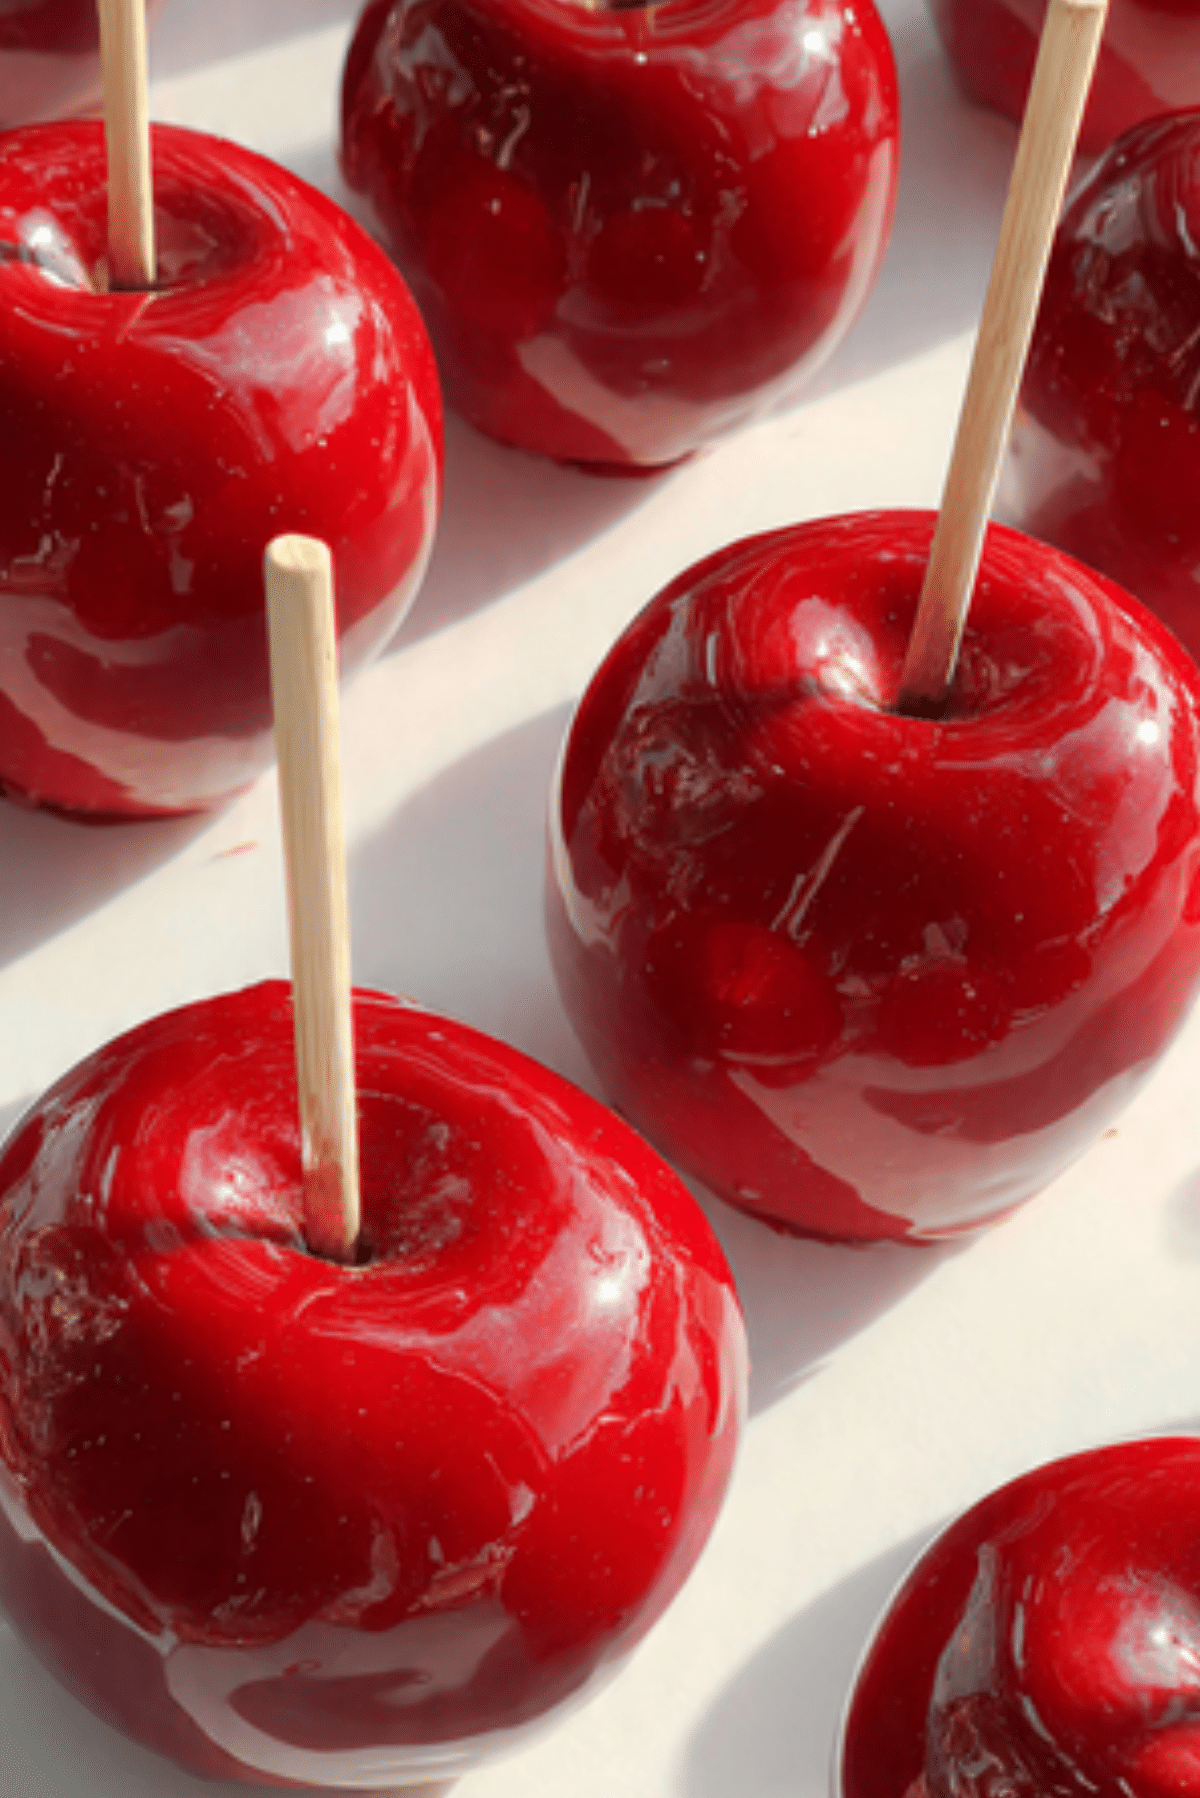
Toffee Apples
There is a nostalgic joy that comes with the first crunch into a perfectly glazed fruit treat. These Toffee Apples are a classic autumn staple that combines the sharp, refreshing snap of a fresh apple with a deeply sweet and brittle candy coating. Trust me, you’re going to love this because it brings back memories of fairs and festivals while being surprisingly easy to master in your own kitchen. This one’s a total game-changer for your next seasonal party and let me tell you, it’s worth every bite.
The Timeless Appeal of Candy Coated Fruit
The tradition of coating fruit in sugar dates back centuries as a way to preserve the harvest, but it has evolved into one of the most beloved treats in the world. The secret lies in the temperature of the syrup, which must reach a specific stage to ensure that the coating is glass-like and shatters upon impact rather than sticking to your teeth. It is a sensory delight that starts with the bright visual of the glossy red shell and ends with the juicy explosion of the fruit inside.
A Global Celebration of Sweet Harvests
While many associate these treats with Guy Fawkes Night in the UK or Halloween in the US, variations of candied apples exist across the globe. From the Tanghulu of China to the festive markets of Europe, the concept of elevating a simple piece of fruit with a sugar glaze is a universal language of celebration. This recipe honors those traditional roots while using modern techniques to ensure a crystal-clear finish every single time, making it a reliable favorite for generations of families.
Why These Glazed Apples Are a Must-Make
Mastering the art of the sugar glaze is a skill that every home cook should have in their repertoire.
Versatile: You can use any firm apple variety or even experiment with different food colorings to match your theme.
Budget-Friendly: The primary ingredients are just sugar, water, and fresh fruit, making it an incredibly affordable treat.
Quick and Easy: Once you have your syrup at the right temperature, the dipping process takes only a few seconds per apple.
Customizable: You can roll the wet toffee in nuts, sprinkles, or desiccated coconut for extra flavor and texture.
Crowd-Pleasing: Both kids and adults find the bright, shiny appearance of these apples completely irresistible.
Make-Ahead Friendly: These can be prepared a few hours before your event and will stay crisp and glossy.
Great for Leftovers: Even if they lose a bit of their shine, the combination of sugar and apple remains a delicious snack.
Expert Secrets for a Flawless Coating
The biggest challenge with toffee is ensuring it sticks to the fruit without bubbling or sliding off.
- Always wash your apples in boiling water for a few seconds to remove the natural wax coating that prevents the toffee from sticking.
- Use a high-quality sugar thermometer to ensure your syrup reaches the hard crack stage exactly.
- Make sure your apples are completely dry and at room temperature before you begin the dipping process.
- Add a tiny splash of vinegar to your sugar mixture to help prevent the sugar from crystallizing as it boils.
Essential Tools for Candy Success
Having the right tools is the difference between a sticky mess and a professional-grade confection.
Sugar Thermometer: This is non-negotiable for reaching the hard crack stage safely and accurately.
Heavy-Based Saucepan: A thick bottom prevents the sugar from burning over the high heat required.
Wooden Lolly Sticks: These provide the necessary handle for dipping and eating the heavy apples.
Baking Parchment: Essential for resting the dipped apples so they don’t stick to your counter.
Heat-Proof Bowl: Helpful if you need to keep your toffee warm while working through a large batch.
The Elements of a Perfect Toffee Glaze
The simplicity of these ingredients belies the complex chemical reaction that creates the perfect crunch.
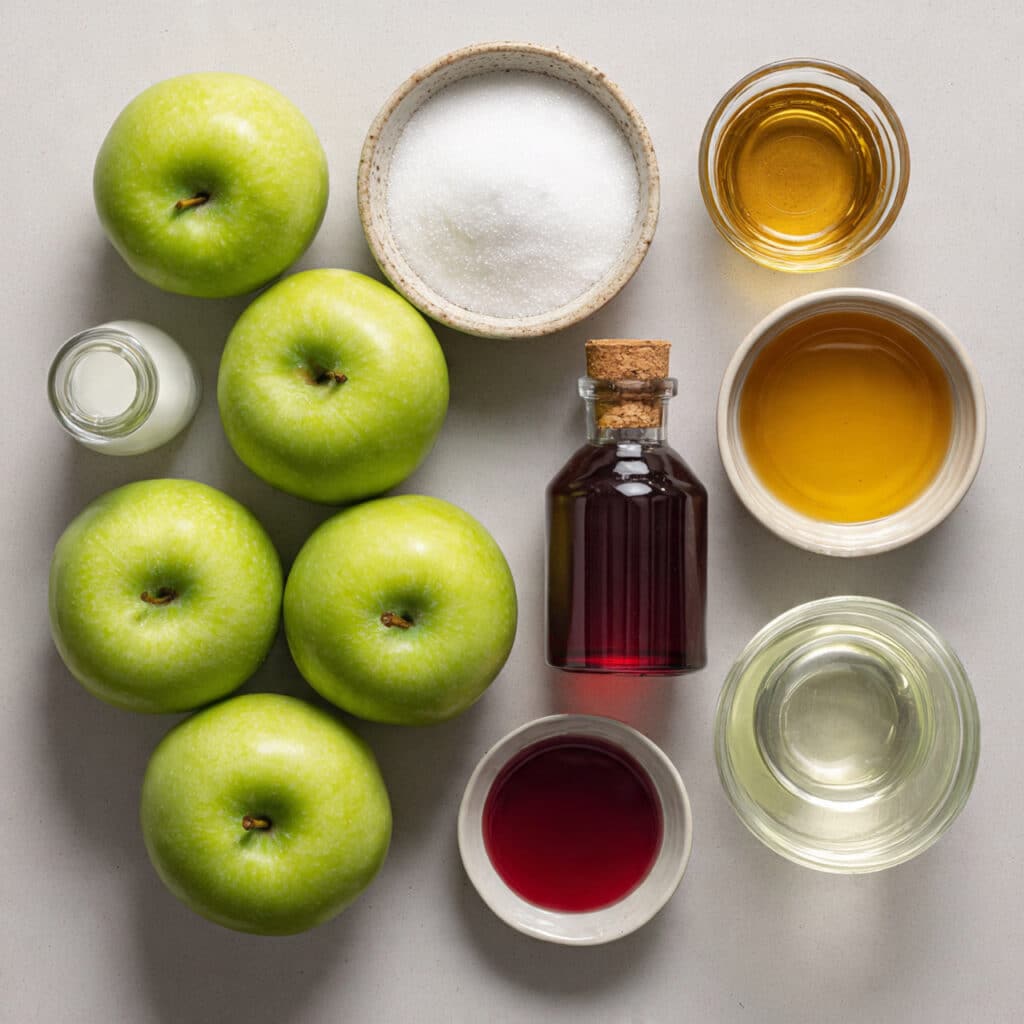
- Granny Smith Apples: 6 medium apples provide the necessary tartness to cut through the heavy sugar.
- Granulated Sugar: 400 grams to create the bulk of the hard candy coating.
- Water: 100 milliliters to dissolve the sugar and start the boiling process.
- Golden Syrup: 4 tablespoons to add a hint of caramel flavor and improve the texture of the toffee.
- Red Food Coloring: 1 teaspoon to give the apples their iconic and vibrant festive look.
- White Vinegar: 1 teaspoon to stabilize the sugar and prevent unwanted crystallization.
Flexible Ingredient Substitutions
If you need to change things up, these alternatives will still result in a delicious treat.
Golden Syrup: You can use light corn syrup or honey, though the flavor profile will shift slightly.
Red Food Coloring: Leave it out for a natural amber toffee or use blue or purple for a spooky theme.
Granny Smith Apples: Any firm, crisp apple like Pink Lady or Braeburn will work just as well.
Focus on the Key Components
The Apple: Using a tart and crisp variety is crucial because a soft apple will turn mushy under the heat of the hot toffee.
The Hard Crack Stage: This refers to the temperature between 149 and 154 degrees Celsius, which is when the sugar becomes brittle and clear.
Entering the Candy Kitchen
Follow these steps carefully to ensure your safety and the quality of your finished treats.
- Preheat Your Equipment: Get your saucepan ready and line a large baking sheet with non-stick parchment paper.
- Combine Ingredients: Place the sugar, water, golden syrup, and vinegar into the pan and stir over low heat until the sugar dissolves.
- Prepare Your Cooking Vessel: Once dissolved, turn up the heat and bring the mixture to a boil without stirring it anymore.
- Assemble the Dish: While the syrup boils, remove the stalks from the apples and push a wooden stick firmly into the core of each.
- Cook to Perfection: Watch the thermometer closely until it hits 150 degrees Celsius, then remove from heat and stir in the food coloring.
- Finishing Touches: Tilt the pan and quickly swirl each apple in the hot toffee until fully coated, then let the excess drip off.
- Serve and Enjoy: Place the apples on the parchment paper to harden, which should take about twenty minutes.
A Contrast of Sweet and Sharp
The experience of eating a Toffee Apple is all about the interaction between the shattering sweetness of the shell and the cool, acidic crunch of the fruit. The toffee should be thin enough to bite through easily but thick enough to provide a satisfying snap. As you chew, the sugar begins to dissolve into a caramel-like consistency that perfectly coats the fresh apple slices.
Success Strategies for the Home Confectioner
- Work quickly once the toffee reaches the correct temperature, as it will start to set and thicken in the pan immediately.
- If the toffee becomes too thick to dip, place the pan back over a very low heat for a minute to loosen it up.
- Use a deep, narrow saucepan rather than a wide one so that the toffee is deep enough to submerge the apples fully.
Common Pitfalls to Avoid
- Stirring the Boiling Sugar: This can cause the mixture to crystallize and become grainy rather than smooth and clear.
- Dipping Wet Apples: Any moisture on the skin of the fruit will cause the toffee to slide right off or create steam bubbles.
- Ignoring the Thermometer: Guessing the temperature often leads to soft toffee that sticks to the teeth or burnt sugar that tastes bitter.
Nutritional Overview
Servings: 6
Calories per serving: 310
Note: These are approximate values.
Timing Your Toffee Task
Prep Time: 15 minutes
Cook Time: 20 minutes
Total Time: 35 minutes
Make-Ahead and Storage Tips
Toffee apples are best eaten on the day they are made because the moisture from the apple will eventually start to dissolve the sugar from the inside out. If you must store them, keep them in a cool, dry place but avoid the refrigerator, as the humidity can cause the toffee to become sticky and weep.
Creative Serving Suggestions
For a party, you can arrange these on a bed of autumn leaves or inside a rustic wooden crate. They also look beautiful wrapped in clear cellophane and tied with a festive ribbon to be given away as edible gifts.
Leftover Transformation Ideas
If the toffee starts to soften, you can slice the apples and bake them into a crumble where the melted toffee acts as a built-in sweetener. You can also chop them up and stir them into a warm bowl of oatmeal for a decadent breakfast.
Additional Confectionery Wisdom
To clean your saucepan after making toffee, fill it with water and bring it to a boil, which will dissolve any hardened sugar residue effortlessly. Be extremely careful when working with hot sugar, as it can cause severe burns if it comes into contact with your skin.
Making It a Showstopper
You can create a “galaxy” effect by swirling a little bit of edible silver glitter into the toffee before dipping. Alternatively, you can double-dip the bottom of the apple into melted white chocolate for a beautiful two-toned appearance that feels very high-end.
Variations to Try
- Salted Caramel: Add a generous pinch of sea salt to the syrup just before dipping for a modern flavor profile.
- Nutty Delight: Roll the freshly dipped apples in crushed peanuts or toasted hazelnuts before the toffee sets.
- Cinnamon Spice: Stir a teaspoon of ground cinnamon into the sugar mixture for a warm, spicy aroma.
- Chocolate Drizzle: Once the toffee has hardened, drizzle the apples with dark chocolate for an extra layer of indulgence.
FAQ’s
1. Why is my toffee sticky?
Sticky toffee is usually a sign that it didn’t reach the hard crack stage or that the environment is too humid.
2. Can I use honey instead of golden syrup?
Yes, honey works well but it will give the toffee a much stronger floral flavor and a darker amber color.
3. How do I get the bubbles out of the toffee?
Let the toffee sit for a minute after removing it from the heat so the bubbles settle before you start dipping.
4. Why did the toffee fall off my apple?
The most common reason is the wax on the apple skin; make sure to scrub them in hot water and dry them thoroughly.
5. Is it safe for children?
The toffee is very hard, so young children should be supervised to avoid any risk of choking or hurting their teeth.
6. Can I make these without food coloring?
Absolutely, the toffee will naturally be a beautiful golden-brown color without any added dye.
7. How long do they take to set?
They should be completely hard and ready to eat within 15 to 20 minutes at room temperature.
8. What is the best apple to use?
Granny Smith is the gold standard because its tartness perfectly balances the sweet candy coating.
10. How do I remove the wax from the apples?
Simply dip them in a bowl of boiling water for about 10 seconds and then wipe them firmly with a clean cloth.
Conclusion
These Toffee Apples are the ultimate way to celebrate the changing seasons with a bit of traditional flair. They are a wonderful project for the kitchen that yields a result as beautiful as it is delicious. I really hope you enjoy the process of making these shimmering treats and seeing the smiles they bring to everyone’s faces, so grab your sugar and get boiling today.
PrintToffee Apples
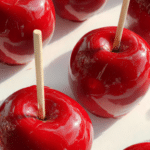
Crisp, tart apples encased in a hard, glossy red candy shell for a traditional and nostalgic autumn treat.
Ingredients
- 6 Medium Granny Smith apples
- 400g Granulated sugar
- 100ml Water
- 4 tbsp Golden syrup
- 1 tsp Red food coloring
- 1 tsp White vinegar
Instructions
- Remove the stalks from the apples and dip them in boiling water for 10 seconds to remove wax, then dry thoroughly.
- Push a wooden lolly stick firmly into the top of each apple.
- Place sugar, water, golden syrup, and vinegar in a heavy-based saucepan and stir over low heat until dissolved.
- Increase heat and boil without stirring until the mixture reaches 150°C (hard crack stage) on a sugar thermometer.
- Remove from heat, stir in the food coloring, and let the bubbles settle.
- Tilt the pan and swirl each apple in the syrup until coated, then let the excess drip off.
- Place on non-stick baking parchment to harden for at least 20 minutes.
Notes
- Work quickly as the toffee sets fast once removed from the heat.
- Ensure apples are at room temperature to prevent the toffee from cracking.
- Boil the pan with water afterwards for easy cleaning of hardened sugar.