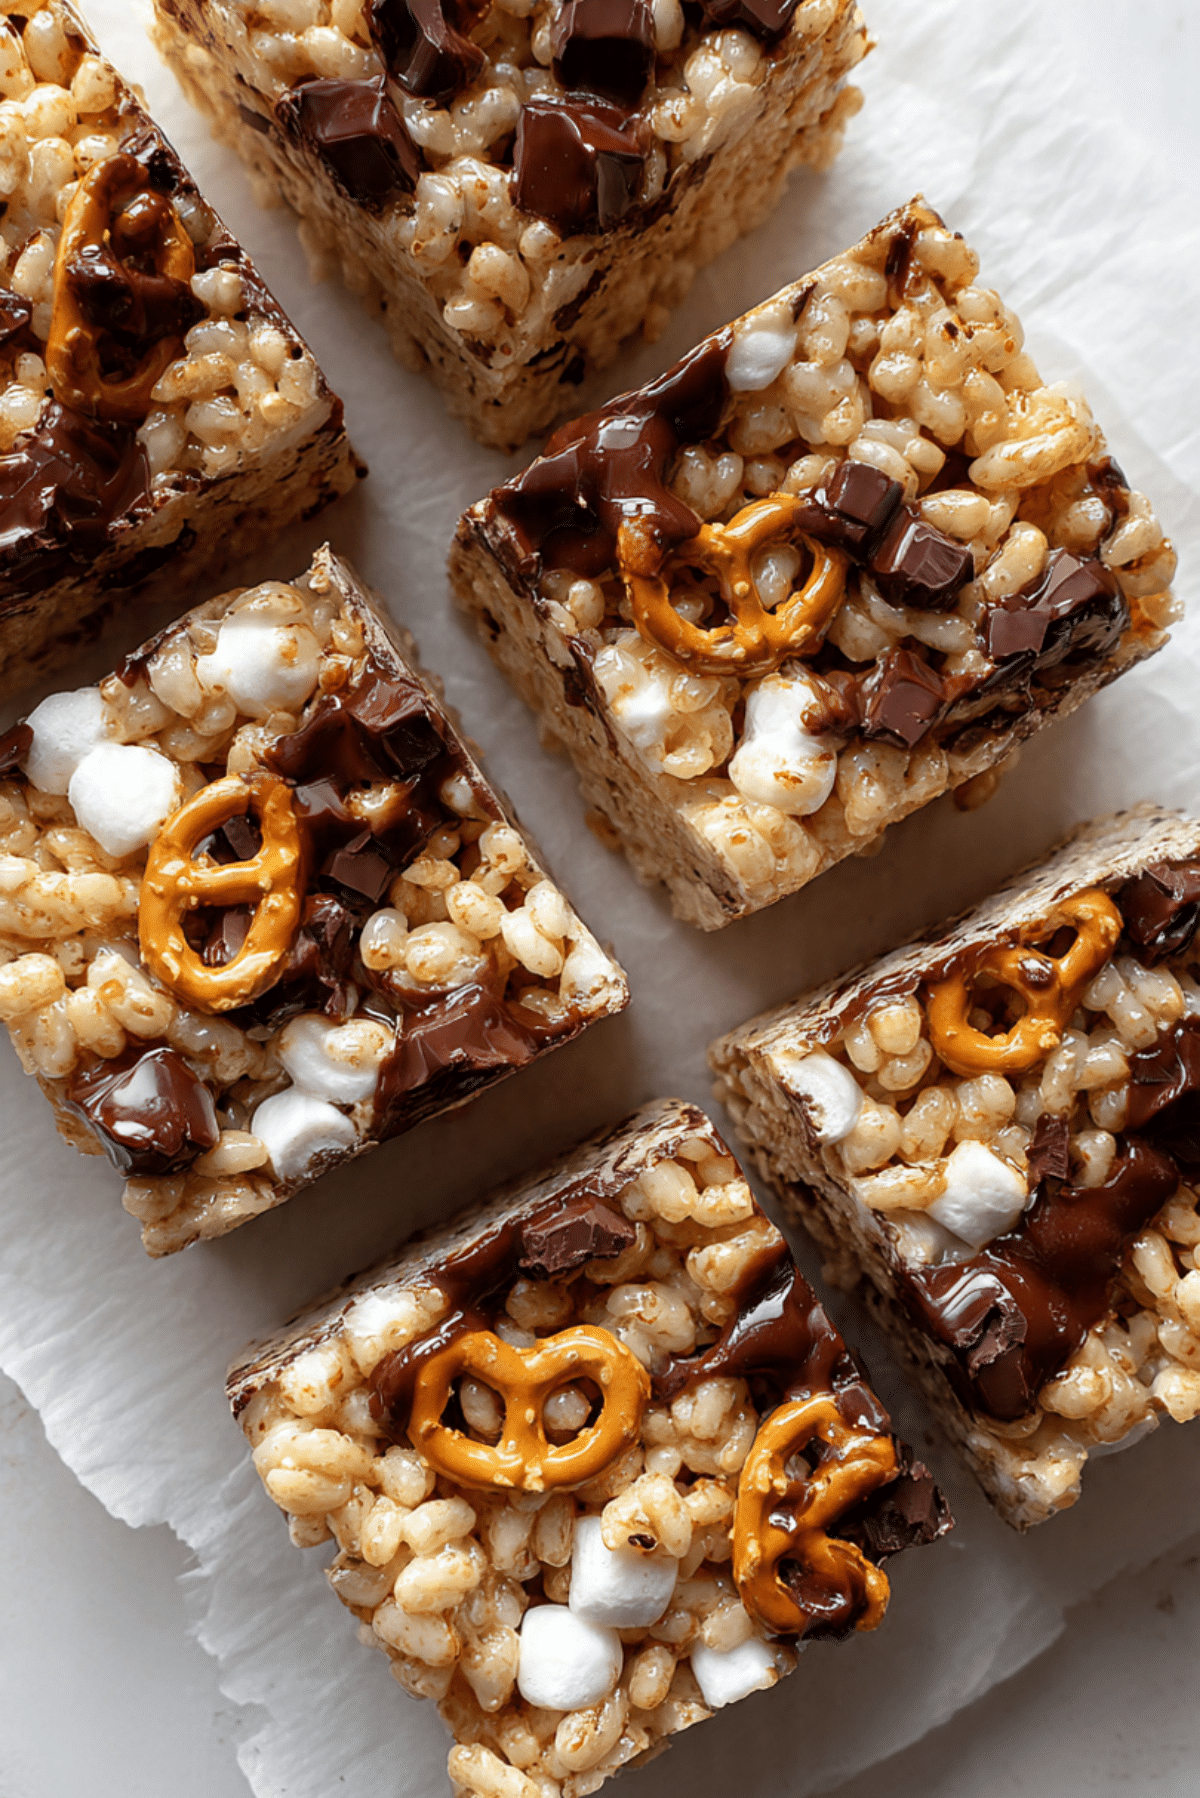
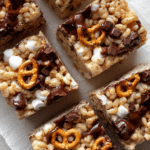
Rice Krispies Treats With Chocolate and Pretzels
Crunchy, gooey, salty, and sweet — these Rice Krispies Treats with Chocolate and Pretzels bring the best of all snack worlds into one irresistible square. They’re the perfect bite when you want something nostalgic but with a grown-up twist. And trust me, these bars disappear fast.
Behind the Recipe
This recipe came to life on a lazy Sunday afternoon when I was rummaging through my pantry for something snackable. I had the usual suspects: a half-empty box of Rice Krispies, some mini marshmallows, a handful of pretzels, and a bar of dark chocolate. One thing led to another, and within minutes, I was pressing this gooey, crunchy mixture into a pan. The rest? A new obsession was born.
Recipe Origin or Trivia
The original Rice Krispies Treats date back to the 1930s, thanks to two Kellogg’s employees who crafted them as a fundraiser snack. Fast forward to today, and this recipe is a modern upgrade. The combination of chocolate and pretzels gives it that sweet-salty balance that elevates it from a kids’ treat to a gourmet indulgence — no oven, no fuss, just pure joy.
Why You’ll Love Rice Krispies Treats With Chocolate and Pretzels
This isn’t your average cereal bar. Here’s what makes them truly addictive:
Versatile: You can switch up the mix-ins based on what’s in your pantry.
Budget-Friendly: Uses basic, inexpensive ingredients you likely already have.
Quick and Easy: Comes together in under 15 minutes with no baking required.
Customizable: Add peanut butter, white chocolate, or sprinkle with sea salt.
Crowd-Pleasing: Ideal for parties, bake sales, or a simple movie night snack.
Make-Ahead Friendly: These bars store beautifully for days without losing texture.
Great for Leftovers: Slice, wrap, and stash for lunchbox treats or on-the-go snacks.
Chef’s Pro Tips for Perfect Results
A few small tips go a long way with this recipe.
- Use fresh marshmallows for a smoother melt.
- Don’t overheat the marshmallows or they’ll become stiff.
- Lightly grease your hands or spatula when pressing the mixture into the pan.
- Let them cool fully before slicing for the cleanest cuts.
- Use high-quality chocolate for melty, rich flavor.
Kitchen Tools You’ll Need
You won’t need much to whip up these beauties.
Large Pot or Saucepan: To melt butter and marshmallows.
Mixing Spoon or Silicone Spatula: For combining the ingredients.
9×13 Baking Pan: For pressing the mixture and forming the bars.
Parchment Paper: For easy removal and no sticking.
Sharp Knife: To cut neat squares once set.
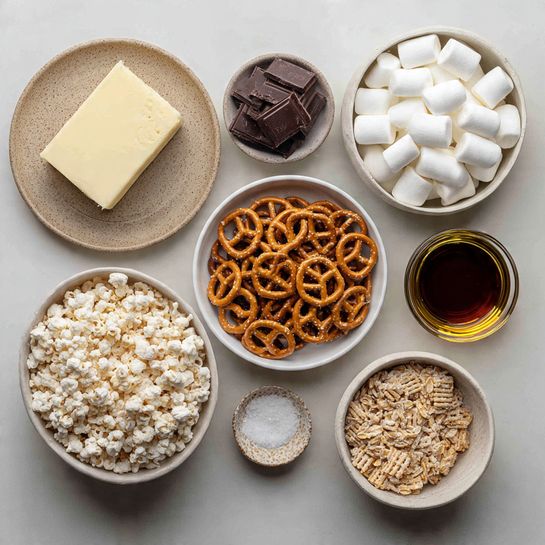
Ingredients in Rice Krispies Treats With Chocolate and Pretzels
The beauty of this recipe is in its simplicity and contrast. Here’s everything you need:
- Unsalted Butter: 6 tablespoons. Adds richness and helps the marshmallows melt evenly.
- Mini Marshmallows: 10 oz (about 4 cups). The gooey glue that binds everything together.
- Vanilla Extract: 1 teaspoon. Adds warmth and depth to the sweetness.
- Rice Krispies Cereal: 5 cups. The classic crisp texture.
- Mini Pretzels: 1.5 cups, roughly crushed. Adds crunch and a salty bite.
- Dark Chocolate Chunks: 1 cup. Brings richness and a satisfying contrast to the sweet marshmallows.
- Sea Salt (optional): A light sprinkle on top balances the flavors beautifully.
Ingredient Substitutions
Need to switch something out? No problem.
Butter: Use margarine or dairy-free butter substitute.
Mini Marshmallows: Regular marshmallows, chopped, or marshmallow fluff.
Dark Chocolate: Milk or white chocolate, or even chocolate chips.
Pretzels: Crushed potato chips or salted nuts for a salty crunch.
Ingredient Spotlight
Mini Marshmallows: These little pillows melt quickly and evenly, giving that signature chewy stretch that defines a good Rice Krispies treat.
Pretzels: The salty snap adds crunch and keeps the sweetness from becoming overwhelming.
Instructions for Making Rice Krispies Treats With Chocolate and Pretzels
Now for the fun part — it all comes together quickly, so be ready to move fast once the marshmallows melt.
- Preheat Your Equipment:
Line a 9×13 inch pan with parchment paper and lightly grease it. - Combine Ingredients:
In a large pot over low heat, melt butter. Add mini marshmallows and stir until smooth. Stir in vanilla. - Prepare Your Cooking Vessel:
Remove pot from heat. Quickly fold in Rice Krispies and crushed pretzels until fully coated. - Assemble the Dish:
Stir in half of the chocolate chunks, letting them melt slightly. Press the mixture evenly into your prepared pan. - Cook to Perfection:
Sprinkle remaining chocolate chunks on top. Press gently so they adhere. - Finishing Touches:
Optional: Sprinkle with sea salt for extra contrast. Let cool completely. - Serve and Enjoy:
Slice into squares and enjoy the crunchy, gooey, chocolatey goodness.
Texture & Flavor Secrets
These bars hit all the right notes — crispy cereal, chewy marshmallow, crunchy pretzel, and melty chocolate. The sweet and salty combo keeps you coming back for more, while the varied textures make each bite exciting.
Cooking Tips & Tricks
Keep these easy tricks in mind for best results:
- Stir continuously while melting marshmallows to avoid burning.
- Work quickly when mixing and pressing — they set fast!
- If you want extra chocolatey bites, add more chunks right before serving.
What to Avoid
Simple mistakes can ruin that perfect chewy-crunchy bite.
- Don’t use stale cereal — it ruins the texture.
- Overcooking the marshmallows makes the bars hard.
- Skipping the parchment paper makes removal tricky.
Nutrition Facts
Servings: 12
Calories per serving: 270
Note: These are approximate values.
Preparation Time
Prep Time: 10 minutes
Cook Time: 5 minutes
Total Time: 15 minutes
Make-Ahead and Storage Tips
These bars are super storage-friendly. Once cooled, store them in an airtight container at room temperature for up to 5 days. You can also freeze them in a sealed bag for up to one month — just thaw at room temp before serving.
How to Serve Rice Krispies Treats With Chocolate and Pretzels
Cut them into squares or rectangles and serve on a platter with a glass of cold milk, hot cocoa, or even coffee for the grown-ups. Wrap them individually for party favors or stack them in jars for a rustic dessert table.
Creative Leftover Transformations
Leftovers? Yes, please. Here’s how to remix them:
- Ice Cream Toppers: Crumble over vanilla ice cream.
- Chewy Sandwiches: Use two bars as a base and add peanut butter or Nutella in the middle.
- S’mores Style: Toast and layer with more chocolate and marshmallow for a gooey upgrade.
Additional Tips
- Lightly dampen your hands to press the mix without sticking.
- Add a handful of crushed graham crackers for a twist.
- Press gently — too much pressure makes the bars dense.
Make It a Showstopper
Want to impress? Drizzle with melted chocolate and sprinkle with extra crushed pretzels before cooling. Serve stacked high on a wooden board or cake stand with a few chocolate shavings around for visual drama.
Variations to Try
- Peanut Butter Crunch: Add 1/2 cup peanut butter when melting marshmallows.
- Trail Mix Bars: Toss in raisins, nuts, and dried cranberries.
- Holiday Twist: Add red and green M&Ms for a festive touch.
- Cookies and Cream: Mix in crushed chocolate sandwich cookies instead of pretzels.
- Spicy Sweet: Add a pinch of chili powder or cayenne for a subtle heat.
FAQ’s
Q1: Can I make these gluten-free?
Yes, just use gluten-free pretzels and cereal.
Q2: Can I use large marshmallows?
Yes, just chop them up for easier melting.
Q3: Can I use honey or maple syrup instead?
No, those won’t bind the bars the same way marshmallows do.
Q4: How do I keep the bars soft?
Store in an airtight container and don’t overcook the marshmallows.
Q5: Can I skip the chocolate?
Absolutely. They’re still delicious without it.
Q6: Are these freezer-friendly?
Yes, wrap them tightly and freeze for up to a month.
Q7: How long do they last?
About 5 days at room temperature in a sealed container.
Q8: Can I use cereal other than Rice Krispies?
Yes, try cornflakes or puffed rice for variation.
Q9: Can I add food coloring?
Yes, add a few drops during the marshmallow melting stage.
Q10: Can kids make these?
Definitely! Just supervise the melting process.
Conclusion
These Rice Krispies Treats with Chocolate and Pretzels are a sweet-salty, crunchy-chewy delight that checks all the boxes. They’re quick, nostalgic, and oh-so-satisfying. Give them a try — and don’t be surprised when they vanish faster than you expected.
PrintRice Krispies Treats With Chocolate and Pretzels
These Rice Krispies treats with chocolate and pretzels are a sweet and salty upgrade of the classic snack. They’re chewy, crunchy, and loaded with gooey marshmallow, melted chocolate chunks, and crispy pretzels — ready in just 15 minutes with no baking needed.
Ingredients
- 6 tablespoons unsalted butter
- 10 oz mini marshmallows (about 4 cups)
- 1 teaspoon vanilla extract
- 5 cups Rice Krispies cereal
- 1.5 cups mini pretzels, roughly crushed
- 1 cup dark chocolate chunks
- Sea salt (optional), for sprinkling
Instructions
- Line a 9×13 inch pan with parchment paper and lightly grease it.
- In a large pot over low heat, melt butter. Add marshmallows and stir until fully melted and smooth. Stir in vanilla extract.
- Remove from heat and quickly fold in Rice Krispies and crushed pretzels until well coated.
- Stir in half the chocolate chunks, allowing them to melt slightly in the mix.
- Press the mixture into the prepared pan using greased hands or spatula.
- Sprinkle the remaining chocolate chunks on top and gently press them in.
- Optional: sprinkle a light pinch of sea salt over the top.
- Let cool completely before slicing into squares.
Notes
- Use fresh marshmallows for the best texture.
- Don’t overcook the marshmallows — low and slow is key.
- Store in an airtight container at room temp to keep them soft.
- Lightly dampen hands or spatula to prevent sticking while pressing.