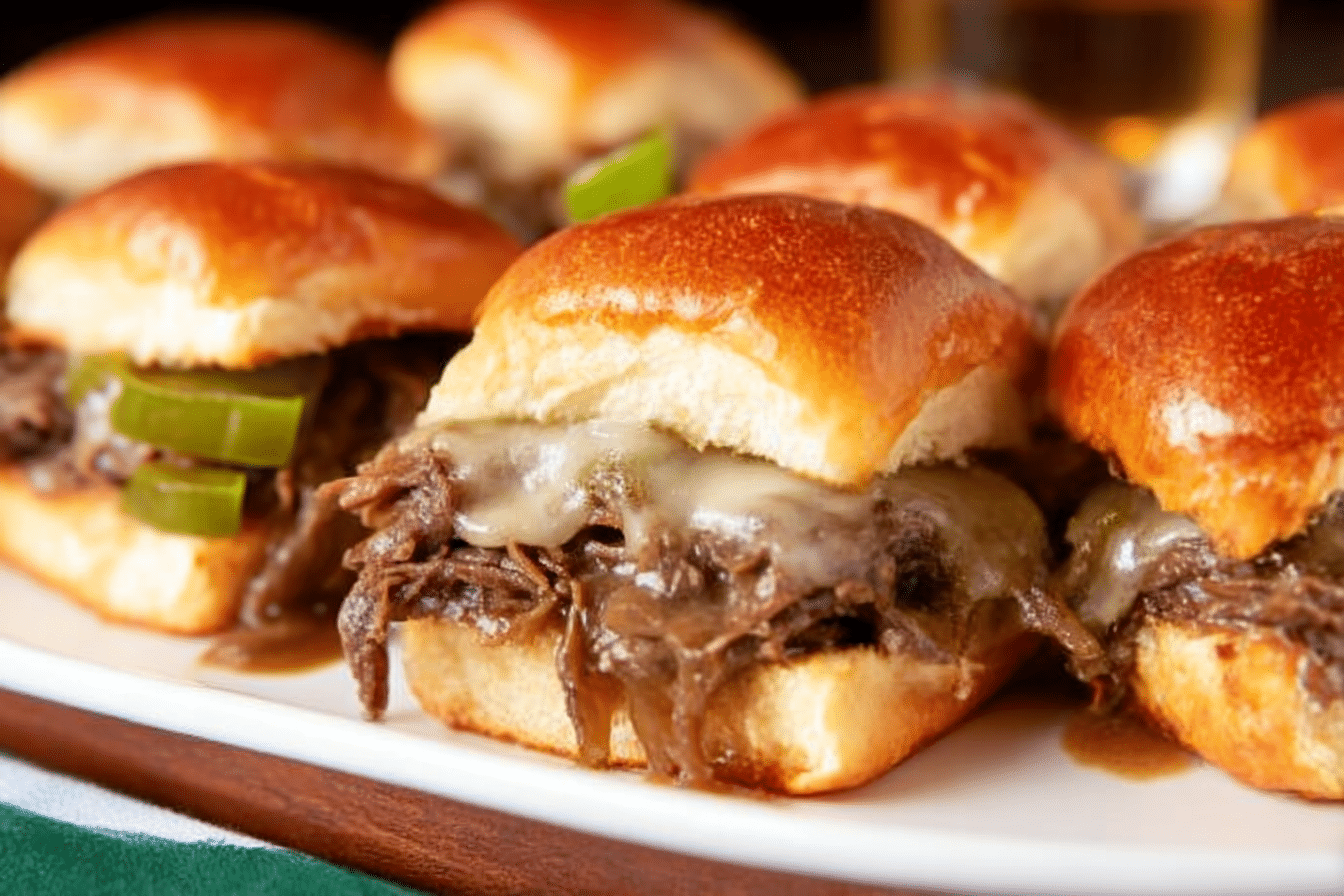
Philly Cheesesteak Sliders
If you’ve ever found yourself torn between wanting the full flavor of a Philly cheesesteak and the bite-sized fun of a slider, let me introduce you to the perfect union. These Philly Cheesesteak Sliders are loaded with juicy, thinly sliced beef, sweet sautéed peppers and onions, and gooey melted provolone, all nestled in soft slider rolls and brushed with a savory garlic butter glaze. Whether you’re prepping for game day, a potluck, or just a hearty dinner, these little sandwiches deliver big flavor in a small package.
Behind the Recipe
The idea for these sliders came from a late-night craving for something warm, cheesy, and shareable. I had leftover roast beef, half a bell pepper, and a pack of Hawaiian rolls that needed rescuing. The result? A tray of sliders so satisfying that they disappeared faster than I could plate them. Since then, they’ve become a staple for parties, movie nights, and last-minute dinners where everyone wants something fun and filling.
Recipe Origin or Trivia
The Philly cheesesteak, born in Philadelphia in the 1930s, traditionally features thinly sliced beef and melted cheese on a long roll. While the original uses Cheez Whiz or provolone and is served without veggies, this slider version brings a modern twist, incorporating caramelized onions and bell peppers for extra flavor and texture. Turning them into sliders makes them easy to serve at gatherings and gives them a fresh, portable appeal without losing their hearty essence.
Why You’ll Love Philly Cheesesteak Sliders
These little bundles of deliciousness are going to be your new go-to for feeding a crowd or satisfying your cheesy cravings.
Versatile: Great as a party snack, lunch, or even a casual dinner.
Budget-Friendly: Uses simple, accessible ingredients and stretches beef across 12 servings.
Quick and Easy: Ready in under an hour and requires minimal prep.
Customizable: Add mushrooms, swap the cheese, or spice things up with jalapeños.
Crowd-Pleasing: Melted cheese, savory beef, and buttery buns—what’s not to love?
Make-Ahead Friendly: Assemble ahead and bake when ready to serve.
Great for Leftovers: Reheat beautifully and make great next-day lunches.
Chef’s Pro Tips for Perfect Results
Want to take your sliders to the next level? Here’s what you need to know:
- Use shaved ribeye for the most authentic, melt-in-your-mouth texture.
- Sauté the veggies until they’re golden and soft to bring out their sweetness.
- Toast the bottom halves of the rolls slightly before assembling to prevent sogginess.
- Don’t skimp on the cheese—layer it both below and above the meat for full melt coverage.
- Cover with foil while baking to melt everything evenly, then uncover to crisp the tops.
Kitchen Tools You’ll Need
Let’s keep it simple. These everyday tools will get the job done:
Large Skillet: For sautéing beef, peppers, and onions.
Baking Dish or Sheet: To bake the assembled sliders.
Sharp Knife: For slicing rolls evenly.
Small Mixing Bowl: For whisking up that tasty garlic butter topping.
Pastry Brush: To evenly coat the tops with buttery goodness.
Ingredients in Philly Cheesesteak Sliders
This is a flavor-packed recipe that doesn’t need a long list. Each ingredient adds its own touch to create the perfect bite.
- Slider Rolls: 12-pack – Soft, slightly sweet rolls hold everything together.
- Shaved Ribeye or Deli Roast Beef: 1 pound – Tender, juicy, and classic.
- Green Bell Pepper: 1, thinly sliced – Adds sweetness and crunch.
- Yellow Onion: 1 medium, thinly sliced – Caramelizes beautifully for depth of flavor.
- Provolone Cheese: 8 slices – Melts into creamy perfection.
- Unsalted Butter: 4 tablespoons – The base for our garlic glaze.
- Garlic Powder: 1 teaspoon – Adds that irresistible aroma.
- Worcestershire Sauce: 1 teaspoon – Enhances the beefy, savory notes.
- Salt: ½ teaspoon – To season the filling.
- Black Pepper: ½ teaspoon – For just a hint of heat.
- Olive Oil: 1 tablespoon – For sautéing the veggies.
Ingredient Substitutions
Make these sliders your own with easy swaps:
Shaved Ribeye: Use deli roast beef, thinly sliced sirloin, or leftover steak.
Provolone Cheese: Swap with mozzarella, Swiss, or pepper jack.
Bell Pepper: Use red or yellow for a sweeter twist.
Slider Rolls: Brioche buns or mini ciabatta rolls work well too.
Ingredient Spotlight
Provolone Cheese: Mild and creamy, provolone melts like a dream and pairs perfectly with beef and onions.
Worcestershire Sauce: A dash of this adds depth, umami, and complexity that elevates the filling from good to gourmet.

Instructions for Making Philly Cheesesteak Sliders
It’s time to bring the flavors of Philly to your kitchen—slider-style.
- Preheat Your Equipment:
Preheat oven to 350°F (175°C). Lightly grease a 9×13 baking dish or line it with parchment paper. - Combine Ingredients:
Heat olive oil in a skillet. Sauté onions and bell pepper over medium heat until soft and caramelized, about 7 minutes. Add shaved beef, Worcestershire sauce, salt, and pepper. Cook for 2–3 more minutes, then remove from heat. - Prepare Your Cooking Vessel:
Slice the slider rolls horizontally without separating them. Place the bottom halves in the prepared dish. Lay half the provolone slices over the bottom buns. - Assemble the Dish:
Spoon the beef and veggie mixture evenly over the cheese. Top with the remaining provolone, then place the top halves of the rolls over the filling. - Cook to Perfection:
In a small bowl, melt butter and stir in garlic powder. Brush over the tops of the rolls. Cover loosely with foil and bake for 15 minutes. Uncover and bake another 5–7 minutes until golden and gooey. - Finishing Touches:
Let the sliders rest for 5 minutes before cutting. This helps everything settle and makes slicing easier. - Serve and Enjoy:
Slice between the rolls and serve warm. Add extra cheese sauce or hot peppers on the side if you like.
Texture & Flavor Secrets
These sliders are all about layers. The meat is juicy and tender, balanced by the soft sweetness of caramelized onions and the slightly crisp bite of bell peppers. The provolone stretches in silky ribbons, and the tops of the buns turn golden and buttery. Each bite is juicy, cheesy, savory, and just the right amount of messy.
Cooking Tips & Tricks
Keep these tips in mind to guarantee delicious results:
- Use foil to prevent burning the tops while cheese melts below.
- Press gently on the sliders before baking for compact, easy slicing.
- Add a spoonful of cheese sauce inside for extra creaminess.
- For crisp bottoms, place the sliders directly on a hot baking sheet.
What to Avoid
Steer clear of these common slider missteps:
- Overloading the filling—it’ll spill out during baking.
- Using too much butter on top—it can make the rolls soggy.
- Not preheating the oven, which can affect melting and texture.
- Skipping the foil—the tops will brown too fast.
Nutrition Facts
Servings: 12 sliders
Calories per serving: 310
Note: These are approximate values.
Preparation Time
Prep Time: 20 minutes
Cook Time: 20 minutes
Total Time: 40 minutes
Make-Ahead and Storage Tips
You can prep the entire dish ahead of time—assemble the sliders, cover, and refrigerate up to 24 hours. When ready to bake, add 5 minutes to the baking time. Leftovers? Wrap tightly and reheat in a warm oven to bring back that melty magic.
How to Serve Philly Cheesesteak Sliders
Serve with chips, fries, or a crisp salad. Add dipping sauces like garlic aioli, spicy mustard, or classic cheese sauce. They’re perfect for game day spreads, backyard BBQs, or an easy weeknight meal.
Creative Leftover Transformations
Got a few sliders left? Try this:
- Chop and scramble into eggs for a savory breakfast hash.
- Reheat and stuff into a tortilla for a Philly cheesesteak wrap.
- Add to mac and cheese for a decadent twist.
Additional Tips
- Sprinkle sesame seeds or poppy seeds on top for visual flair.
- Use parchment paper under the sliders for easier cleanup.
- Serve with pickle spears or hot peppers for a tangy contrast.
Make It a Showstopper
Brush the tops with garlic butter and sprinkle with fresh parsley or shredded Parmesan before serving. Present on a wooden board with sides and dips for maximum party impact.
Variations to Try
- Spicy Jalapeño Sliders: Add sliced jalapeños to the filling for heat.
- Mushroom Swiss Sliders: Swap provolone for Swiss and add sautéed mushrooms.
- BBQ Cheesesteak Sliders: Mix in BBQ sauce for a smoky-sweet twist.
- Bacon Cheesesteak Sliders: Add crispy turkey bacon for crunch.
- Pizza Cheesesteak Sliders: Top with marinara and mozzarella.
FAQ’s
Q1: Can I use frozen rolls?
Yes, just thaw completely before slicing and assembling.
Q2: Can I make these without beef?
Try sliced mushrooms, jackfruit, or soy crumbles for a veggie version.
Q3: What other cheeses work well?
Mozzarella, pepper jack, Swiss, or cheddar are all great options.
Q4: Do I have to sauté the vegetables?
Yes, for best flavor and texture. Raw veggies will stay crunchy and watery.
Q5: How do I keep sliders from getting soggy?
Toast the bottom buns slightly and avoid overfilling with wet ingredients.
Q6: Can I freeze them?
You can freeze before or after baking, though fresh is best for texture.
Q7: Can I use chicken instead?
Yes! Thinly sliced cooked chicken works great with the same seasonings.
Q8: How long can I store leftovers?
Up to 3 days in the fridge, tightly wrapped.
Q9: Can I use a slow cooker?
Not for baking, but you can prep the filling in one to save time.
Q10: Are these good for lunchboxes?
Absolutely—just reheat or pack in foil to retain warmth.
Conclusion
These Philly Cheesesteak Sliders combine the bold, beefy flavors of the classic sandwich with the fun and convenience of bite-sized indulgence. Melty, savory, and totally addictive, they’re the kind of dish that keeps everyone coming back for “just one more.” Trust me, it’s worth every bite.
PrintPhilly Cheesesteak Sliders
Philly Cheesesteak Sliders are mini sandwiches packed with juicy shaved beef, caramelized onions and peppers, melted provolone cheese, and brushed with garlic butter—baked to perfection on soft slider rolls.
Ingredients
- Slider Rolls: 12-pack – Soft, slightly sweet rolls hold everything together.
- Shaved Ribeye or Deli Roast Beef: 1 pound – Tender, juicy, and classic.
- Green Bell Pepper: 1, thinly sliced – Adds sweetness and crunch.
- Yellow Onion: 1 medium, thinly sliced – Caramelizes beautifully for depth of flavor.
- Provolone Cheese: 8 slices – Melts into creamy perfection.
- Unsalted Butter: 4 tablespoons – The base for our garlic glaze.
- Garlic Powder: 1 teaspoon – Adds that irresistible aroma.
- Worcestershire Sauce: 1 teaspoon – Enhances the beefy, savory notes.
- Salt: ½ teaspoon – To season the filling.
- Black Pepper: ½ teaspoon – For just a hint of heat.
- Olive Oil: 1 tablespoon – For sautéing the veggies.
Instructions
- Preheat Your Equipment: Preheat oven to 350°F (175°C). Lightly grease a 9×13 baking dish or line with parchment paper.
- Combine Ingredients: Heat olive oil in a skillet. Sauté onions and bell pepper until soft and caramelized, about 7 minutes. Add shaved beef, Worcestershire sauce, salt, and pepper. Cook for 2–3 more minutes.
- Prepare Your Cooking Vessel: Slice slider rolls horizontally. Place bottom halves in prepared dish and layer with half the provolone cheese.
- Assemble the Dish: Add beef mixture on top, layer remaining cheese, and cap with top buns.
- Cook to Perfection: Melt butter and mix with garlic powder. Brush over top buns. Cover with foil and bake for 15 minutes. Uncover and bake another 5–7 minutes until golden and melty.
- Finishing Touches: Let rest 5 minutes before slicing.
- Serve and Enjoy: Slice between rolls and serve warm with your favorite dipping sauces.
Notes
- Use foil to avoid over-browning the tops.
- Don’t overfill—keep sliders neat and compact.
- Add jalapeños for a spicy kick.
- Pre-toast bottoms of buns to prevent sogginess.