Peppermint Bark Cake
There is a specific kind of magic that arrives with the winter chill, and nothing captures that festive spirit quite like the combination of deep chocolate and cool, refreshing peppermint. This Peppermint Bark Cake is the ultimate holiday showstopper—a towering masterpiece that balances the richness of a dark chocolate sponge with the light, airy tingle of peppermint-infused buttercream. I remember the first time I sliced into one of these at a holiday party; the contrast of the snowy white frosting against the dark cake layers was as beautiful as a winter landscape. Let me tell you, it’s worth every bite, especially when you hit that crunch of crushed candy canes on top.
A Winter Wonderland in Every Slice
While peppermint bark is a beloved candy staple, transforming those iconic flavors into a multi-layered cake elevates the experience to a whole new level of indulgence. This recipe isn’t just a dessert; it’s a celebration centerpiece designed to wow your guests before they even take their first forkful. The dark chocolate ganache drip adds a touch of modern elegance, making it look like it walked straight out of a high-end boutique bakery. Trust me, you’re going to love this because it perfectly captures the nostalgia of the holidays while providing a sophisticated flavor profile that adults and children alike will adore.
The Story of a Holiday Icon
Peppermint bark itself is a relatively modern holiday tradition, gaining massive popularity in the late 1990s as a seasonal gift. It traditionally features layers of dark and white chocolate topped with crushed peppermint candies. By deconstructing these elements and rebuilding them as a cake, we pay homage to this seasonal favorite while adding the luxury of a moist, tender crumb. It’s a marriage of textures—silky ganache, creamy frosting, soft cake, and crunchy candy—that tells the story of winter’s most famous flavor duo.
Why This Cake is the Ultimate Holiday Win
This recipe is destined to become your signature winter bake, the one everyone begs you to bring to the annual gift exchange.
Versatile: Perfect for a formal Christmas dinner, a cozy New Year’s Eve gathering, or even a winter birthday.
Budget-Friendly: Despite its “luxe” look, the ingredients are standard baking staples like cocoa, flour, and butter.
Quick and Easy: While it looks complex, the components can be made in stages, making the final assembly a fun, stress-free process.
Customizable: You can adjust the peppermint intensity to your liking or even add a layer of white chocolate mousse for extra decadence.
Crowd-Pleasing: Chocolate and peppermint is a globally loved pairing that rarely leaves any leftovers.
Make-Ahead Friendly: The cake layers actually benefit from being baked a day early, making your event day much smoother.
Great for Leftovers: This cake stays moist for days, providing a delightful morning-after treat with a hot cup of cocoa.
Expert Secrets for the Perfect Drip
Achieving that perfect, professional-looking chocolate drip requires a little bit of patience and the right temperature.
The secret to a beautiful ganache drip is to make sure your cake is thoroughly chilled before you begin. Cold frosting helps the warm ganache slow down as it travels, creating those thick, intentional-looking drips rather than a messy puddle at the base. Also, always test one “practice drip” on a spare plate or the back of the cake to ensure the ganache is at the right consistency—it should be thick enough to hold its shape but fluid enough to run. Finally, use a squeeze bottle or a small spoon for maximum control over where each drip lands.
Essential Tools for a Professional Finish
Using the right equipment transforms the decorating process from a chore into an art form.
8-Inch Round Cake Pans: This size provides the perfect height-to-width ratio for a dramatic, towering look.
Offset Spatula: Essential for achieving that smooth, “crumb-coat” finish on the white buttercream.
Turntable: A rotating cake stand makes smoothing the sides and applying the ganache drip infinitely easier.
Piping Bag and Open Star Tip: This is the key to creating those large, cloud-like swirls of buttercream on top.
Bench Scraper: Use this for perfectly flat, professional sides that make the chocolate drips pop.
Ingredients You Will Need For The Cake
The interplay of these high-quality ingredients creates a dessert that feels truly special and indulgent.
- All-Purpose Flour: 2 cups providing the necessary structure for the rich chocolate layers.
- Granulated Sugar: 2 cups to sweeten the cocoa and ensure a tender, soft crumb.
- Unsweetened Cocoa Powder: 3/4 cup preferably Dutch-processed for that deep, dark chocolate color and flavor.
- Baking Powder & Soda: 2 teaspoons each to give the cake a beautiful, airy lift.
- Large Eggs: 2 room temperature to bind the batter and add richness.
- Buttermilk: 1 cup for incredible moisture and a subtle tang that balances the sugar.
- Vegetable Oil: 1/2 cup ensuring the cake stays moist even after several days in the fridge.
- Hot Coffee: 1 cup the secret ingredient that “blooms” the cocoa powder for maximum chocolate intensity.
For the Peppermint Buttercream:
- Unsalted Butter: 1.5 cups softened beaten until fluffy and pale.
- Powdered Sugar: 4 cups providing the base and sweetness for the frosting.
- Peppermint Extract: 1.5 teaspoons for that signature cool, winter flavor.
- Heavy Cream: 3 tablespoons to achieve a silky, pipeable consistency.
For the Ganache and Topping:
- Semi-Sweet Chocolate Chips: 1/2 cup for the rich, glossy drip.
- Heavy Cream: 1/3 cup to melt into the chocolate for a smooth ganache.
- Crushed Peppermint Candies: 1/2 cup for the crowning, crunchy finish.
Flexible Ingredient Substitutions
If you’re missing an item, these swaps will keep your holiday baking on track.
Buttermilk: You can make your own by adding a tablespoon of lemon juice or white vinegar to a cup of regular milk and letting it sit for 5 minutes.
Hot Coffee: If you prefer to avoid caffeine, you can use boiling water, though the flavor won’t be quite as deep.
Vegetable Oil: Melted coconut oil or even applesauce can be used, though the texture may vary slightly.
Semi-Sweet Chocolate: Dark chocolate or even white chocolate can be used for the ganache drip depending on your preference.
Spotlight on Key Ingredients
Dutch-Processed Cocoa: This cocoa is treated to be less acidic, resulting in a darker, smoother, and more “European” chocolate flavor that is essential for this cake’s profile.
Peppermint Extract: A little goes a long way! Using a high-quality pure extract ensures the flavor is refreshing and crisp, rather than medicinal.
Step-by-Step Peppermint Bark Cake Instructions
Follow these steps to build your own edible winter masterpiece.
- Preheat Your Equipment: Preheat your oven to 350°F (175°C) and grease/flour two 8-inch round cake pans.
- Combine Ingredients: Whisk the dry ingredients together, then add the eggs, buttermilk, oil, and vanilla. Stir in the hot coffee last (the batter will be thin!).
- Prepare Your Cooking Vessel: Divide the batter between the pans and bake for 30-35 minutes until a toothpick comes out clean.
- Assemble the Dish: Once the cakes are completely cool, level the tops. Place one layer down, frost with a thick layer of peppermint buttercream, and top with the second layer.
- Cook to Perfection: Frost the outside of the cake in a smooth white coat and chill for at least 30 minutes.
- Finishing Touches: Melt the chocolate and cream together for the ganache. Drizzle it over the edges of the chilled cake to create the drip effect.
- Serve and Enjoy: Pipe large swirls of buttercream on top and generously sprinkle with crushed peppermint before serving.
A Symphony of Winter Textures
The Peppermint Bark Cake is a masterclass in contrasting sensations. Your first bite hits the crunchy, sharp peppermint pieces, followed by the silky-smooth, bittersweet ganache. Then you reach the cool, creamy peppermint frosting that melts effortlessly into the incredibly moist, dark chocolate sponge. The flavor is a sophisticated balance of “hot” (rich chocolate) and “cold” (peppermint), making it a refreshingly heavy dessert that cleanses the palate while satisfying every sweet craving.
Pro Tips for Baking Success
- Level the Cakes: Use a serrated knife to cut off the domed tops for a perfectly flat, professional stack.
- The Crumb Coat: Apply a very thin layer of frosting first and chill the cake to “lock in” crumbs before the final thick layer of white frosting.
- Chill for Ganache: I cannot stress this enough—the cake must be cold for the ganache drips to stay in place!
- Crush Carefully: Place candy canes in a zip-top bag and use a rolling pin to crush them so you get a mix of “dust” and larger crunchy bits.
Mistakes to Watch For
- Over-Peppermining: Be careful with the extract; too much can make the cake taste like toothpaste rather than a treat.
- Warm Ganache: If the ganache is too hot, it will melt your buttercream. Let it sit for a few minutes until it feels just barely warm to the touch.
- Overbaking: Chocolate cake can dry out quickly, so start checking for doneness at the 30-minute mark.
Estimated Nutritional Information
Servings: 12
Calories per serving: 520
Note: These are approximate values.
Timing Your Bake
Prep Time: 45 minutes
Cook Time: 35 minutes
Total Time: 1 hour 20 minutes (plus chilling time)
Storage and Freshness Tips
Because of the buttercream and ganache, this cake stores best in the refrigerator in an airtight container for up to 5 days. For the best flavor, let slices sit at room temperature for about 20 minutes before serving so the buttercream softens slightly. You can also freeze the individual cake layers (wrapped in plastic) for up to 3 months before assembling.
Perfect Pairings for Your Cake
This cake is a natural partner for a steaming mug of hot cocoa or a rich peppermint latte. For a festive adult pairing, serve it with a glass of cold milk or a dark roast coffee to cut through the sweetness of the frosting.
Repurposing Your Leftovers
If you find yourself with leftover slices that are starting to dry out, crumble them up and mix with a little extra frosting to make “Peppermint Bark Cake Pops.” Dip them in white chocolate and roll in crushed peppermint for a whole new treat!
Final Flourishes for Flavor
To take the flavor even further, try adding a layer of crushed peppermint bark candy directly into the center frosting layer for an extra hidden crunch. You can also add a pinch of espresso powder to the buttercream to make the peppermint pop even more.
Making a Visual Masterpiece
To make the cake look like a professional display, use a “bench scraper” to get those sides perfectly vertical and smooth. When piping the swirls on top, keep them close together to create a continuous “wreath” of frosting that frames the chocolate ganache center beautifully.
Creative Variations to Explore
- White Chocolate Peppermint: Use white chocolate for the ganache drip for an all-white “snowy” look.
- Red Velvet Twist: Use a red velvet cake base instead of chocolate for a bright red and white festive contrast.
- Peppermint Mocha: Add 2 tablespoons of instant espresso to the cake batter.
- Mini Peppermint Cakes: Bake the batter in cupcake tins for individual holiday portions.
FAQ’s
Q1: Can I make this as a 9×13 sheet cake?
A1: Absolutely! Just bake in a rectangular pan for 35-40 minutes and spread the ganache over the top without the “drip” effect.
Q2: Why did my ganache break or look oily?
A2: This usually happens if the cream was boiled too hard. Heat the cream until it just starts to simmer, then pour over the chocolate and let it sit.
Q3: My peppermint candies melted on the cake, why?
A3: If the cake is stored in a humid environment, the sugar in the candies can start to weep. It’s best to add the crushed candies right before serving if possible.
Q4: Can I use peppermint oil instead of extract?
A4: Yes, but oil is much stronger than extract. Use only a drop or two and taste as you go.
Q5: How do I get the frosting so white?
A5: Use a tiny drop of violet food coloring to neutralize the yellow from the butter, or use clear vanilla extract.
Q6: Can I use gluten-free flour?
A6: Yes, a 1:1 gluten-free baking blend works well with this moist chocolate batter.
Q7: Why is my cake sticking to the pan?
A7: Make sure to grease, flour, and ideally use a parchment paper circle at the bottom of the pans.
Q8: How much ganache should I use for the drip?
A8: Start with a small amount. You only need about a tablespoon for every few inches to get a good run down the side.
Q9: Can I omit the coffee?
A9: You can use boiling water instead, but you will lose that extra “oomph” that brings out the chocolate flavor.
Q10: Does the ganache harden?
A10: It will firm up in the fridge but remain soft and “fudgy” to the touch, which is exactly what you want for a cake.
Conclusion
The Peppermint Bark Cake is more than just a dessert; it’s a holiday experience wrapped in chocolate and frosting. From the dramatic drips of ganache to the cool, refreshing bite of peppermint, every element is designed to bring joy to your winter celebrations. This one’s a total game-changer for your holiday tradition, and I can’t wait for you to see the look on your guests’ faces when you bring this to the table. Let me tell you, it’s worth every bite!
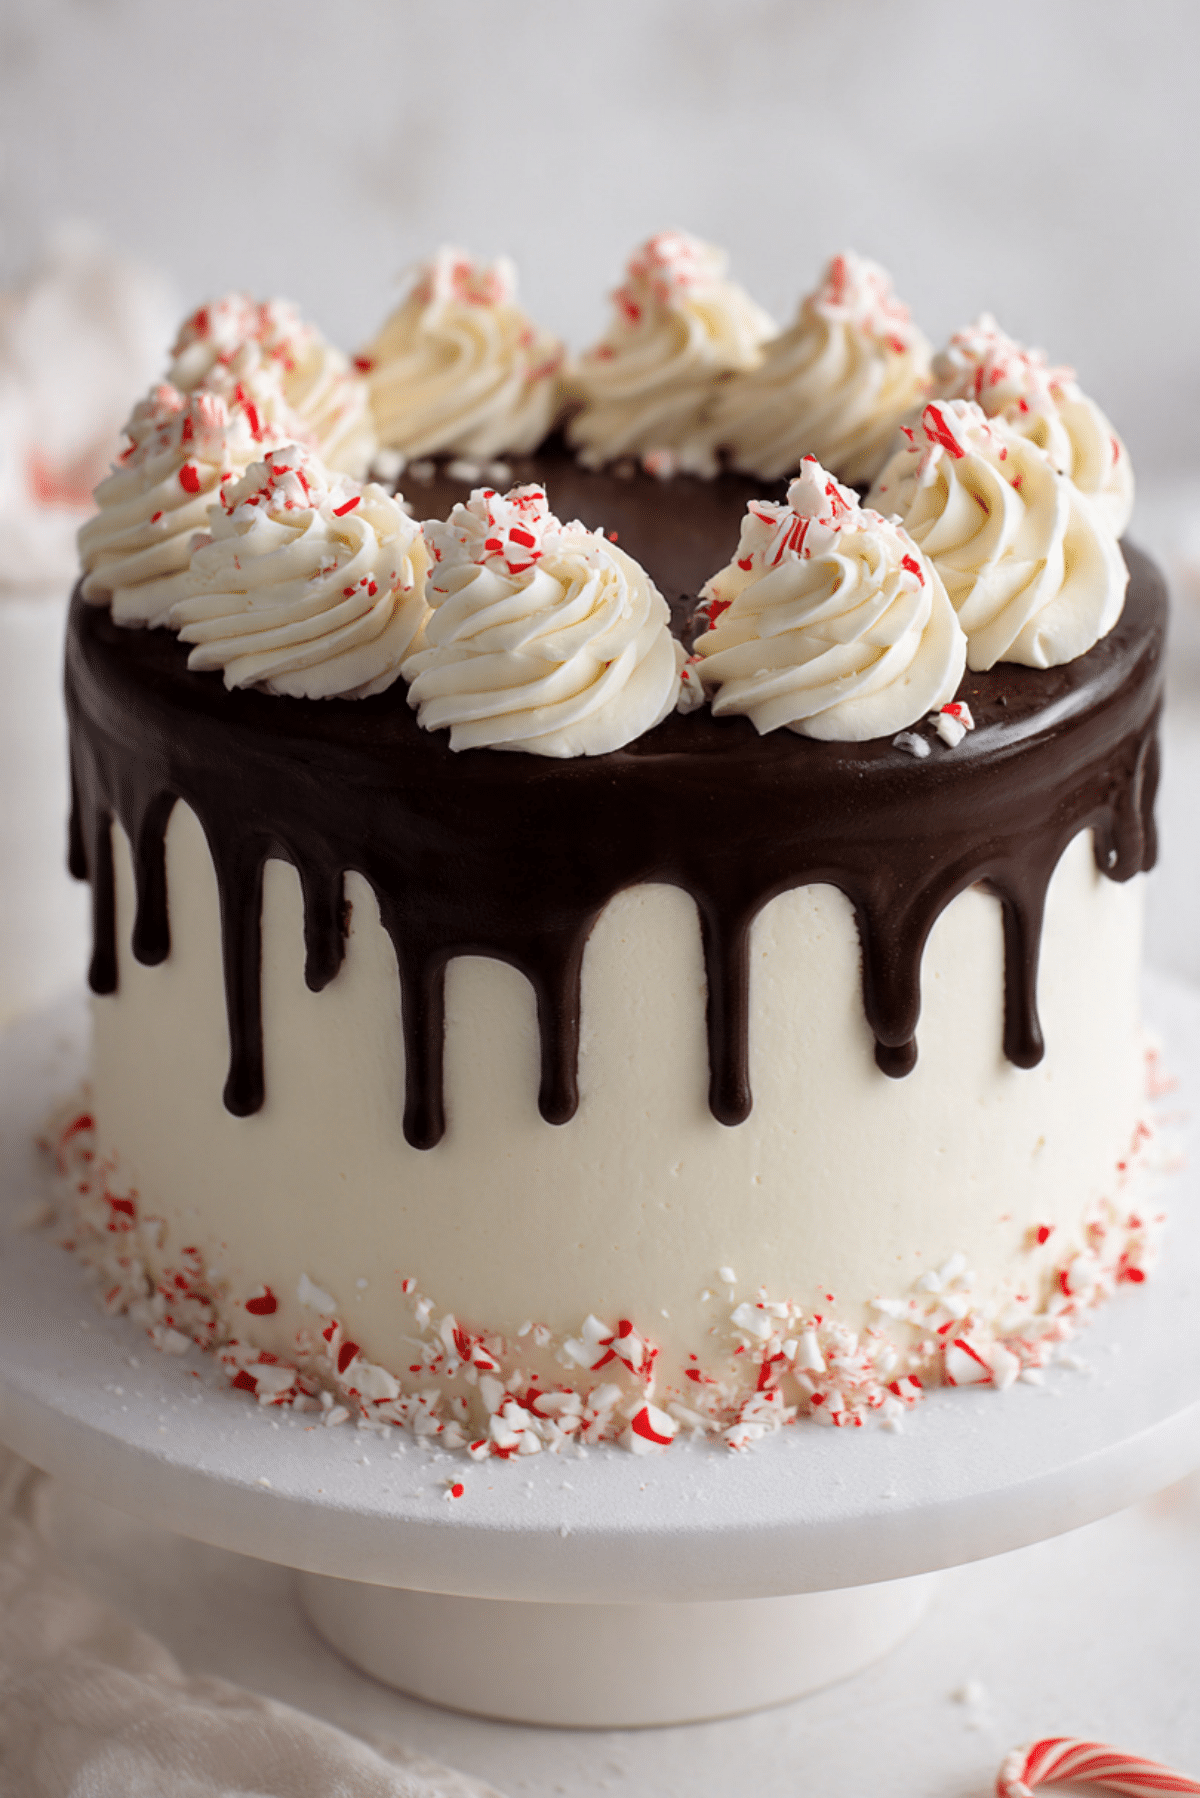
PrintPeppermint Bark Cake

A stunning holiday centerpiece featuring moist dark chocolate cake layers, cool peppermint buttercream, and a decadent dark chocolate ganache drip topped with crushed peppermint candies.
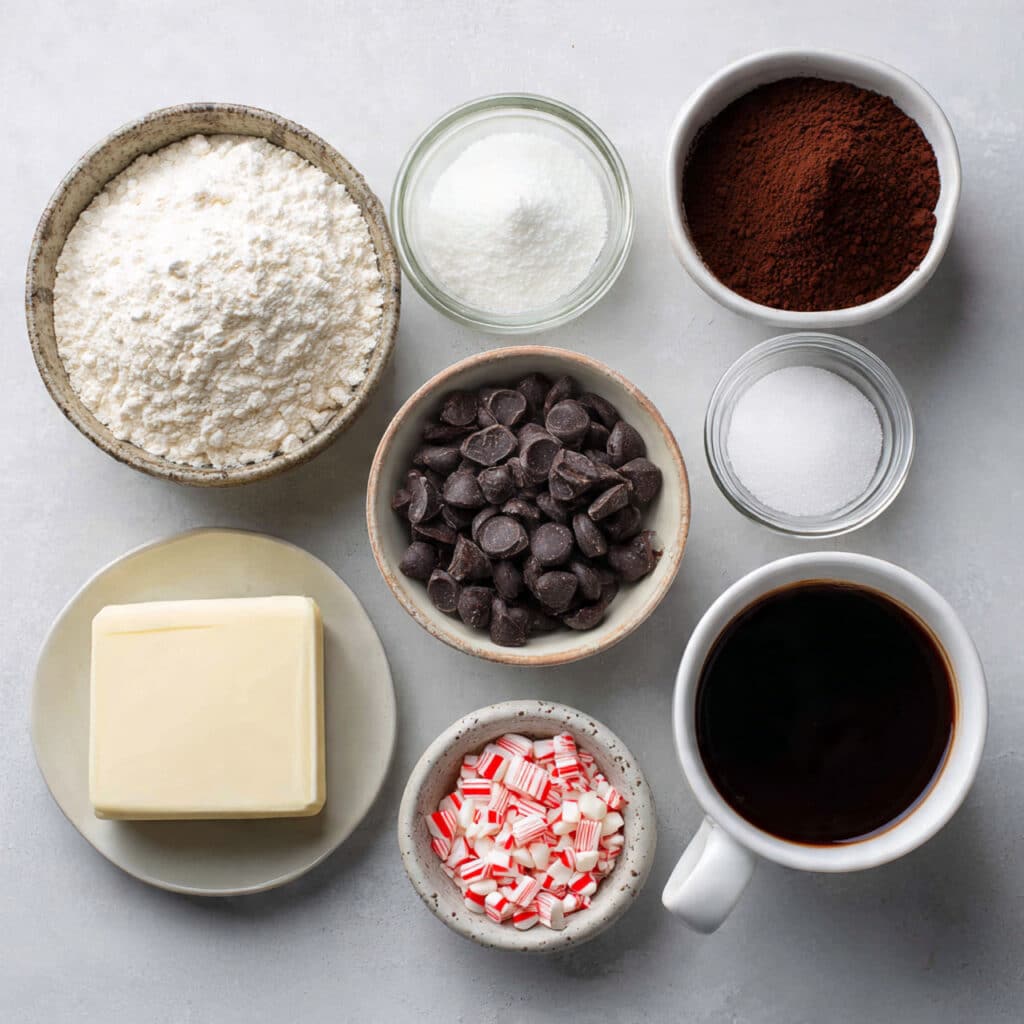
Ingredients
- All-Purpose Flour: 2 cups
- Granulated Sugar: 2 cups
- Unsweetened Cocoa Powder: 3/4 cup
- Baking Powder & Soda: 2 tsp each
- Large Eggs: 2
- Buttermilk: 1 cup
- Vegetable Oil: 1/2 cup
- Hot Coffee: 1 cup
- Unsalted Butter: 1.5 cups
- Powdered Sugar: 4 cups
- Peppermint Extract: 1.5 tsp
- Heavy Cream: 6 tbsp (divided)
- Semi-Sweet Chocolate Chips: 1/2 cup
- Crushed Peppermint Candies: 1/2 cup
Instructions
- Preheat oven to 350°F and prep two 8-inch cake pans.
- Whisk dry ingredients, then mix in eggs, buttermilk, and oil. Stir in hot coffee last.
- Bake for 30-35 minutes. Cool completely.
- Beat butter, powdered sugar, peppermint extract, and 3 tbsp cream into a fluffy frosting.
- Stack and frost cake layers, then chill for 30 minutes.
- Melt chocolate chips with remaining cream for ganache; drip over the edges of the chilled cake.
- Pipe buttercream swirls on top and garnish with crushed peppermint.
Notes
- Note: Chilling the cake before the ganache drip is essential for perfect, controlled drips.
- Use Dutch-processed cocoa for the darkest chocolate color.
- Add peppermint candies just before serving to prevent them from softening.