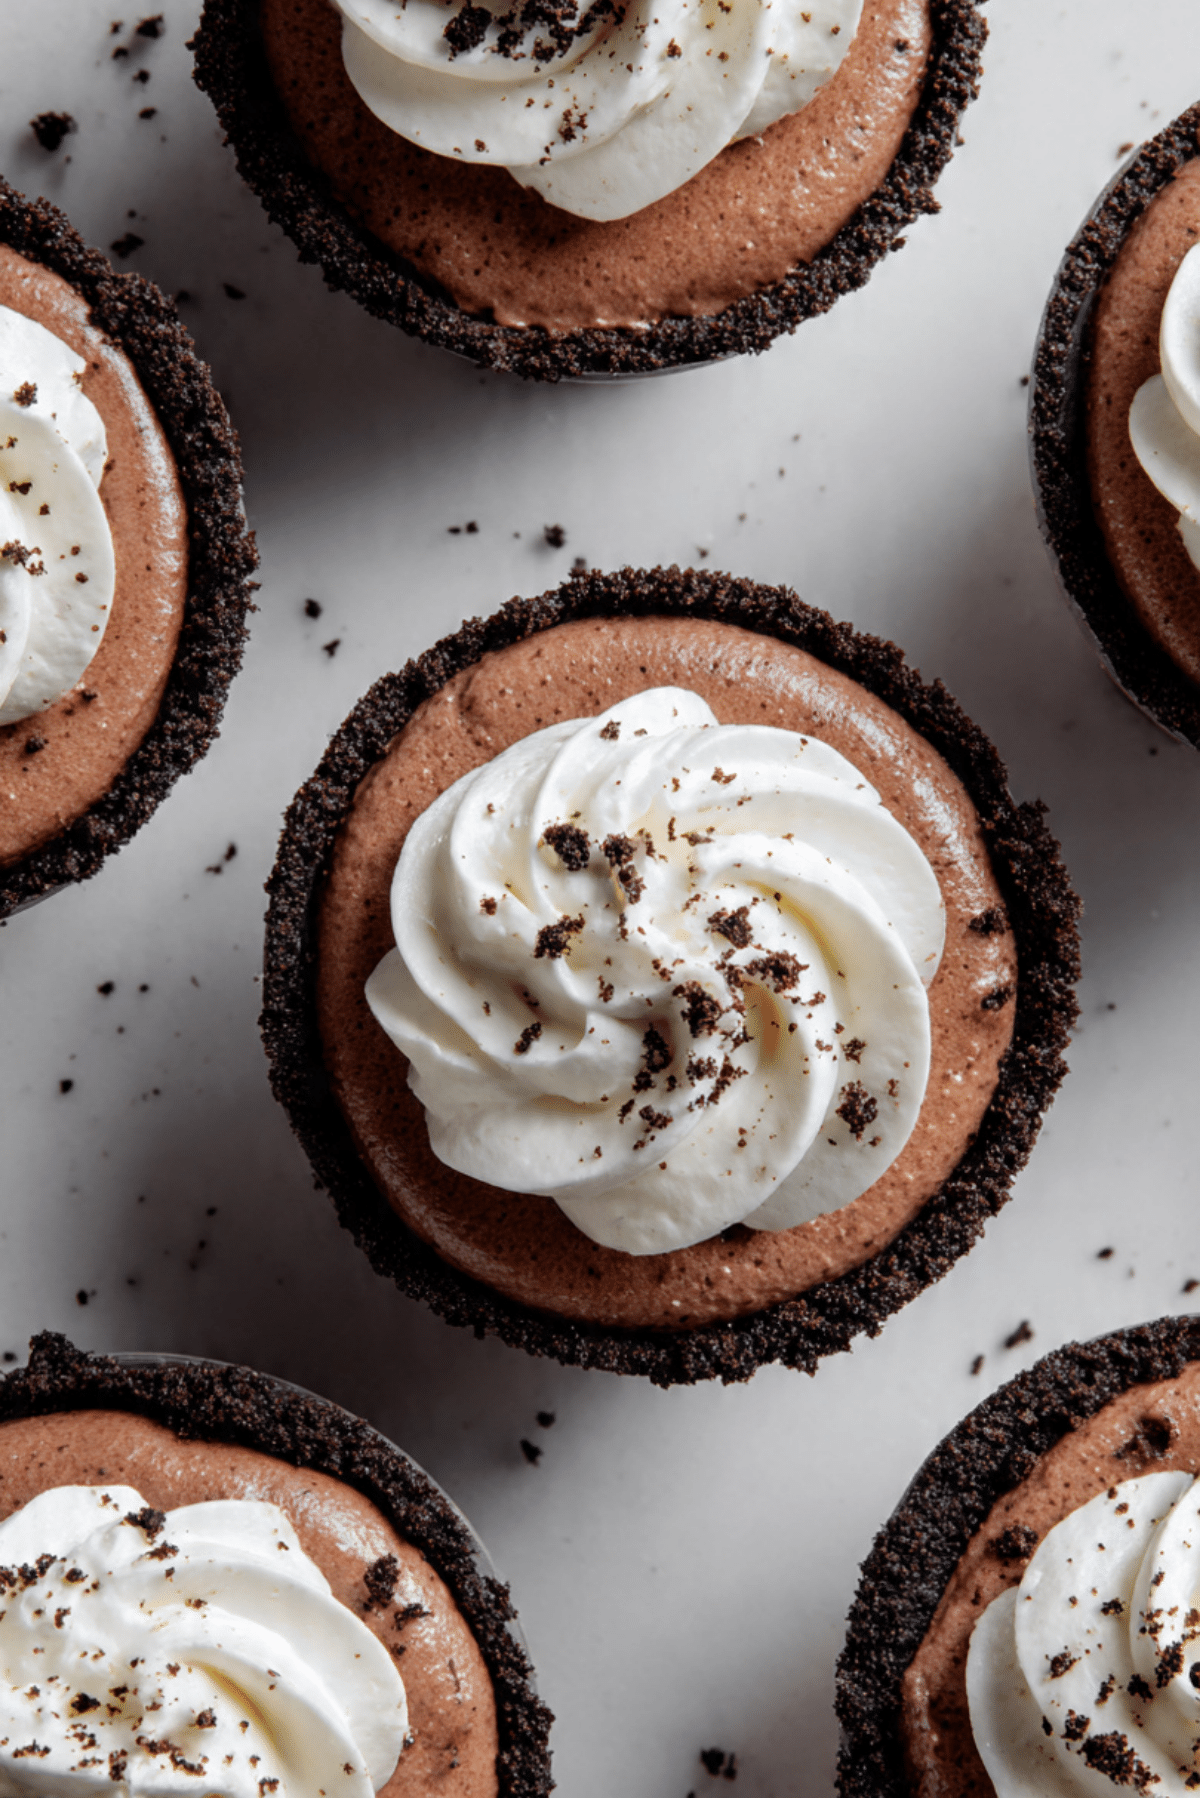
Nutella Crunch Dessert Shooters
There is something absolutely magical about the way chocolate and hazelnut dance together, especially when you introduce a bit of crunch into the mix. These Nutella Crunch Dessert Shooters are the ultimate crowd pleaser because they manage to be sophisticated and playful all at once. Whether you are hosting a fancy dinner party or just looking for a sweet treat to brighten your week, this one is a total game changer.
The Perfect Mini Treat for Any Occasion
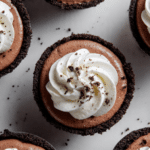
When it comes to dessert, bigger is not always better, and these tiny glasses prove that good things really do come in small packages. This recipe is designed to give you that hit of rich, decadent flavor in a perfectly portioned serving that leaves everyone reaching for just one more. The contrast between the dark, sandy cookie base and the cloud like mousse is pure heaven, and let me tell you, it is worth every bite.
A Sweet Tradition of Hazelnut and Cocoa
The combination of cocoa and roasted hazelnuts has roots that stretch back to Italy, where it was originally created as a way to make expensive cocoa last longer. Over the decades, this blend has become a global obsession, evolving into the creamy spread we all know and love today. These shooters take that classic flavor profile and elevate it into a layered masterpiece that feels both nostalgic and modern.
Why You Will Love These Dessert Shooters
You are going to find that these little cups are as reliable as they are delicious, making them a staple in your dessert repertoire.
Versatile: These work beautifully for everything from casual backyard barbecues to elegant wedding showers.
Budget-Friendly: You only need a handful of simple pantry staples to create a dessert that looks like it came from a high end bakery.
Quick and Easy: There is no baking required, which means you can whip these up without even turning on the oven.
Customizable: You can easily swap the cookie base or add different toppings to suit your personal taste.
Crowd-Pleasing: I have never met a person who can turn down the combination of Nutella and whipped cream.
Make-Ahead Friendly: These actually benefit from sitting in the fridge, so you can prep them well in advance.
Great for Leftovers: If you happen to have any left, they stay perfectly delicious in the fridge for a couple of days.
Pro Tips for the Perfect Mousse
Creating a mousse that is light yet stable is the secret to a great shooter, so keep these expert tricks in mind while you work.
The biggest tip I can give you is to ensure your heavy cream is ice cold before you start whipping it, as this helps it hold its shape much better. When you are folding the hazelnut spread into the cream, do it gently with a spatula to keep as much air in the mixture as possible. Also, don’t be afraid to press the cookie crumbs firmly into the bottom of the glass to create a solid foundation for your layers.
Essential Tools for Success
Having the right equipment on hand will make the assembly process much smoother and more enjoyable.
Mini Dessert Glasses: These provide the perfect vessel for showcasing those beautiful layers.
Electric Hand Mixer: Essential for getting that whipped cream to stiff peaks quickly and efficiently.
Piping Bags: Using a bag to fill the glasses ensures a clean look without smudging the sides of the containers.
Food Processor: This is the easiest way to turn your cookies into uniform, fine crumbs.
Ingredients You Will Need For Success
Every element of this dish works in harmony to create a balanced bite that is not too heavy but deeply satisfying.
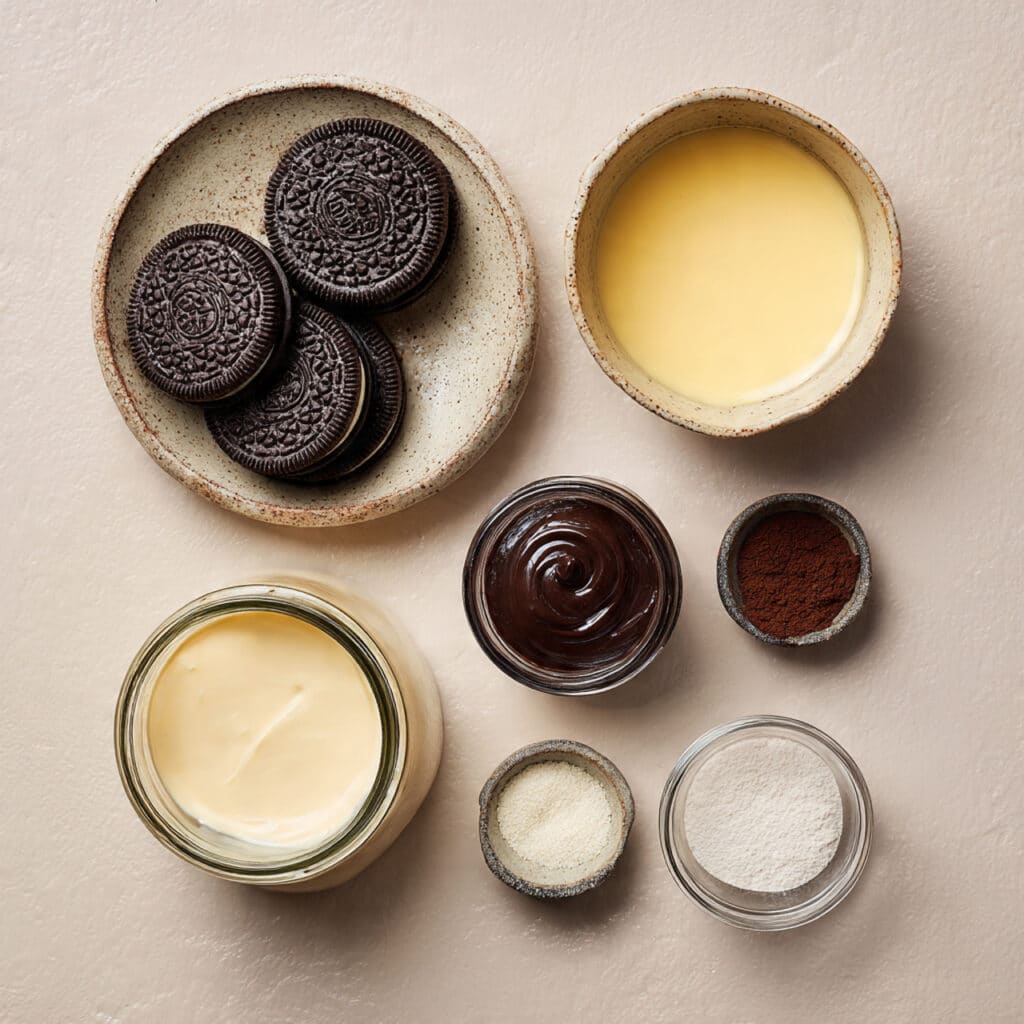
- Chocolate Sandwich Cookies: 15 cookies crushed into fine crumbs to create a dark and crunchy base.
- Unsalted Butter: 3 tablespoons melted to bind the crumbs together into a sturdy crust.
- Heavy Whipping Cream: 2 cups chilled to create the airy volume of the mousse and the topping.
- Hazelnut Chocolate Spread: 1 cup of smooth Nutella to provide that iconic rich flavor.
- Powdered Sugar: 3 tablespoons to lightly sweeten the whipped cream topping without making it grainy.
- Vanilla Extract: 1 teaspoon to enhance the floral notes of the cream and chocolate.
Flexible Ingredient Substitutions
If you find yourself missing an item, there are several ways to pivot while keeping the essence of the dish intact.
Chocolate Cookies: Graham crackers or vanilla wafers.
Nutella: Any brand of chocolate hazelnut spread or even a smooth almond butter for a different twist.
Heavy Cream: A stabilized whipped topping can work in a pinch, though the flavor will be different.
Spotlight on Our Star Ingredients
Hazelnut Chocolate Spread: This is the heart of the recipe, providing the creamy texture and the deep, nutty chocolate flavor that everyone recognizes.
Heavy Whipping Cream: This ingredient provides the structural integrity and the luxurious mouthfeel that transforms a simple spread into a gourmet mousse.
Let Us Start the Assembly Process
Rolling up your sleeves and layering these shooters is where the fun really begins, so let’s get into it. Trust me, you are going to love this process.
- Preheat Your Equipment: While there is no oven involved, make sure your mixing bowl and beaters are chilled in the freezer for ten minutes to help the cream whip better.
- Combine Ingredients: Pulse your chocolate cookies in a food processor until fine and then stir in the melted butter until it looks like wet sand.
- Prepare Your Cooking Vessel: Line up your mini dessert glasses on a flat tray so you can easily move them in and out of the refrigerator.
- Assemble the Dish: Spoon a tablespoon of the crumb mixture into each glass and press down firmly with the back of a small spoon or a dowel.
- Cook to Perfection: Whip the heavy cream until soft peaks form, then gently fold in the Nutella and vanilla until the color is uniform and the texture is fluffy.
- Finishing Touches: Pipe the mousse into the glasses, leaving room for a final dollop of plain sweetened whipped cream and a sprinkle of extra cookie crumbs on top.
- Serve and Enjoy: Let the shooters chill in the refrigerator for at least two hours to allow the flavors to meld and the mousse to set firmly.
Flavor and Texture Development
The magic here lies in the contrast between the gritty, buttery crust and the silkiness of the hazelnut cream. As the shooters sit in the fridge, the moisture from the mousse softens the crust just enough to make it easy to scoop, while the hazelnut flavor deepens and becomes more pronounced. The unsweetened cream on top cuts through the richness of the Nutella, ensuring every bite is perfectly balanced.
Helpful Cooking Tips and Tricks
- Use a small funnel or a piping bag with a large round tip to fill the glasses without making a mess on the rims.
- For an extra touch of decadence, toast some chopped hazelnuts and sprinkle them on top for added crunch.
- If you want a more intense chocolate flavor, add a teaspoon of cocoa powder to the cookie crust mixture.
What to Avoid for Best Results
- Do not overmix the mousse once you add the hazelnut spread, or you will lose all that lovely air and it will become dense.
- Avoid using room temperature cream, as it will struggle to reach the necessary volume and might turn into butter if overbeaten.
- Don’t skip the chilling time, as the mousse needs that cold environment to stabilize and hold its shape when you dive in with a spoon.
Nutritional Information
Servings: 12 shooters
Calories per serving: 285
Note: These are approximate values.
Timing Your Preparation
Prep Time: 20 minutes
Cook Time: 0 minutes
Total Time: 20 minutes
Make Ahead and Storage Tips
These are the perfect make ahead dessert because they actually taste better after a few hours of chilling. You can prepare the entire shooter up to 24 hours in advance, just be sure to cover the tray with plastic wrap to prevent them from picking up any fridge odors. They will stay fresh in the refrigerator for up to three days, though the cookie crust will gradually become softer the longer they sit.
Beautiful Ways to Serve
For a stunning presentation, serve these on a slate board or a silver tray to make the colors pop. You can also garnish each one with a whole hazelnut or a tiny mint leaf for a splash of green. Pairing these with a strong cup of coffee or a cold glass of milk creates a wonderful end to any meal.
Creative Leftover Transformations
If you have extra mousse that didn’t fit into the glasses, it makes an incredible dip for fresh strawberries or apple slices. You can also freeze any leftover shooters to create a semi-frozen treat that has the texture of a rich chocolate gelato.
Additional Advice for Success
Always taste your whipped cream before you finish to ensure the sweetness level is exactly where you want it. Remember that the hazelnut spread is already quite sweet, so you may want to adjust the powdered sugar in the topping accordingly.
Make It a Showstopper
To really wow your guests, try drizzling a little bit of warmed Nutella over the final whipped cream swirl. You can also use a star tip on your piping bag to create professional looking rosettes that give the dessert an expensive, artisanal feel.
Variations to Try
- Peanut Butter Twist: Swap the hazelnut spread for smooth peanut butter and use peanut butter cookies for the base.
- White Chocolate Raspberry: Use white chocolate spread and place a fresh raspberry at the bottom of each glass.
- Mocha Crunch: Add a teaspoon of espresso powder to the mousse for a sophisticated coffee kick.
- Salted Caramel: Drizzle a bit of salted caramel between the crust and the mousse layer.
FAQ’s
- Can I use a different type of cookie for the base?
Absolutely, any crunchy cookie like ginger snaps or shortbread will work beautifully. - How long do I need to whip the cream?
You want to reach stiff peaks, which usually takes about 3 to 5 minutes with a hand mixer on medium high speed. - Can I make this dairy free?
You can use a coconut based whipping cream and a dairy free chocolate hazelnut spread, though the texture may vary slightly. - What size glasses should I use?
Standard 2 or 3 ounce shot glasses or mini dessert cups are the ideal size for this recipe. - Is it okay to use a blender for the cookies?
Yes, a blender works just as well as a food processor to get those fine crumbs. - Can I freeze these?
While they are best refrigerated, they can be frozen for a firm, ice cream like texture. - Do I have to use a piping bag?
No, you can use a small spoon, but a piping bag is much faster and cleaner. - Can I add fruit?
Sliced bananas or strawberries are fantastic additions between the layers. - What if my mousse is too runny?
This usually happens if the cream wasn’t whipped enough or the Nutella was too warm; try chilling it for longer. - Can I use homemade hazelnut spread?
Yes, as long as it is processed until completely smooth to maintain the mousse texture.
Conclusion
These Nutella Crunch Dessert Shooters are a testament to the fact that simple ingredients can create something truly extraordinary. With their beautiful layers and irresistible flavor, they are guaranteed to be the highlight of your next gathering. I hope you enjoy making and eating these as much as I do. Now, grab your whisk and get started on this sweet journey!
PrintNutella Crunch Dessert Shooters
A decadent and creamy no-bake dessert featuring layers of buttery chocolate cookie crumbs, rich Nutella-infused mousse, and airy whipped cream.
Ingredients
- 15 Chocolate Sandwich Cookies
- 3 tablespoons Unsalted Butter, melted
- 2 cups Heavy Whipping Cream, chilled
- 1 cup Hazelnut Chocolate Spread (Nutella)
- 3 tablespoons Powdered Sugar
- 1 teaspoon Vanilla Extract
Instructions
- Pulse chocolate cookies in a food processor until fine crumbs form.
- Mix the cookie crumbs with melted butter and press a tablespoon into the bottom of each mini glass.
- In a chilled bowl, whip the heavy cream and vanilla until soft peaks form.
- Gently fold the hazelnut spread into half of the whipped cream until smooth and combined.
- Add powdered sugar to the remaining plain whipped cream and whip to stiff peaks.
- Pipe the Nutella mousse over the cookie base, then top with a swirl of the plain whipped cream.
- Garnish with extra cookie crumbs and chill for at least 2 hours before serving.
Notes
- Ensure the heavy cream is very cold for the best volume.
- Use a piping bag for clean, professional-looking layers.
- Chill the serving glasses beforehand to keep the dessert cool during assembly.