No-Bake Chocolate Cheesecake
If you are looking for a dessert that delivers maximum decadence with minimal effort, this is the one. This No-Bake Chocolate Cheesecake is a chocolate lover’s dream, featuring a buttery, dark cookie crust paired with a filling so silky it practically melts on your tongue. Trust me, you’re going to love this because it offers all the richness of a traditional cheesecake without the stress of water baths or cracked tops. Let me tell you, it’s worth every bite and is guaranteed to be the star of any dinner party.
The Joy of a Perfectly Set No-Bake Filling
The beauty of a no-bake dessert lies in its simplicity and the unique texture achieved through whipping rather than baking. By combining melted high-quality chocolate with airy cream and tangy cream cheese, you create a mousse-like consistency that is both light and incredibly deep in flavor. This one’s a total game-changer for those hot summer days when you want a gourmet dessert but cannot bear the thought of turning on the oven. It is the perfect balance of convenience and luxury.
A Decadent History of Chocolate and Cheese
While traditional baked cheesecakes date back to ancient Greece, the no-bake version gained massive popularity in the mid-20th century as home refrigeration became standard. Chocolate was a natural evolution for this chilled treat, merging the beloved flavors of chocolate ganache with the structured creaminess of American cheesecake. This specific recipe leans into the modern desire for bold, dark cocoa notes and a crumbly, cocoa-rich crust that provides the perfect textural contrast to the smooth interior.
Why You Will Fall in Love With This Recipe
This dessert is designed to impress your guests while keeping your time in the kitchen productive and stress-free.
Versatile: You can top this with anything from fresh raspberries and whipped cream to a drizzle of salted caramel or chopped hazelnuts.
Budget-Friendly: Despite its expensive taste, the ingredients are accessible and often found in a well-stocked pantry or local grocery store.
Quick and Easy: The active prep time is short, making it an ideal choice for busy schedules or last-minute celebrations.
Customizable: You can swap the dark chocolate for milk or white chocolate depending on your preferred level of sweetness.
Crowd-Pleasing: It is hard to find anyone who can resist the combination of a crunchy chocolate crust and a velvety chocolate filling.
Make-Ahead Friendly: This cheesecake actually tastes better after a night in the fridge, allowing you to get your prep done well in advance.
Great for Leftovers: Because it is stored in the refrigerator, it stays fresh and delicious for several days, making for a perfect midnight snack.
Pro Secrets for a Silky Finish
To achieve that professional, mirror-smooth texture, ensure your cream cheese is completely at room temperature before you begin mixing. This prevents lumps from forming when you incorporate the melted chocolate. Additionally, when melting your chocolate, let it cool for a few minutes before adding it to the cream cheese mixture so it doesn’t cause the fats to separate. Using a high-quality cocoa cookie for the crust will provide a much deeper flavor than standard graham crackers.
Essential Tools for Your Kitchen
Using the right tools ensures your cheesecake sets properly and releases beautifully for serving.
Springform Pan: This is non-negotiable for a cheesecake, as it allows you to remove the sides without damaging the delicate crust.
Electric Hand Mixer: This tool is essential for whipping the cream cheese and cream to the perfect, airy consistency.
Rubber Spatula: Perfect for folding in the melted chocolate and ensuring no streaks of white remain in the filling.
Small Saucepan: Used to gently melt the butter for the crust and the chocolate for the filling.
Offset Spatula: This helps you achieve that perfectly flat, professional-looking top before the cheesecake goes into the fridge.
Ingredients You Will Need For This Chocolate Delight
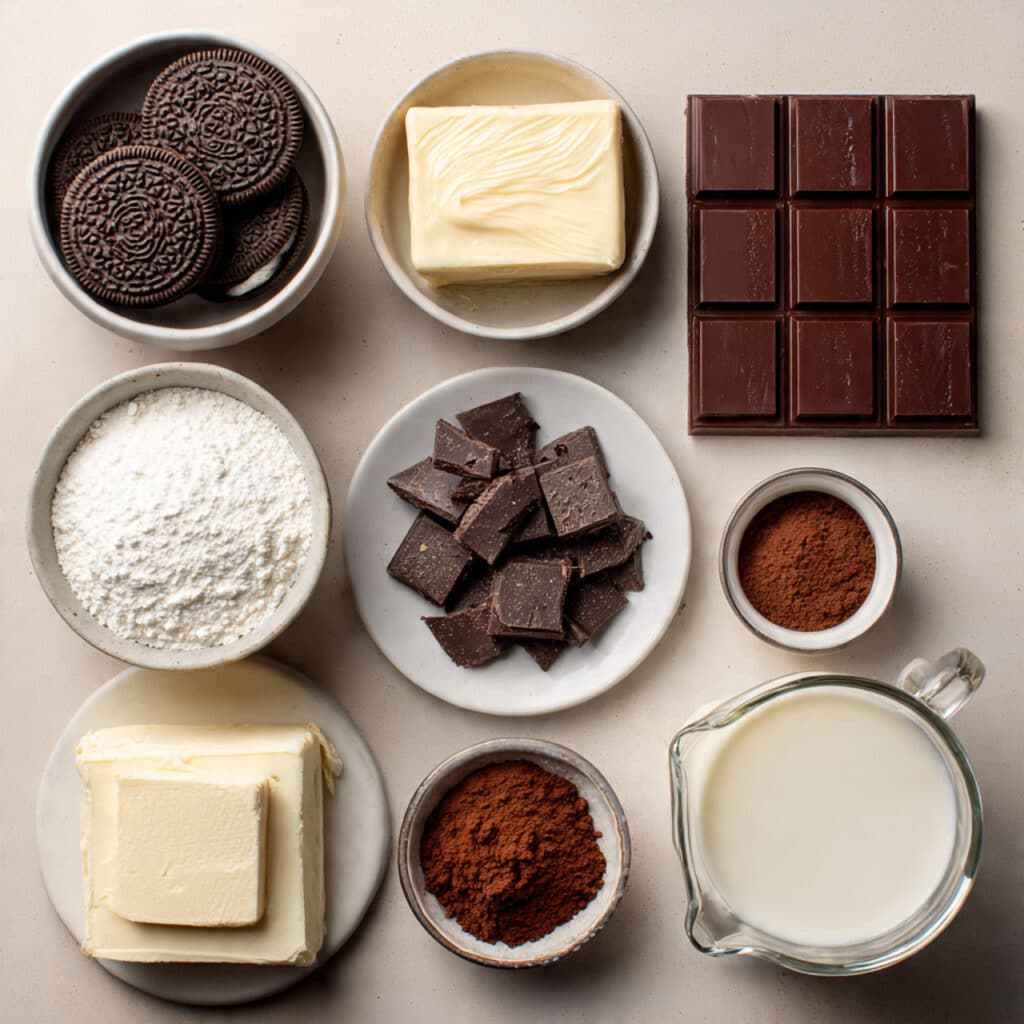
Each component is selected to create a harmonious balance of sweetness, tang, and intense chocolate flavor.
- Chocolate Sandwich Cookies: 24 cookies crushed into fine crumbs to form a sturdy and flavorful base.
- Unsalted Butter: 6 tablespoons melted to bind the cookie crumbs together into a crisp crust.
- Cream Cheese: 16 ounces (two blocks) softened to room temperature for the signature cheesecake tang and body.
- Powdered Sugar: 1 cup to provide sweetness and help stabilize the no-bake structure.
- Dark Chocolate: 8 ounces melted and cooled slightly to give the filling its rich, deep color and flavor.
- Cocoa Powder: 1/4 cup of unsweetened powder to intensify the chocolate notes throughout the filling.
- Heavy Cream: 1 and 1/2 cups whipped to stiff peaks to provide an airy, mousse-like texture.
- Vanilla Extract: 1 teaspoon to enhance the complexity of the chocolate and cream.
- Salt: a tiny pinch to balance the sugar and make the chocolate flavor pop.
Smart Ingredient Substitutions
If you are missing an ingredient, these alternatives will help you reach the finish line with great results.
Chocolate Sandwich Cookies: You can use chocolate graham crackers or even digestive biscuits mixed with two tablespoons of cocoa powder.
Dark Chocolate: Semi-sweet chocolate chips work beautifully if you prefer a slightly sweeter profile.
Heavy Cream: In a pinch, a pre-whipped topping can be used, though the final texture will be much lighter and sweeter.
Powdered Sugar: If you only have granulated sugar, pulse it in a blender until it reaches a powdery consistency to avoid a grainy filling.
Spotlight on Key Ingredients
Dark Chocolate: This is the heart of the recipe, providing the structural stability and the intense cocoa flavor that defines the dish.
Cream Cheese: The foundation of the cheesecake, providing the necessary tanginess to balance the rich chocolate and sugar.
Step Into the Kitchen
Follow these steps to create a showstopping dessert that requires no heat and minimal effort.
- Preheat Your Equipment: There is no oven needed here, but make sure your springform pan is clean and ready, and your mixing bowls are chilled for the cream.
- Combine Ingredients: Stir the crushed cookies and melted butter together until the mixture looks like wet sand, then press firmly into the bottom and up the sides of your pan.
- Prepare Your Cooking Vessel: Place the crust in the freezer to set while you prepare the filling, ensuring it stays together when the cheesecake is sliced.
- Assemble the Dish: Beat the cream cheese and sugar until smooth, then fold in the melted chocolate, cocoa powder, and vanilla before gently folding in the whipped heavy cream.
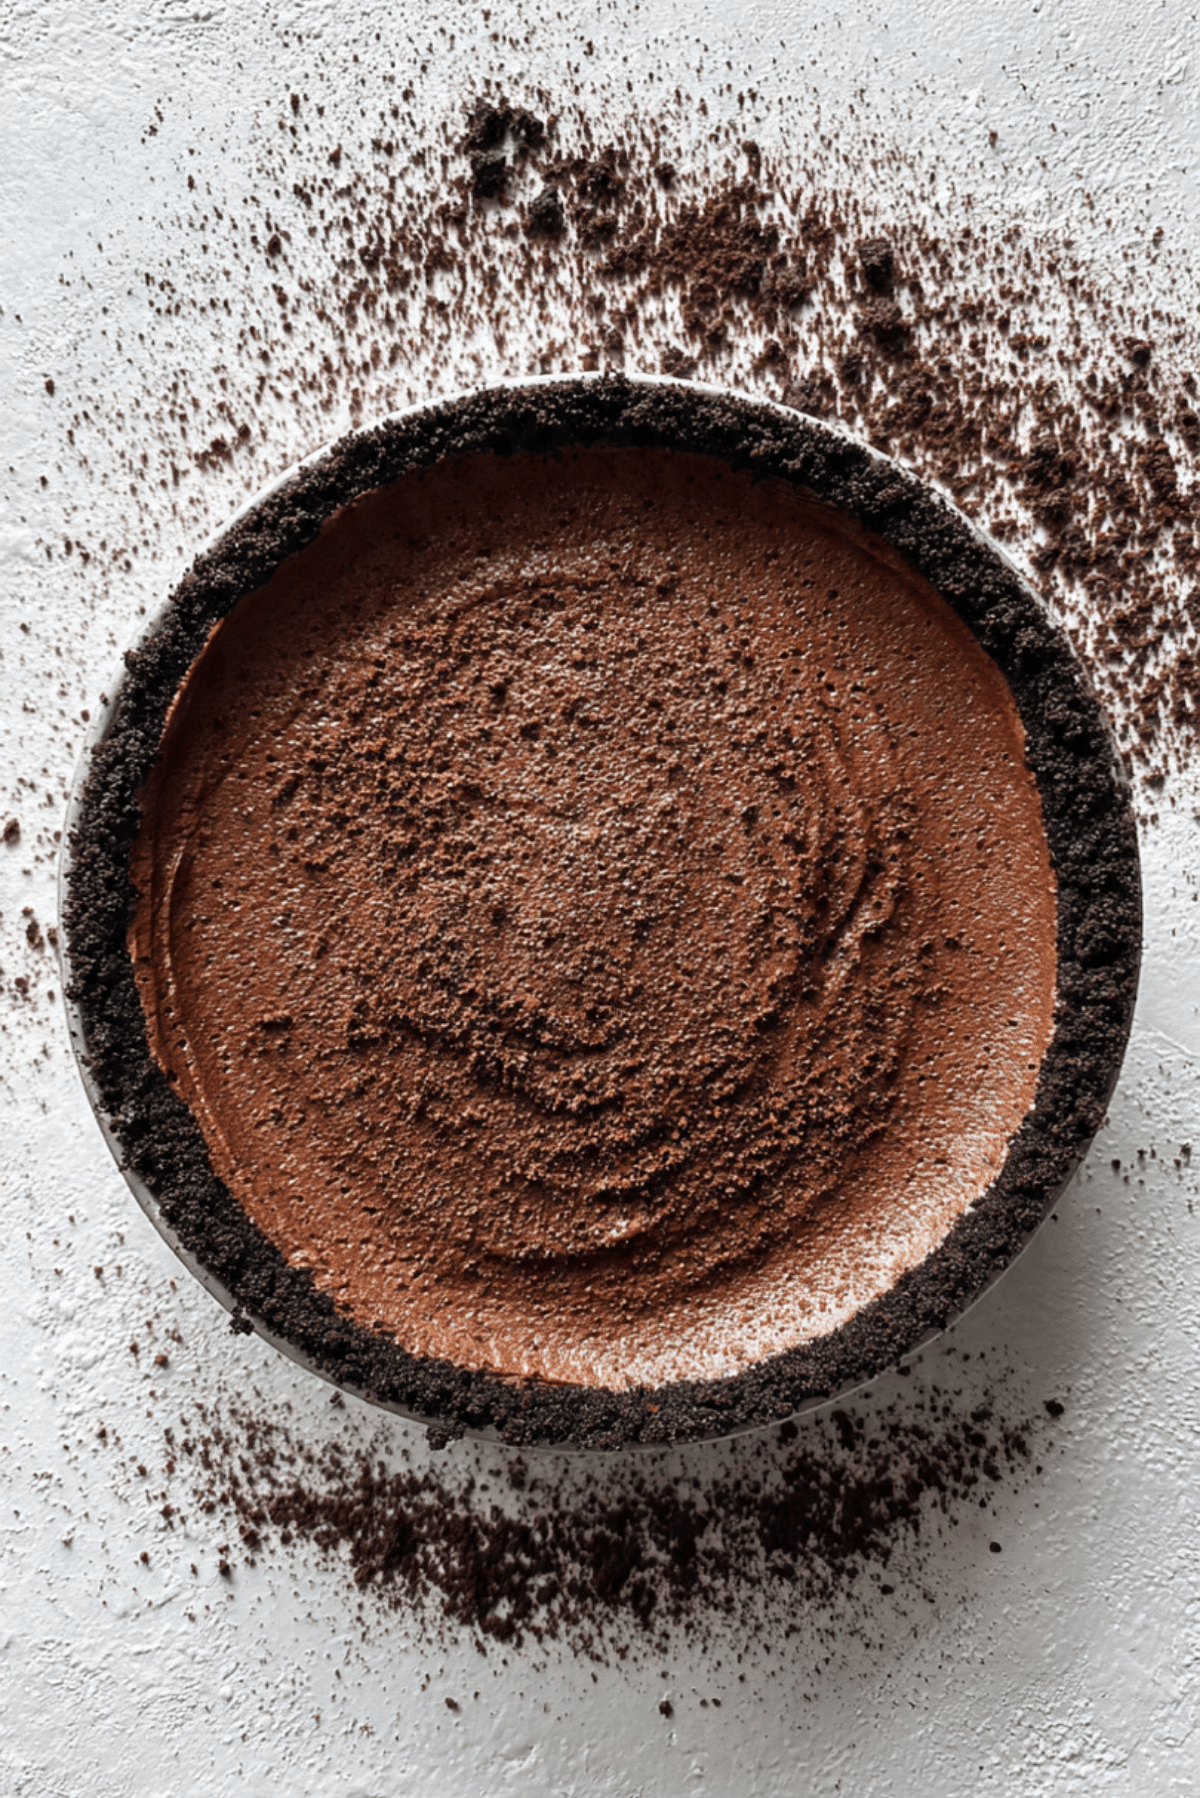
- Cook to Perfection: Pour the silky mixture over the set crust and use an offset spatula to smooth the top into an even, beautiful layer.
- Finishing Touches: Cover and refrigerate for at least six hours, or ideally overnight, to allow the filling to set into a firm, sliceable consistency.
- Serve and Enjoy: Run a warm knife around the edge of the pan before releasing the springform, then slice and serve with your favorite chocolate garnishes.
A Symphony of Texture and Flavor
The first thing you will experience is the satisfying crunch of the dark cookie crust, which gives way to the incredibly dense and silky chocolate filling. The flavor is a sophisticated journey from the initial tang of the cream cheese to a lingering, deep cocoa finish. It is not overly sweet, which allows the quality of the chocolate to shine through and makes it feel like a truly high-end indulgence.
Helpful Cooking Tips and Tricks
- Freeze the crust for at least 15 minutes before adding the filling to prevent the crumbs from mixing into the chocolate.
- Use a warm, slightly damp knife to get those perfectly clean, professional-looking slices.
- Whip the heavy cream in a chilled bowl to get the best volume and stability for the filling.
What to Avoid for Best Results
- Cold Cream Cheese: This will result in a lumpy filling that is impossible to smooth out.
- Hot Chocolate: If the melted chocolate is too hot, it will deflate the whipped cream and prevent the cheesecake from setting.
- Rushing the Set: If you cut the cheesecake too early, it will be more like a pudding than a firm cake.
Nutrition Facts
Servings: 12 slices
Calories per serving: 420
Note: These are approximate values.
Preparation Time
Prep Time: 30 minutes
Chill Time: 6 hours
Total Time: 6 hours 30 minutes
Storage and Freshness Advice
Keep your cheesecake in the refrigerator at all times when not serving. It will stay fresh and hold its texture for up to five days if kept covered. For longer storage, you can freeze individual slices for up to a month, allowing them to thaw in the fridge for an hour before enjoying.
How to Serve
This cheesecake is stunning on its own, but it truly shines when garnished with fresh seasonal berries or a dusting of extra cocoa powder. For a more dramatic presentation, add some chocolate shavings or a few whole chocolate cookies to the top before serving.
Creative Leftover Transformations
If you have a slice or two left, you can blend them into a thick, ultra-rich cheesecake milkshake. Alternatively, you can scoop small portions of the chilled filling and roll them in cocoa powder to create decadent “cheesecake truffles.”
Additional Flavor Tips
For a hint of coffee flavor that makes the chocolate taste even deeper, add a teaspoon of instant espresso powder to the cream cheese mixture. It won’t make the cake taste like coffee, but it will amplify the richness of the cocoa significantly.
Make It a Showstopper
To make this look like it came from a professional bakery, use a piping bag to add swirls of whipped cream around the border of the cake. Place a small chocolate curl or a fresh mint leaf on each swirl for a pop of color and an elegant finish.
Variations to Try
- Peanut Butter Swirl: Swirl in 1/4 cup of creamy peanut butter into the filling before setting.
- Mocha Cheesecake: Add two teaspoons of espresso powder and use coffee-flavored cookies for the crust.
- Mint Chocolate: Add 1/2 teaspoon of peppermint extract and use mint chocolate cookies for the base.
- Triple Chocolate: Use white chocolate chips and milk chocolate shavings as a garnish on top of the dark chocolate filling.
FAQ’s
- Can I make this without a springform pan? You can use a regular pie dish, though it will be harder to get clean slices out.
- Why didn’t my cheesecake set? This usually happens if the heavy cream wasn’t whipped to stiff peaks or if the cream cheese was too watery.
- Can I use low-fat cream cheese? I don’t recommend it, as the fat content is necessary for the cheesecake to set firmly without baking.
- How do I get the crust to not crumble? Make sure you press it very firmly into the pan and don’t skimp on the melted butter.
- Can I use chocolate chips? Yes, semi-sweet or dark chocolate chips work perfectly for melting.
- Do I need to add gelatin? No, the chocolate and the whipped cream provide enough structure for this recipe to set on its own.
- How long does it need to chill? At least six hours, but overnight is always best for the most stable texture.
- Can I make this vegan? You would need to use specific plant-based cream cheese and heavy cream alternatives, which may alter the setting time.
- What cookies are best for the crust? Any chocolate sandwich cookie or chocolate-flavored wafer will work beautifully.
- Is the vanilla extract necessary? It helps round out the flavors, but the cheesecake will still be delicious without it.
Conclusion
Creating a No-Bake Chocolate Cheesecake is a wonderful way to treat yourself and your loved ones to a gourmet experience without the complexity of traditional baking. The result is a dessert that is as beautiful to look at as it is delicious to eat. So gather your ingredients, clear some space in the fridge, and get ready to enjoy the smoothest, richest chocolate treat you have ever made!
PrintNo-Bake Chocolate Cheesecake
An ultra-rich and silky smooth chocolate cheesecake featuring a crunchy dark cookie crust and a mousse-like filling, made entirely without the oven.
Ingredients
- 24 Chocolate Sandwich Cookies, crushed
- 6 tablespoons Unsalted Butter, melted
- 16 ounces Cream Cheese, softened
- 1 cup Powdered Sugar
- 8 ounces Dark Chocolate, melted and cooled
- 1/4 cup Cocoa Powder, unsweetened
- 1 and 1/2 cups Heavy Cream
- 1 teaspoon Vanilla Extract
- 1 pinch Salt
Instructions
- Mix crushed cookies and melted butter, then press firmly into a 9-inch springform pan and freeze for 15 minutes.
- In a large bowl, beat room temperature cream cheese and powdered sugar until completely smooth.
- Gently fold in the melted and cooled dark chocolate, cocoa powder, vanilla, and salt.
- In a separate chilled bowl, whip heavy cream to stiff peaks.
- Gently fold the whipped cream into the chocolate mixture until no white streaks remain.
- Pour the filling over the prepared crust and smooth the top with a spatula.
- Refrigerate for at least 6 hours or overnight until firm.
- Release from the springform pan and serve chilled.
Notes
- Ensure cream cheese is at room temperature to avoid lumps in the filling.
- Allow melted chocolate to cool slightly so it doesn’t deflate the whipped cream.
- Use a warm knife for clean slices.