Mom’s Easy Fudge Recipe
Some recipes instantly take you back, and this fudge is one of those. Smooth, rich, and perfectly chocolatey, it is the kind of treat that feels like it came straight from the family kitchen. One bite melts softly on your tongue, and suddenly you understand why this recipe has been passed down with so much love. Trust me, you’re going to love this one.
Why This Fudge Is So Loved
This fudge is simple, reliable, and deeply satisfying. There is no complicated technique or fancy equipment, just classic ingredients coming together into something magical. It is perfect for holidays, gift boxes, or those moments when you need a little comfort.
The Story Behind This Classic Treat
Fudge has long been a staple in home kitchens, especially when cooks wanted something sweet without spending hours baking. This version reflects that tradition, easy, rich, and made to be shared. It is the kind of recipe that gets scribbled on recipe cards and guarded closely.
What Makes This Recipe a Keeper
Before we get started, let’s talk about why this fudge stands the test of time.
Versatile: Works for holidays, parties, or simple sweet cravings.
Budget-Friendly: Uses everyday pantry ingredients.
Quick and Easy: No baking required and minimal prep.
Customizable: Easy to add flavors or textures.
Crowd-Pleasing: Smooth chocolate flavor that everyone loves.
Make-Ahead Friendly: Perfect for preparing days in advance.
Great for Leftovers: Stores beautifully and tastes just as good later.
Helpful Candy-Making Tips
Now let’s ease into a few tips that make the process foolproof.
- Use low, steady heat to avoid scorching.
- Stir gently and consistently for smooth texture.
- Line your pan for easy removal.
- Let the fudge set fully before cutting.
Tools You Will Need
Keeping things simple is part of the charm.
Saucepan: Heavy-bottomed for even heating.
Wooden Spoon or Spatula: For gentle stirring.
Square Pan: An 8×8 inch pan works perfectly.
Parchment Paper: Makes lifting and slicing easy.
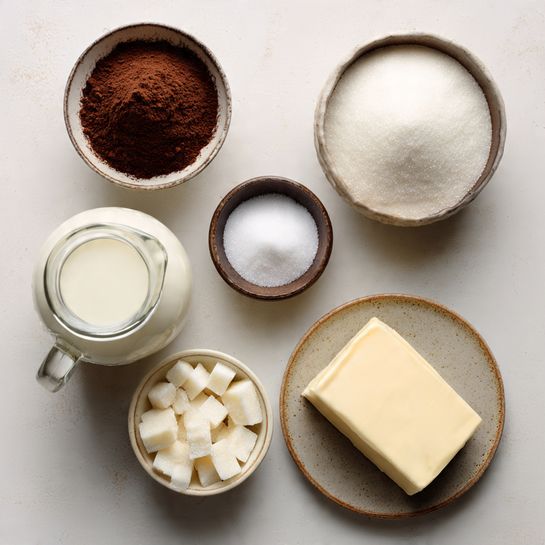
Ingredients You Will Need
Each ingredient plays a key role in creating that signature creamy texture.
- Granulated Sugar: 2 cups, providing sweetness and structure.
- Unsweetened Cocoa Powder: ½ cup, delivering deep chocolate flavor.
- Milk: 1 cup, creating a smooth base.
- Unsalted Butter: ½ cup, adding richness and shine.
- Vanilla Extract: 1 teaspoon, enhancing the chocolate notes.
- Salt: ¼ teaspoon, balancing sweetness.
Easy Ingredient Substitutions
This recipe is flexible and forgiving.
Milk: Dairy-free milk alternatives work well.
Vanilla Extract: Almond extract for a different flavor note.
Key Ingredients Worth Highlighting
A couple of ingredients really define this fudge.
Cocoa Powder: Gives a bold chocolate taste without heaviness.
Butter: Creates that smooth, melt-in-your-mouth finish.
Let’s Make the Fudge
Now comes the fun part. Take your time and enjoy the process.
- Preheat Your Equipment: Line an 8×8 inch pan with parchment paper.
- Combine Ingredients: In a saucepan, mix sugar, cocoa powder, and salt.
- Prepare Your Cooking Vessel: Add milk and butter to the saucepan.
- Assemble the Dish: Place over medium heat and stir until melted and smooth.
- Cook to Perfection: Bring to a gentle simmer, stirring until thickened.
- Finishing Touches: Remove from heat and stir in vanilla extract.
- Serve and Enjoy: Pour into the prepared pan, cool completely, then slice.
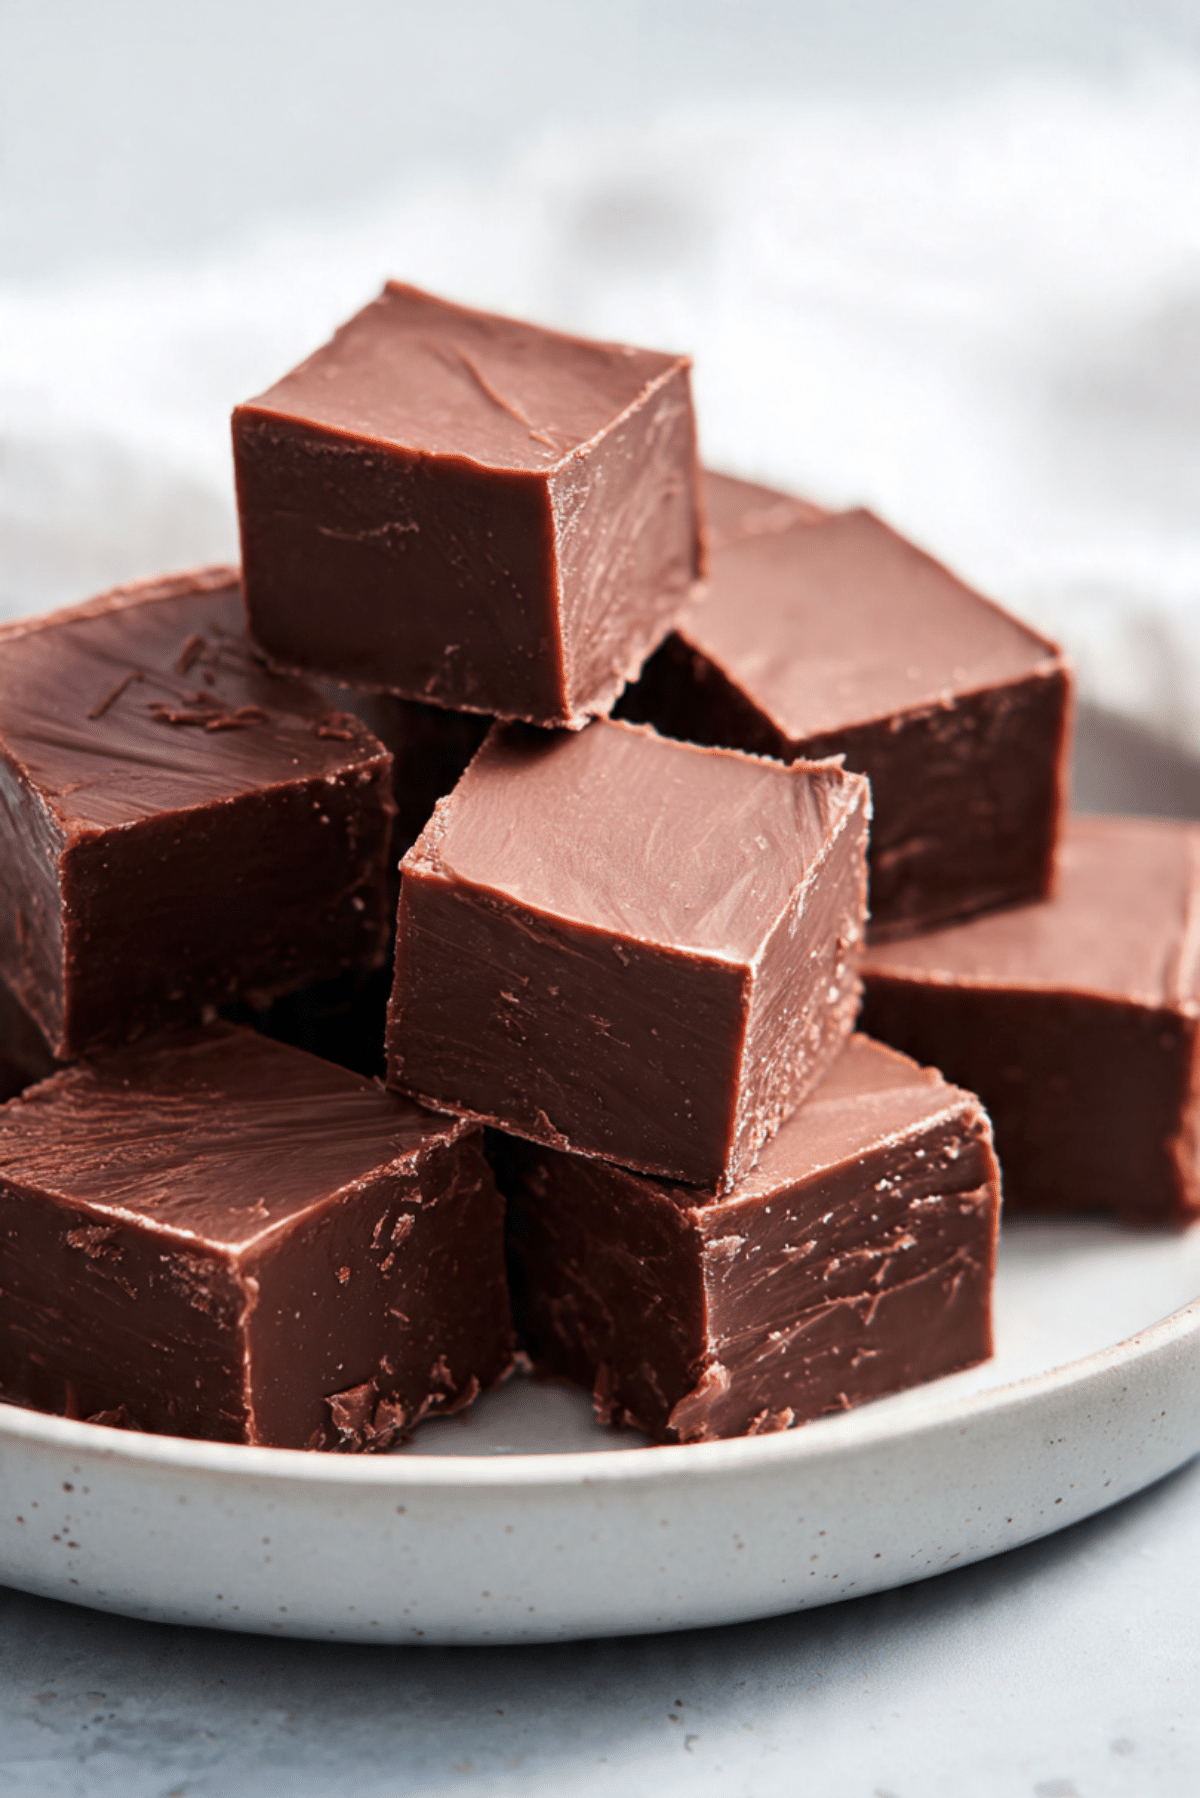
Texture and Flavor Development
As the fudge cools, it firms up into a smooth, dense square with a creamy bite. The cocoa brings deep chocolate flavor while the butter softens the sweetness, creating balance in every piece.
Helpful Tips for Success
A few final pointers to keep things perfect.
- Do not rush the cooling process.
- Use a sharp knife for clean cuts.
- Store in a cool place for best texture.
What to Avoid When Making Fudge
Here are common mistakes and how to avoid them.
- Cooking over high heat, which can cause graininess.
- Skipping stirring, which may lead to uneven texture.
- Cutting before fully set.
Nutrition Facts
Servings: 16
Calories per serving: Approximately 180
Note: These values are approximate.
Time Overview
Prep Time: 10 minutes
Cook Time: 15 minutes
Total Time: 25 minutes plus cooling
Make-Ahead and Storage Tips
This fudge can be made several days ahead and stored in an airtight container at room temperature or in the refrigerator. It also freezes well for longer storage. Simply thaw before serving.
How to Serve This Fudge
Serve as a dessert square, add it to a cookie platter, or wrap pieces for gifting. It pairs beautifully with coffee or tea.
Creative Leftover Ideas
Leftover fudge can be chopped and folded into ice cream, layered into parfaits, or used as a topping for other desserts. Let me tell you, it is worth every bite.
Extra Tips for Best Results
Use good-quality cocoa powder for the richest flavor. Patience during cooling makes all the difference.
Make It Look Extra Special
Cut into neat squares and arrange on a simple platter. A clean presentation lets the glossy surface shine.
Variations to Try
- Add chopped nuts for texture.
- Swirl in peanut butter.
- Sprinkle flaky salt on top.
- Add a hint of espresso powder.
FAQ’s
1. Can I make this without a thermometer?
Yes, this recipe does not require one.
2. Why is my fudge grainy?
High heat or overcooking can cause this.
3. Can I double the recipe?
Yes, use a larger pan.
4. Does this fudge freeze well?
Yes, wrap tightly before freezing.
5. How long does it last?
Up to two weeks when stored properly.
6. Can I add mix-ins?
Yes, stir them in before pouring into the pan.
7. Is this recipe kid-friendly?
Absolutely, it is simple and safe with supervision.
8. Can I reduce the sugar?
Slight reductions are possible but affect texture.
9. Why didn’t my fudge set?
It may need more cooling time.
10. Can I use a different pan size?
Yes, thickness will vary.
Conclusion
This easy fudge recipe is a total game-changer. Rich, smooth, and full of nostalgic comfort, it is the kind of treat that brings people together. Make a batch, share it with someone you love, and enjoy every creamy bite.
PrintMom’s Easy Fudge Recipe
A rich, smooth chocolate fudge that comes together easily on the stovetop, delivering classic homemade flavor with a creamy, melt-in-your-mouth texture.
- Prep Time: 10 minutes
- Cook Time: 15 minutes
- Total Time: 25 minutes
- Yield: 16 pieces
- Category: Dessert
- Method: Stovetop
- Cuisine: American
- Diet: Vegetarian
Ingredients
- Granulated sugar, 2 cups
- Unsweetened cocoa powder, 1/2 cup
- Milk, 1 cup
- Unsalted butter, 1/2 cup
- Vanilla extract, 1 teaspoon
- Salt, 1/4 teaspoon
Instructions
- Line an 8×8 inch pan with parchment paper and set aside.
- In a saucepan, combine granulated sugar, cocoa powder, and salt.
- Add milk and butter to the saucepan and place over medium heat.
- Stir gently until the butter melts and the mixture becomes smooth.
- Bring to a gentle simmer and continue cooking, stirring, until slightly thickened.
- Remove from heat and stir in vanilla extract.
- Pour the mixture into the prepared pan and let cool completely before slicing.
Notes
- Use low to medium heat to avoid burning.
- Allow the fudge to fully set before cutting.
- Store in an airtight container for best texture.
Nutrition
- Serving Size: 1 piece
- Calories: 180
- Sugar: 22g
- Sodium: 45mg
- Fat: 9g
- Saturated Fat: 5g
- Unsaturated Fat: 3g
- Trans Fat: 0g
- Carbohydrates: 26g
- Fiber: 2g
- Protein: 2g
- Cholesterol: 20mg