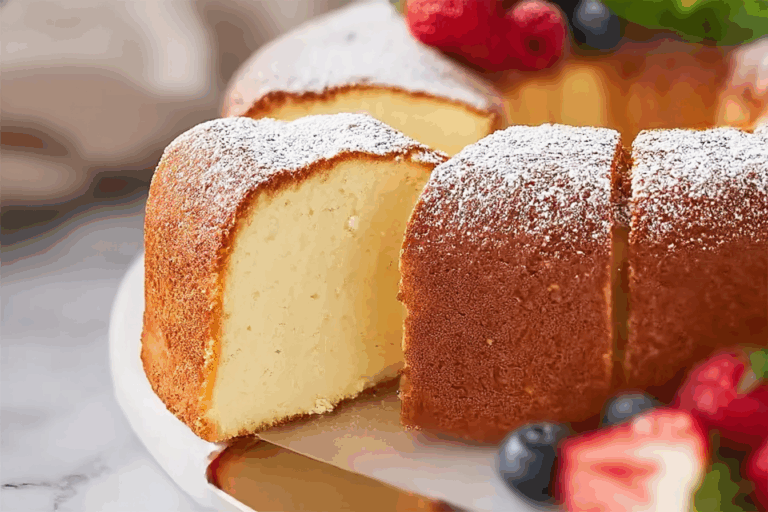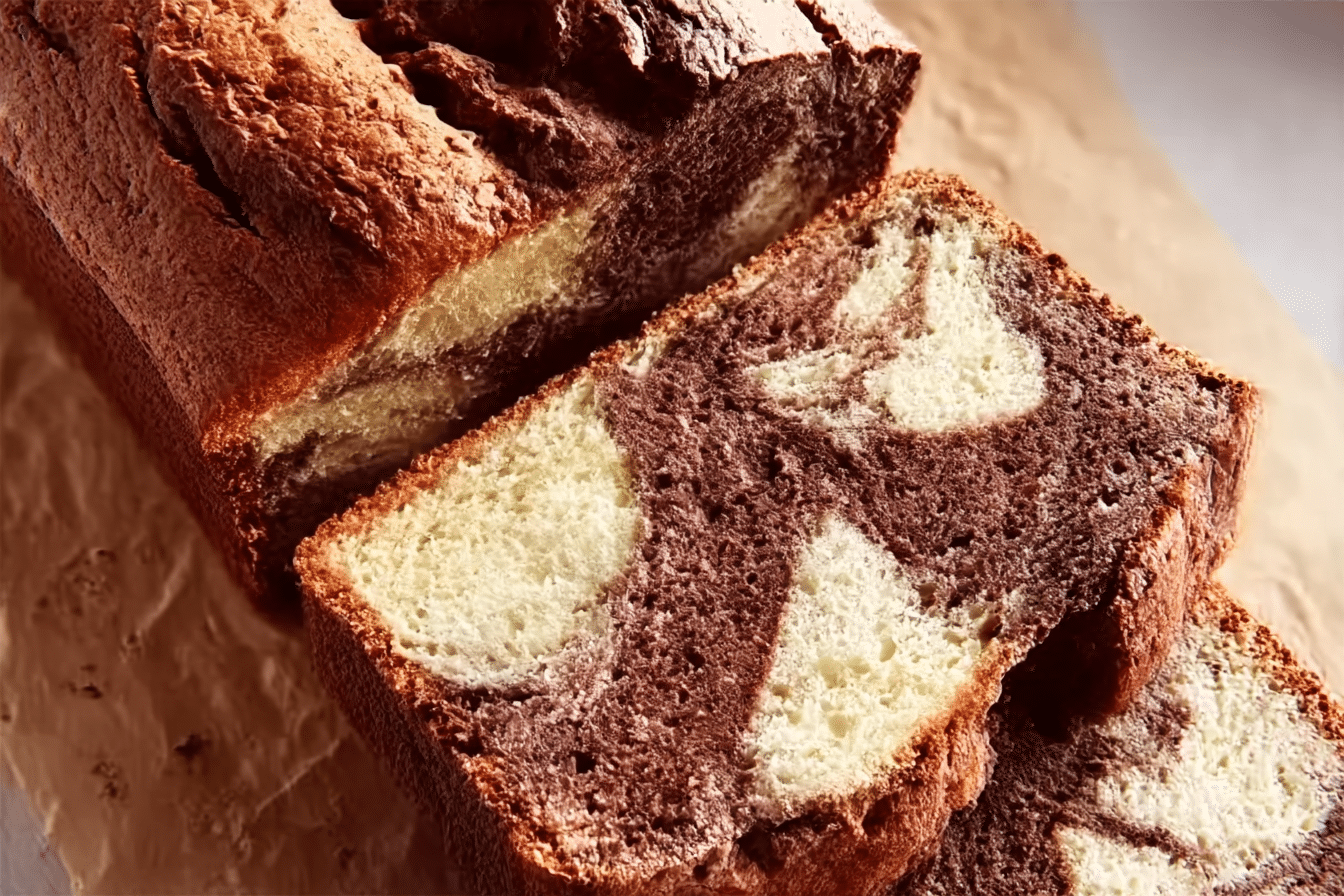
Marble Loaf Cake
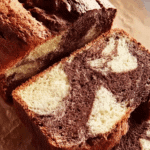
There’s something undeniably comforting about a slice of marble loaf cake—the way the swirls of chocolate and vanilla dance together, both visually and on your taste buds, is like edible art. The outer crust is golden and slightly crisp, giving way to a moist, tender crumb that melts in your mouth. Each bite is a delightful blend of cocoa richness and buttery vanilla, creating a harmony that feels like a warm hug in cake form. Whether served alongside your morning coffee or as a late-night indulgence, this classic treat never goes out of style.
Behind the Recipe
This marble loaf cake was born from a moment of sweet indecision. Chocolate or vanilla? Why not both! I remember my grandmother’s old marbled bundt cake, always slightly different each time but consistently delicious. As a kid, I was mesmerized watching her swirl the batters with a butter knife, transforming two simple flavors into a masterpiece. Now, I recreate that same magic in this loaf version—perfect for slicing, sharing, or secretly devouring all on your own.
Recipe Origin or Trivia
Marble cake traces its roots back to 19th-century Germany, where bakers combined light and dark batters to mimic the appearance of marble stone. When German immigrants brought the recipe to America, it evolved with the addition of chocolate. Traditionally, the dark swirl was made with molasses or spices, but modern versions embrace cocoa for its decadent flavor. This cake became especially popular in Jewish-American communities, often served at celebrations and holidays.
Why You’ll Love Marble Loaf Cake
This cake isn’t just visually stunning—it’s a flavor-packed experience that checks all the right boxes.
Versatile: Perfect as breakfast, snack, or dessert, and pairs beautifully with coffee, tea, or milk.
Budget-Friendly: Made from pantry staples, this cake doesn’t require fancy or expensive ingredients.
Quick and Easy: With straightforward steps and no fancy equipment, it’s a breeze to whip up.
Customizable: Add nuts, a drizzle of glaze, or a hint of spice to make it your own.
Crowd-Pleasing: Its swirled look and rich flavor make it a hit at any gathering or potluck.
Make-Ahead Friendly: Keeps well for several days and tastes even better the next day.
Great for Leftovers: Toast a slice or warm it up with a scoop of ice cream—it’s a win every time.
Chef’s Pro Tips for Perfect Results
To ensure your marble loaf cake turns out just as stunning and tasty as you imagine, here are a few insider tricks:
- Use room temperature ingredients for a smoother batter that blends effortlessly.
- Don’t overmix once the flour goes in—this keeps the cake soft and fluffy.
- When swirling the batters, less is more. Gentle zig-zags create beautiful marbling without blending the colors.
- Line your loaf pan with parchment for easy removal and a clean finish.
- Let the cake cool completely before slicing to lock in moisture and prevent crumbling.
Kitchen Tools You’ll Need
You don’t need a professional kitchen to bake this beauty. Just a few basics will do the job perfectly.
Mixing Bowls: You’ll need two medium bowls—one for vanilla batter and one for chocolate.
Hand or Stand Mixer: Helps cream the butter and sugar to fluffy perfection.
Loaf Pan (9×5-inch): The ideal size for a perfect bake and shape.
Parchment Paper: Makes lifting the cake out of the pan a breeze.
Butter Knife or Skewer: For creating those iconic marble swirls.
Measuring Cups & Spoons: Accuracy matters in baking, especially with cocoa and flour.
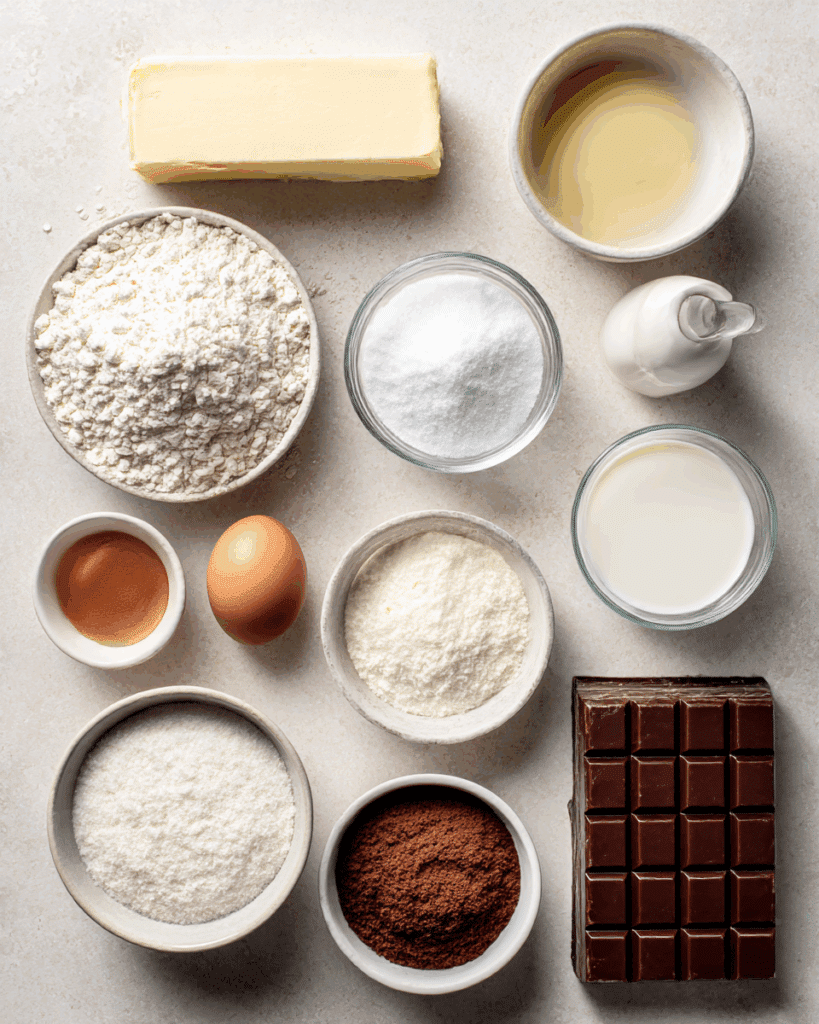
Ingredients in Marble Loaf Cake
This cake brings together simple ingredients that play off each other beautifully, from the richness of cocoa to the sweet creaminess of butter.
- All-Purpose Flour: 1¾ cups – Provides structure while keeping the crumb tender.
- Granulated Sugar: 1 cup – Sweetens and helps achieve a soft texture.
- Unsalted Butter: ½ cup (1 stick), softened – Adds richness and buttery flavor.
- Eggs: 3 large – Bind the batter and contribute to the cake’s fluffy texture.
- Milk: ½ cup – Moistens the batter and creates a smooth consistency.
- Vanilla Extract: 1½ teaspoons – Enhances the vanilla swirl’s flavor.
- Cocoa Powder: ¼ cup – Gives the chocolate swirl its deep, decadent taste.
- Baking Powder: 2 teaspoons – Leavens the cake, making it rise beautifully.
- Salt: ¼ teaspoon – Balances sweetness and sharpens other flavors.
Ingredient Substitutions
Need to adapt the recipe? No problem—here are some handy swaps.
Milk: Almond milk or oat milk works well for a dairy-free version.
Butter: Use vegan butter or margarine for a plant-based option.
Eggs: Try flax eggs (1 tablespoon flaxseed + 3 tablespoons water per egg) for a vegan alternative.
Flour: A 1:1 gluten-free flour blend can be used if needed.
Cocoa Powder: Dutch-processed or natural unsweetened cocoa both work here.
Ingredient Spotlight
Cocoa Powder: This humble pantry item transforms part of the batter into a rich, chocolatey ribbon. Its deep, slightly bitter notes balance the sweetness perfectly.
Vanilla Extract: A must-have that adds warmth and depth to the plain batter, making the contrast with the chocolate even more exciting.
Instructions for Making Marble Loaf Cake
Ready to swirl some magic? Here’s how to bring your marble loaf cake to life:
- Preheat Your Equipment:
Set your oven to 350°F (175°C) and line a 9×5-inch loaf pan with parchment paper. - Combine Ingredients:
In a large bowl, cream together the butter and sugar until light and fluffy. Beat in the eggs one at a time. Add milk and vanilla, mixing until smooth. In a separate bowl, whisk together the flour, baking powder, and salt. Gradually add the dry mix to the wet ingredients until just combined. - Prepare Your Cooking Vessel:
Divide the batter in half. Stir cocoa powder into one half until fully incorporated. - Assemble the Dish:
Alternate spoonfuls of vanilla and chocolate batter into the loaf pan. Use a knife or skewer to gently swirl the batters together, creating a marble pattern. - Cook to Perfection:
Bake for 50–60 minutes or until a toothpick inserted in the center comes out clean. The top should be golden and gently cracked. - Finishing Touches:
Let the cake cool in the pan for 10 minutes before lifting it out and placing on a wire rack to cool completely. - Serve and Enjoy:
Slice into thick, gorgeous pieces and enjoy with your favorite hot drink or a dusting of powdered sugar.
Texture & Flavor Secrets
The real magic of a marble loaf cake lies in contrast. The chocolate swirl is rich and slightly dense, while the vanilla remains light and fluffy. Together, they create a luxurious, melt-in-your-mouth bite with a slight crisp on the edges and a pillowy center. The flavor develops further a day after baking, when the crumb becomes even more tender and pronounced.
Cooking Tips & Tricks
Here are a few nuggets of baking wisdom to make your loaf unforgettable:
- Use high-quality cocoa for a richer chocolate flavor.
- Don’t over-swirl or you’ll lose the marbled effect.
- Let all ingredients come to room temperature for better mixing.
- Store leftovers tightly wrapped to keep them moist for days.
What to Avoid
Even the simplest bakes have their pitfalls. Avoid these for best results:
- Overbaking: It can dry out your cake. Check at 50 minutes.
- Cold ingredients: They won’t mix as smoothly, affecting texture.
- Overmixing: This makes the cake tough instead of tender.
Nutrition Facts
Servings: 10
Calories per serving: 280
Note: These are approximate values.
Preparation Time
Prep Time: 15 minutes
Cook Time: 55 minutes
Total Time: 1 hour 10 minutes
Make-Ahead and Storage Tips
One of the joys of marble loaf cake is how well it keeps. You can make it a day ahead and it actually gets better overnight. Store it in an airtight container at room temperature for up to 4 days. For longer storage, wrap slices individually and freeze for up to 2 months. Thaw at room temp or toast lightly for a warm treat.
How to Serve Marble Loaf Cake
This cake shines on its own, but you can easily dress it up. Try it with:
- A drizzle of melted chocolate or vanilla glaze.
- A scoop of ice cream for dessert flair.
- Paired with espresso, chai, or warm milk for cozy vibes.
Creative Leftover Transformations
Don’t let leftovers go to waste! Here’s how to repurpose them deliciously:
- Make marble cake French toast with thick slices.
- Crumble into parfaits or trifles with whipped cream and fruit.
- Toast and spread with nut butter for a hearty snack.
Additional Tips
Here are some final nuggets to elevate your cake game:
- Sift your flour and cocoa powder to avoid clumps.
- Grease your pan even with parchment to ensure no sticking.
- Let the cake rest before slicing—this locks in flavor and moisture.
Make It a Showstopper
Presentation takes this cake from simple to stunning. Try these:
- Sprinkle powdered sugar over the top for a snow-dusted finish.
- Use a serrated knife for clean, dramatic swirls in every slice.
- Serve on a wooden board or ceramic platter for rustic charm.
Variations to Try
Give your marble loaf a twist with these fun ideas:
- Mocha Marble: Add 1 tablespoon espresso powder to the chocolate batter.
- Zesty Citrus: Add lemon or orange zest to the vanilla batter.
- Nutty Delight: Mix chopped hazelnuts or walnuts into both batters.
- Coconut Swirl: Use coconut milk and a bit of shredded coconut.
- Chocolate Chip: Stir mini chocolate chips into the vanilla batter for bursts of sweetness.
FAQ’s
Q1: Can I use oil instead of butter?
Yes, but butter gives better flavor. Use a neutral oil like canola if substituting.
Q2: Can I double the recipe?
Absolutely! Use two loaf pans or a bundt pan and adjust baking time accordingly.
Q3: Is this cake freezer-friendly?
Yes! Wrap tightly and freeze for up to 2 months.
Q4: Can I make it gluten-free?
Use a 1:1 gluten-free flour blend for best results.
Q5: How do I keep it from being dry?
Don’t overbake and store properly in an airtight container.
Q6: Can I use Greek yogurt or sour cream?
Yes, sub ¼ cup milk with yogurt or sour cream for extra moisture.
Q7: What if I don’t have cocoa powder?
Melted dark chocolate (2 oz) can be used in place of cocoa.
Q8: Can I bake this in a bundt pan?
Definitely. Just adjust baking time to about 45–50 minutes.
Q9: How do I swirl without blending the batters?
Gently drag a knife or skewer through the batter in a zigzag pattern.
Q10: Can I add a glaze?
Yes! Vanilla or chocolate glaze adds a sweet finishing touch.
Conclusion
Marble loaf cake is that timeless bake that brings smiles with every slice. It’s simple, stunning, and irresistibly delicious. Whether you’re a baking newbie or a seasoned pro, this cake is sure to become a staple in your kitchen. So go ahead, swirl it up and savor every marbled bite.
PrintMarble Loaf Cake
A moist, buttery marble loaf cake that swirls rich chocolate and classic vanilla for the perfect slice every time.
- Prep Time: 15 minutes
- Cook Time: 55 minutes
- Total Time: 1 hour 10 minutes
- Yield: 10 slices
- Category: Dessert
- Method: Baking
- Cuisine: American
- Diet: Vegetarian
Ingredients
- All-Purpose Flour: 1¾ cups – Provides structure while keeping the crumb tender.
- Granulated Sugar: 1 cup – Sweetens and helps achieve a soft texture.
- Unsalted Butter: ½ cup (1 stick), softened – Adds richness and buttery flavor.
- Eggs: 3 large – Bind the batter and contribute to the cake’s fluffy texture.
- Milk: ½ cup – Moistens the batter and creates a smooth consistency.
- Vanilla Extract: 1½ teaspoons – Enhances the vanilla swirl’s flavor.
- Cocoa Powder: ¼ cup – Gives the chocolate swirl its deep, decadent taste.
- Baking Powder: 2 teaspoons – Leavens the cake, making it rise beautifully.
- Salt: ¼ teaspoon – Balances sweetness and sharpens other flavors.
Instructions
- Preheat Your Equipment: Set your oven to 350°F (175°C) and line a 9×5-inch loaf pan with parchment paper.
- Combine Ingredients: In a large bowl, cream together the butter and sugar until light and fluffy. Beat in the eggs one at a time. Add milk and vanilla, mixing until smooth. In a separate bowl, whisk together the flour, baking powder, and salt. Gradually add the dry mix to the wet ingredients until just combined.
- Prepare Your Cooking Vessel: Divide the batter in half. Stir cocoa powder into one half until fully incorporated.
- Assemble the Dish: Alternate spoonfuls of vanilla and chocolate batter into the loaf pan. Use a knife or skewer to gently swirl the batters together, creating a marble pattern.
- Cook to Perfection: Bake for 50–60 minutes or until a toothpick inserted in the center comes out clean. The top should be golden and gently cracked.
- Finishing Touches: Let the cake cool in the pan for 10 minutes before lifting it out and placing on a wire rack to cool completely.
- Serve and Enjoy: Slice into thick, gorgeous pieces and enjoy with your favorite hot drink or a dusting of powdered sugar.
Notes
- Use room temperature ingredients for the best texture.
- Don’t overmix the batter once flour is added to keep the cake tender.
- Store in an airtight container to keep it moist for days.
Nutrition
- Serving Size: 1 slice
- Calories: 280
- Sugar: 18g
- Sodium: 120mg
- Fat: 12g
- Saturated Fat: 7g
- Unsaturated Fat: 4g
- Trans Fat: 0g
- Carbohydrates: 36g
- Fiber: 1g
- Protein: 4g
- Cholesterol: 55mg