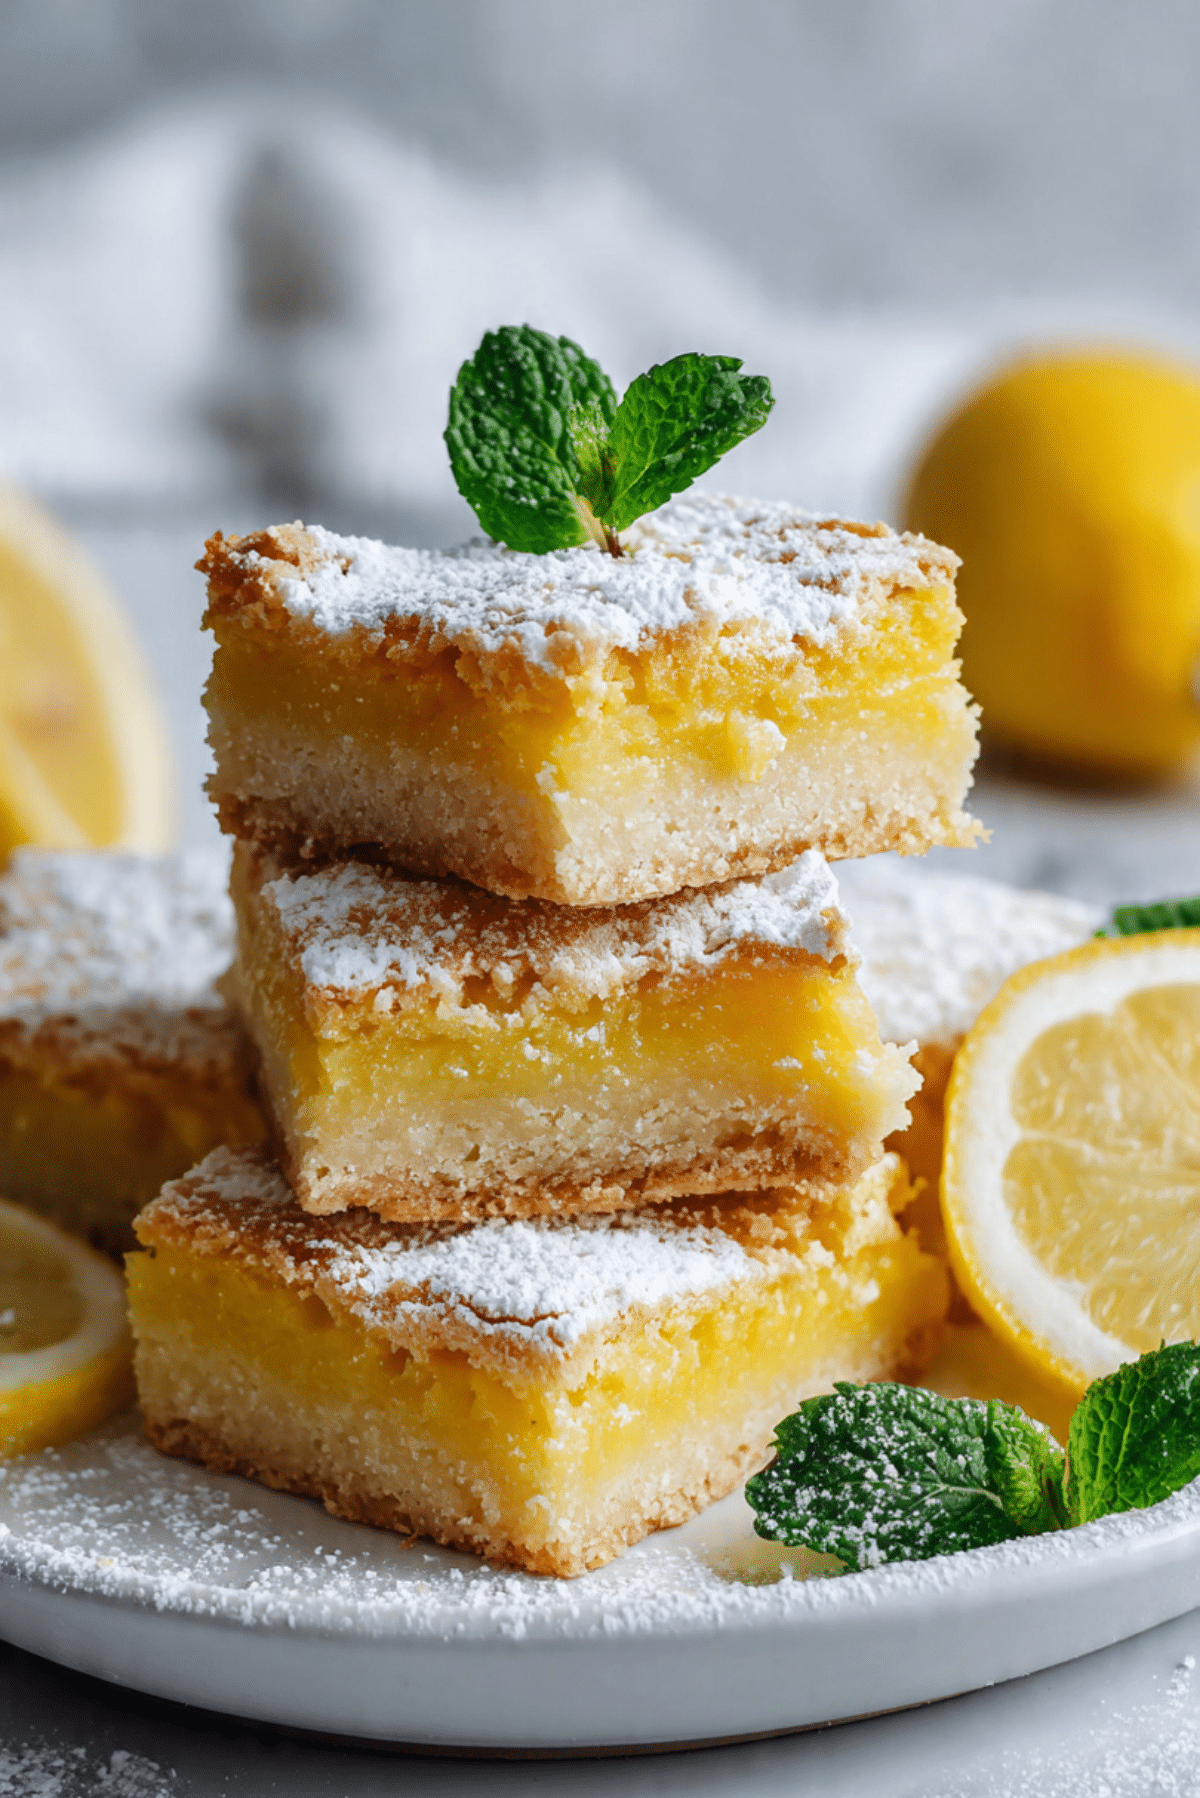
Lemon Bars
These lemon bars are the kind of treat that instantly brightens your day. With their buttery shortbread crust and a vibrant, tangy lemon filling, they strike the perfect balance between sweet and tart. Each bite melts in your mouth, finishing with a soft zing that lingers just long enough to make you want another slice. Whether it’s a picnic, a bake sale, or simply a cozy afternoon with tea, these lemon bars feel like sunshine on a plate.
Behind the Recipe
I remember the first time I tasted a lemon bar—it was at a summer garden party, and I was instantly hooked. The zesty lemon curd sitting atop a crisp, buttery crust was a revelation. This recipe came to life from that memory, inspired by the idea of capturing a moment of sunshine in dessert form. It’s been through dozens of tweaks to get the filling silky and bold, and the crust firm yet tender. Trust me, you’re going to love this.
Recipe Origin or Trivia
Lemon bars are a classic American dessert that gained popularity in the 1960s, thanks to community cookbooks and magazine columns. Rooted in the custard and citrus desserts of Europe, these bars took on a distinct identity in the United States where lemons grow abundantly in California and Florida. Today, they’re a staple in potlucks and lunchboxes, loved for their refreshing zing and simplicity.
Why You’ll Love Lemon Bars
Let me tell you, these little squares of lemony joy aren’t just beautiful to look at—they’re practical and irresistible too.
Versatile: Great for afternoon tea, school snacks, or fancy brunch tables.
Budget-Friendly: Uses basic pantry staples, so no fancy shopping trips.
Quick and Easy: A straightforward two-part process—crust, then filling.
Customizable: Add berries or swap in lime for a twist.
Crowd-Pleasing: Always the first dessert to disappear at parties.
Make-Ahead Friendly: Chill them overnight for even better flavor.
Great for Leftovers: Store well and taste just as good the next day.
Chef’s Pro Tips for Perfect Results
To really make your lemon bars shine, here are some of my go-to tricks:
- Use room-temperature eggs to ensure the filling mixes smoothly and bakes evenly.
- Line your baking pan with parchment paper for easy lifting and clean slicing.
- Don’t overbake—pull them out when the center is just set and jiggles slightly.
- Chill before cutting to get those perfect, clean edges.
- Dust with powdered sugar just before serving to avoid it dissolving into the filling.
Kitchen Tools You’ll Need
No fancy gadgets here, just a few simple tools that make the process smooth and easy.
Mixing Bowls: For preparing the crust and the lemon filling separately.
Whisk: Helps achieve that silky-smooth lemon custard.
Zester or Microplane: Essential for fresh lemon zest.
8×8 Baking Dish: The perfect size for thick, satisfying bars.
Fine Mesh Sieve: If you want to strain out pulp or egg bits for a smooth finish.
Sharp Knife: To slice those beautiful bars with clean edges.
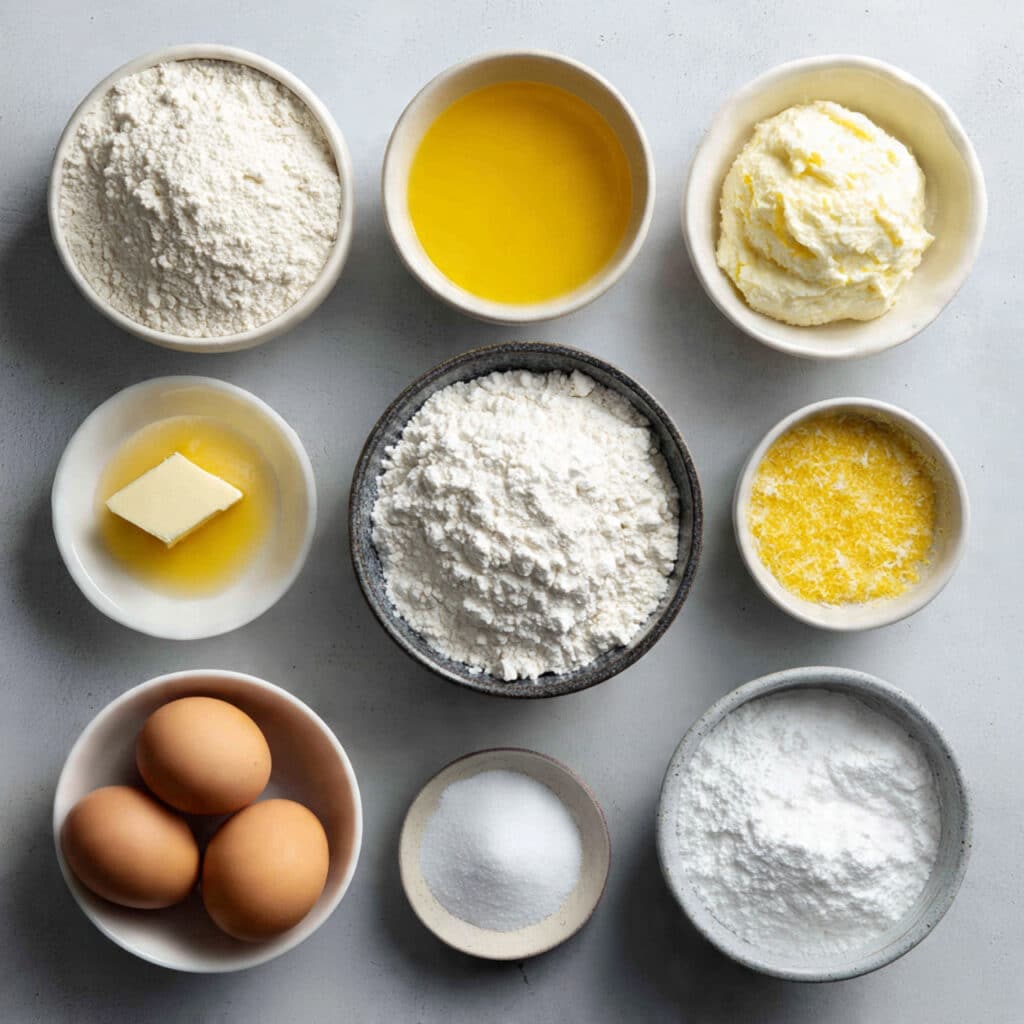
Ingredients in Lemon Bars
This recipe is all about balance—the richness of butter and eggs with the brightness of lemon. Here’s everything you’ll need:
- All-Purpose Flour: 1 ¾ cups – Used for both the crust and the filling to create structure and thickness.
- Powdered Sugar: ½ cup – Sweetens the crust without graininess.
- Unsalted Butter: ¾ cup (cold and cubed) – Forms the crumbly, rich shortbread base.
- Granulated Sugar: 1 ½ cups – Sweetens the lemon filling and balances its tartness.
- Large Eggs: 4 – Provide body and richness to the lemon layer.
- Fresh Lemon Juice: ½ cup – The star of the show, giving that tangy burst of flavor.
- Lemon Zest: 1 tablespoon – Adds aromatic citrus oils for depth.
- Cornstarch: 2 tablespoons – Helps the filling set with a silky texture.
- Salt: ¼ teaspoon – Enhances the overall flavor.
Ingredient Substitutions
Life happens. Here’s how to tweak the recipe when you’re out of something.
All-Purpose Flour: Use a gluten-free 1:1 blend to make it gluten-free.
Powdered Sugar: Blend granulated sugar in a blender until fine.
Unsalted Butter: Substitute with vegan butter for a dairy-free version.
Fresh Lemon Juice: Bottled will work, but the flavor won’t be as vibrant.
Cornstarch: Replace with arrowroot powder in equal amounts.
Ingredient Spotlight
Lemon Zest: Packed with natural oils, it intensifies the lemon flavor and adds brightness.
Cornstarch: Gives the filling that dreamy, custard-like consistency without making it gummy.
Instructions for Making Lemon Bars
Baking these lemon bars is a joyful two-step process that fills your kitchen with a citrusy scent you’ll never forget. Here are the steps you’re going to follow:
- Preheat Your Equipment:
Set your oven to 350°F (175°C). Line an 8×8 inch baking pan with parchment paper, leaving a little overhang on the sides. - Combine Ingredients:
In a bowl, mix flour, powdered sugar, and salt. Add cold butter cubes and use your fingers or a pastry cutter to blend until the texture resembles coarse crumbs. - Prepare Your Cooking Vessel:
Press the crust mixture evenly into the bottom of your prepared pan. Prick lightly with a fork. - Assemble the Dish:
Bake the crust for 20 minutes or until lightly golden. Meanwhile, whisk together eggs, sugar, lemon juice, lemon zest, cornstarch, and a bit of flour until smooth. - Cook to Perfection:
Pour the lemon filling over the hot crust. Return to the oven and bake for another 20-25 minutes until the center is just set. - Finishing Touches:
Let cool completely in the pan. Refrigerate for at least 2 hours before slicing. - Serve and Enjoy:
Slice into squares and dust with powdered sugar just before serving.
Texture & Flavor Secrets
What makes these lemon bars unforgettable is the contrast. The crust is buttery and firm, giving way to a lush, zesty lemon layer that’s smooth and custard-like. The powdered sugar on top melts just slightly, adding a delicate sweetness to every tangy bite.
Cooking Tips & Tricks
Just a few extra things to help you ace it:
- Chill the bars for cleaner cuts and enhanced flavor.
- Use fresh lemons for both juice and zest to get that real citrus kick.
- Avoid aluminum pans—they can react with lemon juice and affect the taste.
What to Avoid
A few common mistakes that are easy to steer clear of:
- Overbaking: Can lead to a rubbery filling. Stop baking once the center is just set.
- Skipping the chill: Makes slicing messy and uneven.
- Using bottled juice only: It dulls the flavor. Always add some zest for balance.
Nutrition Facts
Servings: 16
Calories per serving: 195
Note: These are approximate values.
Preparation Time
Prep Time: 15 minutes
Cook Time: 45 minutes
Total Time: 1 hour
Make-Ahead and Storage Tips
Lemon bars are perfect for planning ahead. You can bake them a day in advance and chill overnight. Store in an airtight container in the fridge for up to 5 days. They also freeze beautifully—just wrap them well and store for up to 3 months. Thaw overnight in the fridge for best texture.
How to Serve Lemon Bars
Serve chilled, dusted with powdered sugar, and maybe a little lemon twist or mint sprig for garnish. Pair them with black tea, iced green tea, or even a scoop of vanilla frozen yogurt for a refreshing contrast.
Creative Leftover Transformations
If you happen to have leftovers, here are some fun ideas:
- Crumble over Greek yogurt for a citrusy parfait.
- Chop and layer into a trifle with whipped cream and berries.
- Serve with raspberry sauce and fresh fruit for a plated dessert.
Additional Tips
Here’s a little extra magic:
- Add a pinch of turmeric for a more golden filling without affecting taste.
- For a twist, swirl in some raspberry purée before baking.
- Always let your bars cool fully before dusting with sugar to prevent melting.
Make It a Showstopper
Presentation matters. Cut your bars cleanly, wipe the knife between slices, and serve on a simple white platter. Add lemon zest curls or edible flowers to make them pop at any gathering.
Variations to Try
- Lime Bars: Swap lemon juice and zest with lime for a tropical vibe.
- Berry Lemon Bars: Add a thin layer of mashed raspberries between crust and filling.
- Coconut Crust: Mix shredded coconut into the crust for a hint of island flavor.
- Gluten-Free Version: Use almond flour or a gluten-free mix for the crust.
- Lavender Lemon Bars: Infuse the sugar with dried lavender for floral notes.
FAQ’s
Q1: Can I double the recipe?
Yes, use a 9×13 pan and adjust baking time slightly.
Q2: Do I need to refrigerate lemon bars?
Yes, they taste best chilled and hold their shape better.
Q3: Can I use bottled lemon juice?
You can, but fresh juice and zest give the best flavor.
Q4: How do I keep the crust from getting soggy?
Bake it fully before adding the filling, and pour the filling over hot crust.
Q5: Can I make this dairy-free?
Yes, use a plant-based butter alternative.
Q6: Why is my filling foamy?
Over-whisking the eggs can create foam. Whisk gently for a smooth texture.
Q7: Can I add toppings?
Yes, fresh berries or whipped cream make great additions.
Q8: What’s the best way to cut them cleanly?
Chill well and use a sharp knife wiped clean between cuts.
Q9: How long do they last in the fridge?
Up to 5 days in an airtight container.
Q10: Can I freeze lemon bars?
Absolutely. Wrap tightly and freeze for up to 3 months.
Conclusion
Whether you’re baking for a special gathering or just craving something sunny and sweet, these lemon bars never disappoint. Their perfect balance of tart and sweet, combined with that melt-in-your-mouth texture, makes them a dessert you’ll come back to again and again. So go ahead, preheat your oven, and treat yourself to a slice of sunshine.
PrintLemon Bars
Buttery shortbread base topped with a tangy, vibrant lemon curd. These lemon bars are zesty, sweet, and absolutely irresistible—perfect for any occasion.
Ingredients
- 1 ¾ cups all-purpose flour
- ½ cup powdered sugar
- ¾ cup unsalted butter, cold and cubed
- 1 ½ cups granulated sugar
- 4 large eggs
- ½ cup fresh lemon juice
- 1 tablespoon lemon zest
- 2 tablespoons cornstarch
- ¼ teaspoon salt
Instructions
- Preheat the oven to 350°F (175°C) and line an 8×8 inch baking pan with parchment paper.
- In a bowl, combine flour, powdered sugar, and salt. Cut in the cold butter until mixture resembles coarse crumbs.
- Press crust mixture into the bottom of the pan and bake for 20 minutes or until lightly golden.
- While crust bakes, whisk together eggs, granulated sugar, lemon juice, lemon zest, cornstarch, and a bit of flour until smooth.
- Pour lemon filling over the hot crust and return to oven. Bake 20–25 minutes until just set.
- Let cool completely in pan, then refrigerate for 2 hours before slicing.
- Dust with powdered sugar before serving and enjoy!
Notes
- Use fresh lemons for best flavor.
- Chill before slicing for clean edges.
- Dust with powdered sugar right before serving to avoid absorption.
- Line the pan with parchment for easy removal.