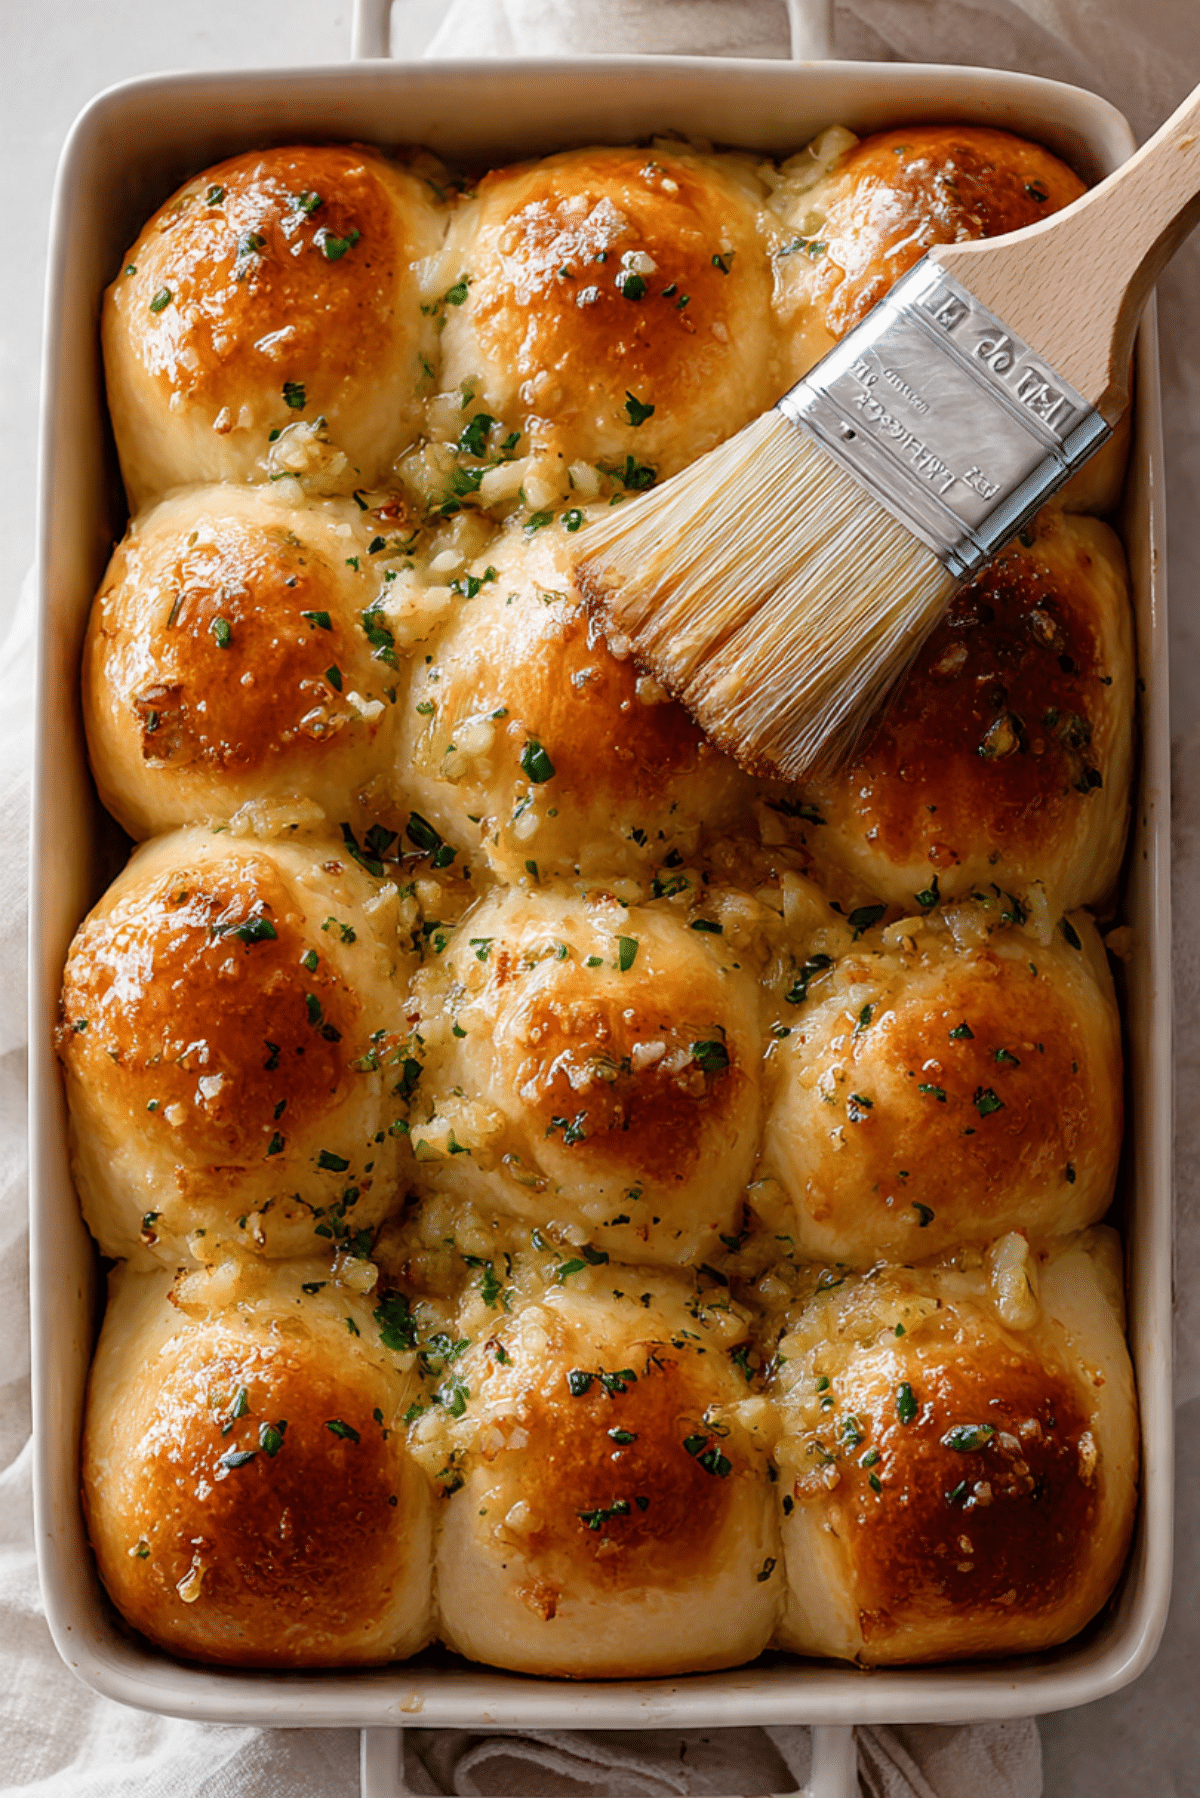
Herby Rhodes Rolls
There’s nothing quite like the aroma of warm, freshly baked rolls filling the kitchen. Herby Rhodes rolls take that classic comfort and elevate it with a savory blend of butter, garlic, and fresh herbs that turn these humble dinner rolls into something unforgettable. Each bite is soft, pillowy, and full of flavor — perfect for any meal, any time.
Behind the Recipe
Growing up, dinner rolls were a must-have at family meals, especially during the holidays. But once I discovered Rhodes rolls — frozen, foolproof, and ready to rise — it was a total game-changer. With a few tweaks and a buttery herb topping, they transformed into something that tasted just like homemade. These herby rolls were my little secret weapon for impressing guests without the stress of making dough from scratch.
Recipe Origin or Trivia
Rhodes Bake-N-Serv rolls are a staple in many American households. Developed in the mid-20th century, they offer the convenience of frozen dough while still delivering bakery-level results. Over the years, home cooks began jazzing them up with creative toppings, turning a simple roll into something worthy of center stage. Adding herbs, butter, and garlic is one of the most beloved ways to upgrade them.
Why You’ll Love Herby Rhodes Rolls
These rolls are soft, flavorful, and ridiculously easy to make — what’s not to love?
Versatile: They pair with almost any dish, from soups to roasts to pasta.
Budget-Friendly: Store-bought dough keeps things affordable.
Quick and Easy: Minimal effort, maximum flavor.
Customizable: Change up the herbs, add cheese, or try flavored butter.
Crowd-Pleasing: Everyone reaches for seconds — every time.
Make-Ahead Friendly: Prep them earlier and bake just before serving.
Great for Leftovers: Reheat beautifully, and even better with a dab of jam the next morning.
Chef’s Pro Tips for Perfect Results
Here’s how to get bakery-level rolls without breaking a sweat:
- Let them rise slowly: Give the dough enough time to rise until puffy and light.
- Use fresh herbs: They add brightness and bold flavor you can’t get from dried.
- Brush with butter while hot: It soaks into the tops and makes them ultra-moist.
- Add a pinch of salt on top: Just before baking for a delicious savory finish.
- Don’t overcrowd the pan: Leave a bit of space between rolls for even baking.
Kitchen Tools You’ll Need
Keep it simple — you don’t need much to make these rolls shine:
Baking dish or pan: A 9×13-inch dish works great for a dozen rolls.
Pastry brush: For brushing on that dreamy garlic herb butter.
Small saucepan: To melt butter and infuse it with herbs.
Measuring spoons: For accurate butter and seasoning ratios.
Tongs or spoon: For gently lifting and placing rolls, if needed.
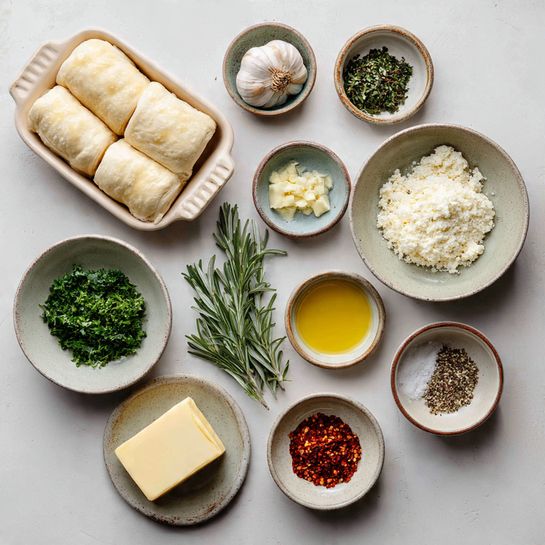
Ingredients in Herby Rhodes Rolls
This simple list is where convenience meets big flavor.
- Frozen Rhodes rolls: 12 rolls. The base of the recipe, soft and ready to rise.
- Unsalted butter: 1/3 cup, melted. Rich, creamy flavor for brushing on top.
- Garlic: 3 cloves, finely minced. Adds that irresistible savory kick.
- Fresh parsley: 2 tablespoons, chopped. Bright and fresh.
- Fresh rosemary: 1 tablespoon, minced. Earthy and aromatic.
- Salt: 1/2 teaspoon. Enhances the flavors and balances the butter.
- Crushed red pepper flakes (optional): A pinch for subtle heat.
Ingredient Substitutions
Need to switch things up? Here are a few easy swaps.
Frozen Rhodes rolls: Use any frozen dinner roll dough or even refrigerated biscuit dough.
Butter: Try plant-based butter for a dairy-free version.
Garlic: Garlic powder can work in a pinch — use 1 teaspoon.
Fresh herbs: Use dried parsley and rosemary (1 teaspoon each) if fresh isn’t available.
Ingredient Spotlight
Rhodes Rolls: These frozen rolls rise beautifully, bake golden, and taste homemade with none of the hassle. They’re soft, chewy, and the perfect base for flavorful toppings.
Fresh Garlic: Infusing melted butter with minced garlic makes each bite rich and full of depth.
Instructions for Making Herby Rhodes Rolls
This recipe couldn’t be simpler. Let’s get baking.
- Preheat Your Equipment:
Preheat your oven to 350°F. Grease a 9×13-inch baking dish. - Combine Ingredients:
Melt butter in a small saucepan. Stir in garlic, parsley, rosemary, salt, and optional red pepper flakes. Let it sit to infuse. - Prepare Your Cooking Vessel:
Arrange frozen Rhodes rolls in the baking dish, spaced slightly apart. Cover with plastic wrap or a clean towel and let rise in a warm place until doubled in size (about 3–5 hours depending on room temp). - Assemble the Dish:
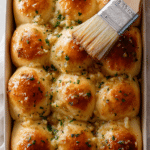
Once rolls have risen, gently brush the tops with the herby garlic butter mixture. - Cook to Perfection:
Bake for 15–20 minutes, or until the tops are golden brown and the centers are baked through. - Finishing Touches:
As soon as they come out of the oven, brush with any remaining herb butter for a glossy, flavorful finish. - Serve and Enjoy:
Serve warm and fresh with your favorite main dish — or just enjoy one on its own.
Texture & Flavor Secrets
The exterior of these rolls bakes to a golden, slightly crisp finish while the inside stays soft and airy. The garlic herb butter melts into every crevice, giving you a savory burst of flavor in each bite. The combo of buttery richness with fresh herbs and a whisper of heat makes them downright addictive.
Cooking Tips & Tricks
Here’s how to bring out the best in every batch:
- Use parchment paper to prevent sticking and make cleanup easier.
- For deeper flavor, let the butter and herbs steep longer before brushing.
- Add grated parmesan over the top before baking for cheesy rolls.
What to Avoid
Skip these mistakes to keep your rolls perfect:
- Under-rising the dough: Rolls will be dense instead of fluffy.
- Baking too long: Keep an eye on them so they don’t dry out.
- Skipping the post-bake butter: That second brush of butter is key for flavor and moisture.
Nutrition Facts
Servings: 12
Calories per serving: 210
Note: These are approximate values.
Preparation Time
Prep Time: 10 minutes (plus rise time)
Cook Time: 20 minutes
Total Time: 3 hours 30 minutes (includes rising)
Make-Ahead and Storage Tips
You can prep the rolls up to the point of baking and refrigerate overnight. Let them come to room temperature before baking the next day. Leftover rolls store well in an airtight container for up to 3 days. Reheat in the oven wrapped in foil for best texture.
How to Serve Herby Rhodes Rolls
Serve them straight from the oven alongside soups, stews, pasta, or roasted meats. They also make the perfect side for a holiday feast. Or go simple — spread with butter or jam for a comforting snack.
Creative Leftover Transformations
Here’s how to give your extras a delicious second life:
- Breakfast sliders: Slice and stuff with eggs and cheese.
- Mini sandwiches: Fill with turkey or chicken and cranberry sauce.
- Herby croutons: Cube and toast in the oven for salad toppers.
Additional Tips
- Let your dough rise near a warm window or on top of a preheating oven for faster results.
- Sprinkle flaky sea salt over the buttered tops for added crunch.
- Store leftover herb butter in the fridge to use on veggies or toast.
Make It a Showstopper
Present the rolls in a rustic bread basket lined with a linen cloth. Add a small bowl of extra garlic butter for brushing or dipping at the table. Garnish with sprigs of rosemary for a visual pop that screams fresh and homemade.
Variations to Try
- Cheesy herb rolls: Add shredded mozzarella or cheddar before baking.
- Lemon garlic rolls: Stir in lemon zest to the butter mix for brightness.
- Spicy rolls: Add cayenne or extra chili flakes for bold flavor.
- Sweet-savory twist: Mix in honey with the butter for a unique finish.
- Everything bagel rolls: Sprinkle seasoning over the tops before baking.
FAQ’s
Q1: Can I use another brand of frozen rolls?
Yes, any frozen dinner roll dough should work well.
Q2: How long should I let them rise?
Typically 3–5 hours, or until the rolls double in size.
Q3: Can I use dried herbs?
Yes, use about 1 teaspoon of dried herbs for each tablespoon of fresh.
Q4: Can I make these dairy-free?
Yes, substitute plant-based butter for a dairy-free version.
Q5: What if my rolls didn’t rise?
Make sure they were kept in a warm enough environment. Cold kitchens slow the process.
Q6: Can I freeze baked rolls?
Yes. Freeze in a sealed bag and reheat in the oven wrapped in foil.
Q7: How do I make them extra golden?
Brush with egg wash before baking for a shiny, golden finish.
Q8: Can I bake them in a muffin tin?
Yes! It creates adorable individual servings.
Q9: Can I add cheese inside the rolls?
Sure. Insert a cube of cheese into each roll before baking for a melty surprise.
Q10: Can I double the recipe?
Absolutely — just use a larger pan or two dishes.
Conclusion
Herby Rhodes rolls are the kind of side dish that quietly steals the show. With buttery tops, fresh herbs, and melt-in-your-mouth texture, they’re impossible to resist. Whether you’re serving them at a festive feast or just because, trust me — these rolls are worth every bite.
PrintHerby Rhodes Rolls
These herby Rhodes rolls are buttery, fluffy, and packed with fresh garlic and herbs. An easy upgrade to frozen rolls that brings homemade flavor to any table.
Ingredients
- 12 frozen Rhodes rolls
- 1/3 cup unsalted butter, melted
- 3 garlic cloves, finely minced
- 2 tablespoons fresh parsley, chopped
- 1 tablespoon fresh rosemary, minced
- 1/2 teaspoon salt
- Pinch of crushed red pepper flakes (optional)
Instructions
- Preheat oven to 350°F and grease a 9×13-inch baking dish.
- Melt butter in a saucepan, stir in garlic, parsley, rosemary, salt, and pepper flakes. Let infuse.
- Arrange frozen rolls in the baking dish with space between each. Cover and let rise in a warm spot until doubled in size (3–5 hours).
- Brush the risen rolls with garlic herb butter.
- Bake for 15–20 minutes, until golden brown and baked through.
- Remove from oven and brush with remaining butter while hot.
- Serve warm and enjoy.
Notes
- Let rolls rise fully before baking for the best texture.
- Add grated parmesan before baking for a cheesy finish.
- Use dried herbs if needed, reducing quantities accordingly.