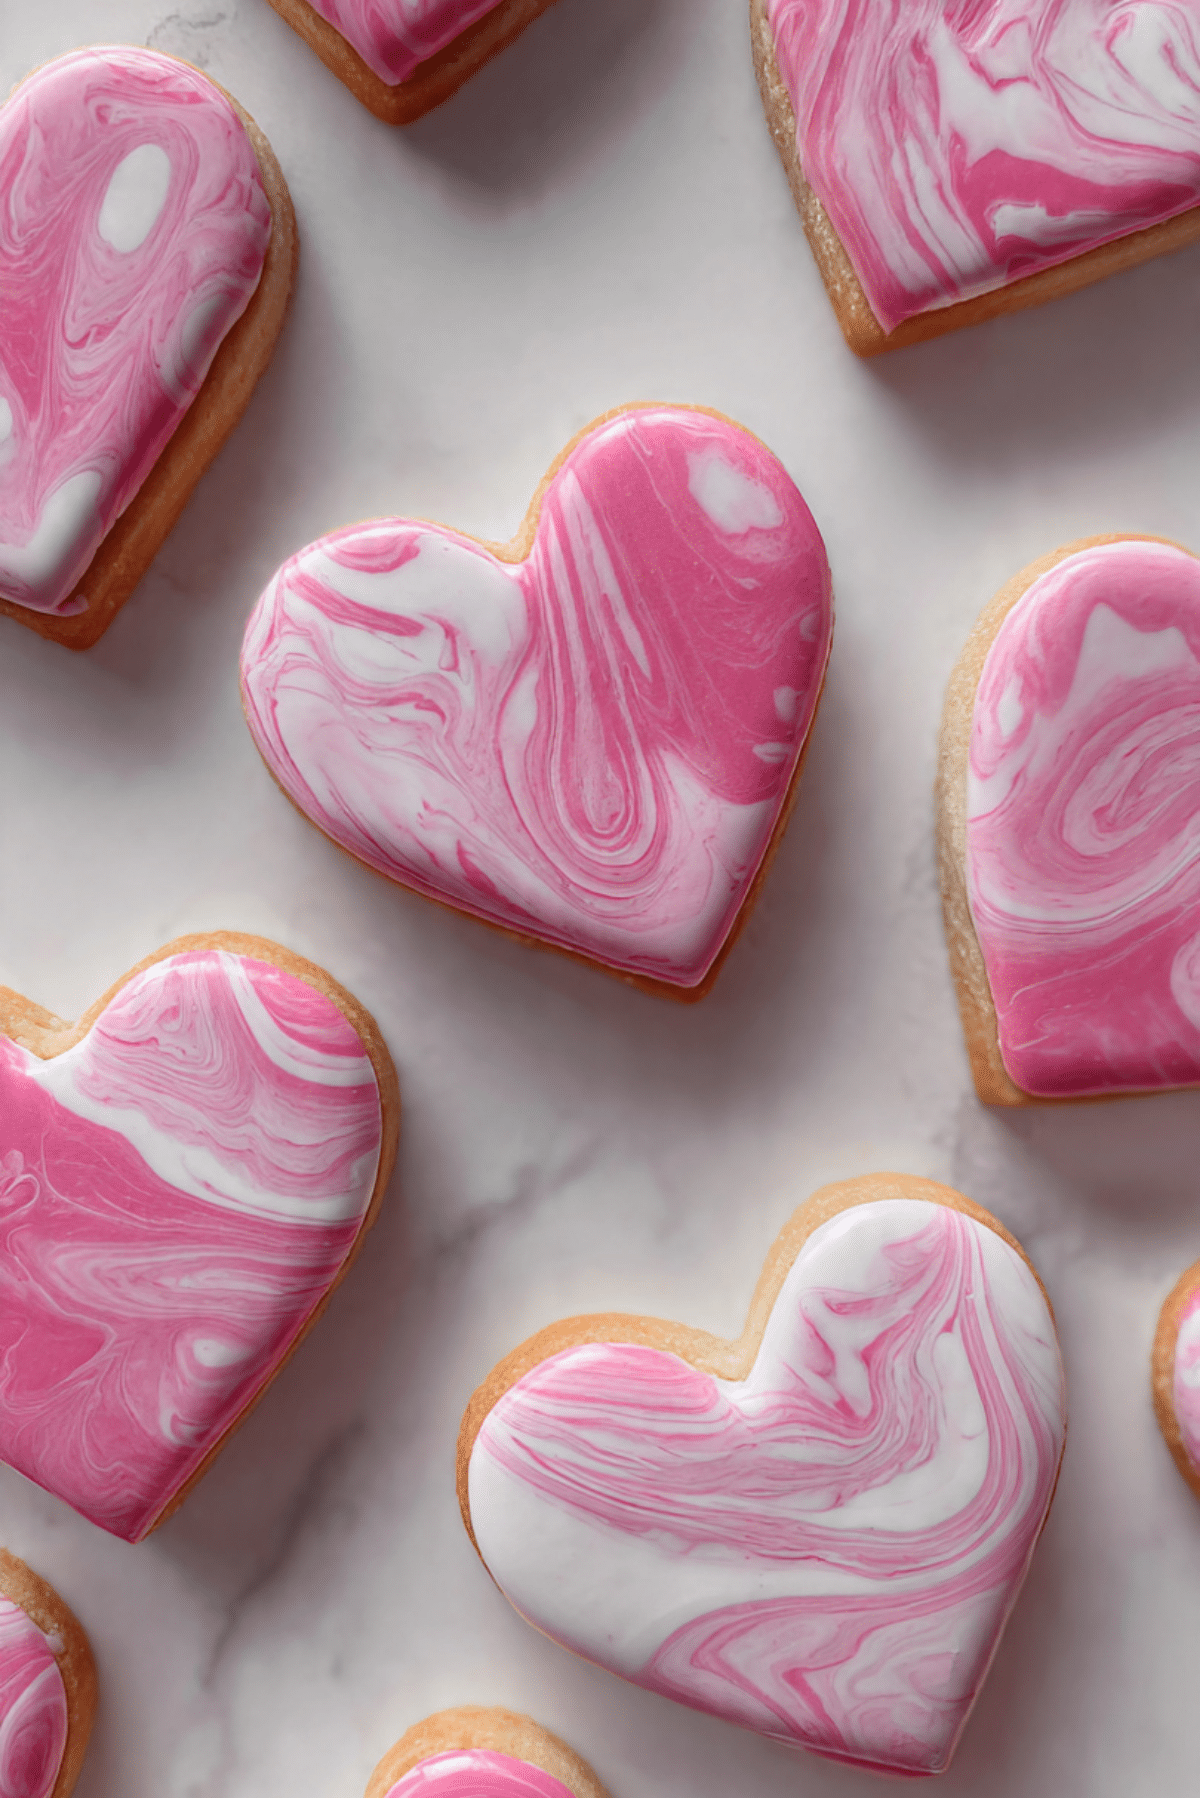
Heart Cookies
There is something inherently joyful about a perfectly shaped heart cookie, especially when it is adorned with a stunning marbled glaze. These cookies are more than just a sweet treat, they are a edible expression of affection and creativity. Trust me, you’re going to love this recipe because it combines a foolproof, buttery shortbread base with a decorating technique that looks professional but is surprisingly simple to master.
A Visual and Flavorful Masterpiece
When you take a bite of these, the first thing you notice is the delicate snap of the marbled icing, followed immediately by the melt-in-your-mouth texture of the cookie. The subtle notes of almond and vanilla in the dough are perfectly complemented by the sweet, smooth glaze. Let me tell you, it’s worth every bite, and seeing that beautiful pink swirl makes the experience feel like a true celebration of the senses.
The Timeless Tradition of Heart Shaped Sweets
Heart shaped food has been a symbol of love and friendship for centuries, with the heart shape itself appearing in decorative arts as far back as the Middle Ages. While originally associated with medicinal herbs and later with courtly love, the heart cookie has become a staple for weddings, anniversaries, and Valentine’s Day. This recipe takes that classic silhouette and updates it with a modern marbled icing technique that ensures no two cookies are exactly alike. It is a beautiful way to carry on a tradition while adding your own unique, artistic flair.
Why This Recipe is a Total Game-Changer
This recipe is designed to be your go-to for special occasions, offering a stunning visual impact with reliable, delicious results.
Versatile: You can easily change the colors of the icing to match any theme, from soft pastels for a baby shower to bold reds for an anniversary.
Budget-Friendly: The ingredients are basic pantry staples like flour, butter, and sugar, making these an affordable luxury.
Quick and Easy: The dough comes together in minutes and the dipping method for the icing is much faster than traditional piping.
Customizable: You can add different extracts like lemon or orange to the dough to create a completely different flavor profile.
Crowd-Pleasing: Everyone loves a sugar cookie, and the artistic marbled look makes them a conversation starter at any party.
Make-Ahead Friendly: The cookies can be baked days in advance and glazed whenever you are ready to serve.
Great for Leftovers: These stay fresh and crisp for a long time, making them perfect for tucking into lunchboxes or enjoying with a late-night tea.
Secrets for the Perfect Marbled Glaze
The key to a successful marbled look is the consistency of your icing, it should be thick enough to stay on the cookie but thin enough to dip easily. When adding your food coloring, only use a tiny drop and swirl it very gently with a toothpick; over-swirling will lead to a muddy color rather than distinct ribbons. Also, make sure your cookies are completely cool before dipping, as any residual warmth will cause the icing to run right off the edges.
Essential Tools for Cookie Artistry
Having the right tools ensures that your cookies keep their shape and your marbled icing looks clean and professional.
Heart Shaped Cookie Cutter: A sharp, metal cutter will give you the cleanest edges and the most defined heart shape.
Rolling Pin with Spacers: This helps you roll the dough to a perfectly even thickness so all cookies bake at the same rate.
Shallow Wide Bowl: Essential for the dipping process, as it gives you enough surface area to create beautiful swirls in the icing.
Toothpicks: The best tool for gently swirling the food coloring into the icing to create that marbled effect.
Baking Sheet with Parchment Paper: Prevents sticking and ensures the bottoms of your cookies don’t brown too quickly.
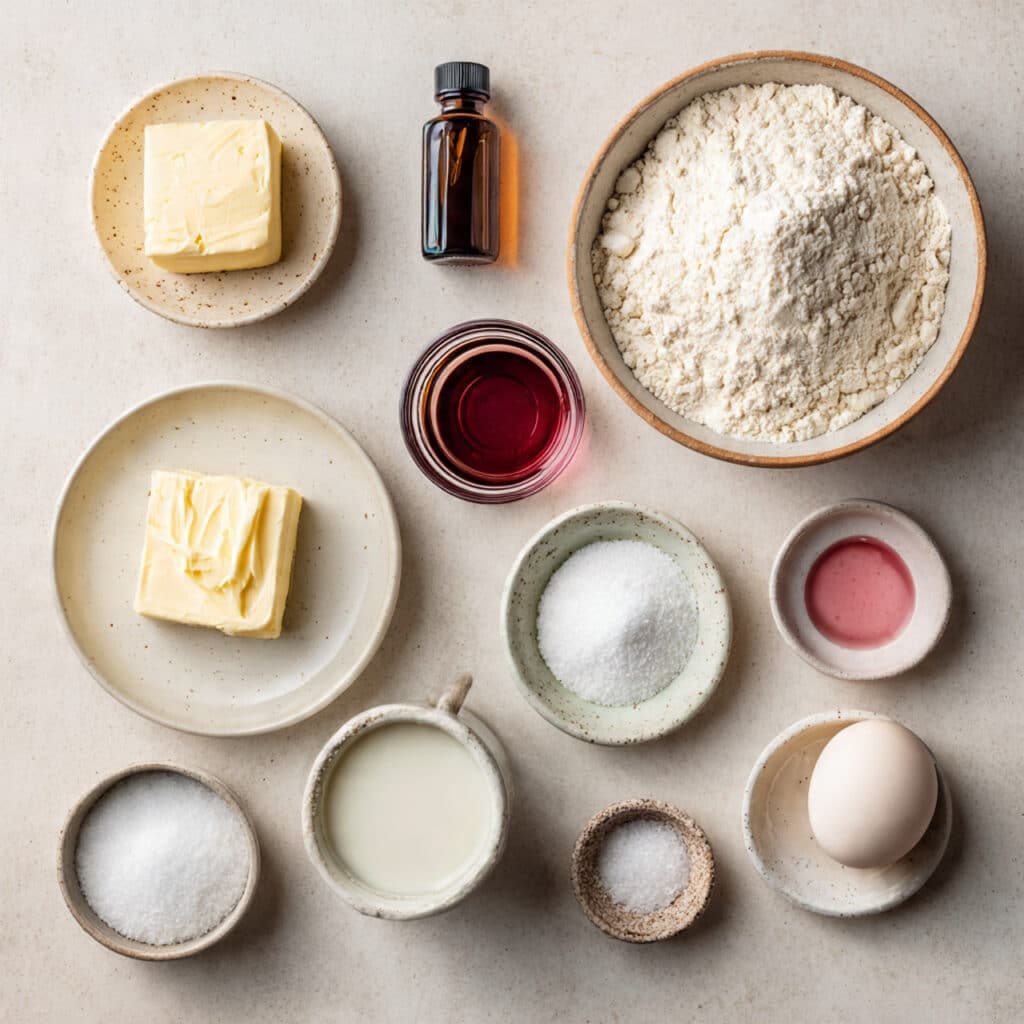
Ingredients You Will Need For Heart Cookies
The balance of these simple ingredients is what creates the perfect tender-yet-sturdy base for your cookie art.
- All-Purpose Flour: 2.5 cups to provide the necessary structure while maintaining a delicate crumb.
- Unsalted Butter: 1 cup softened to create that signature rich and buttery flavor that melts on the tongue.
- Granulated Sugar: 1 cup to sweeten the dough and help create those slightly crisp, golden edges.
- Large Egg: 1 whole egg to bind the ingredients and provide a soft, slightly chewy texture.
- Vanilla Extract: 1 teaspoon for a classic, comforting aroma that enhances the butter.
- Almond Extract: 0.5 teaspoons to add a professional, bakery-style depth to the flavor profile.
- Powdered Sugar: 2 cups for the base of the smooth and glossy marbled glaze.
- Milk: 2 to 3 tablespoons to achieve the perfect dipping consistency for the icing.
- Pink Food Coloring: 1 small drop to create the beautiful ribbons of color in the marbling.
- Salt: 0.25 teaspoons to balance the sweetness and make all the flavors pop.
Smart Ingredient Substitutions
If you are missing an ingredient, these alternatives will still result in a beautiful and delicious cookie.
Granulated Sugar: You can use powdered sugar in the dough for an even more delicate, melt-in-your-mouth shortbread texture.
Milk: Water or even a bit of heavy cream can be used to thin the icing to the correct consistency.
Almond Extract: If you have a nut allergy or simply don’t have it, you can just use extra vanilla extract.
Butter: A high-quality margarine or plant-based butter stick can be used for a dairy-free version.
Spotlight on Key Ingredients
Almond Extract: This is the “secret” ingredient that gives these cookies their sophisticated, high-end bakery taste.
Powdered Sugar: Essential for the glaze, as its fine texture ensures a perfectly smooth, mirror-like finish for the marbling.
Step-by-Step Culinary Journey
Follow these steps to create a tray of cookies that look like they were made by a professional pastry chef.
- Preheat Your Equipment: Set your oven to 350 degrees Fahrenheit and line your baking sheets with parchment paper.
- Combine Ingredients: In a large bowl, cream together the softened butter and granulated sugar until light and fluffy, then beat in the egg and extracts.
- Prepare Your Cooking Vessel: Gradually add the flour and salt to the wet ingredients, mixing until a soft dough forms that pulls away from the sides of the bowl.
- Assemble the Dish: Roll the dough out on a floured surface to 1/4 inch thickness and use your heart cutter to create as many shapes as possible.
- Cook to Perfection: Bake for 8 to 10 minutes until the edges are just barely starting to turn golden, then let them cool completely on a wire rack.
- Finishing Touches: Mix the powdered sugar and milk for the glaze, add a drop of coloring and swirl with a toothpick, then dip the top of each cookie into the mixture.
- Serve and Enjoy: Allow the icing to set for at least an hour before stacking them or sharing them with your loved ones.
Texture and Flavor Development
The cookie itself is dense and buttery, providing a neutral yet rich base that lets the sweet icing shine. As the glaze sets, it forms a thin, delicate crust that “snaps” when you bite into it, revealing the soft cookie underneath. The combination of vanilla and almond creates a nostalgic flavor that feels both elegant and cozy.
Pro Tips and Tricks
- Chill your cut-out cookies on the baking sheet for 10 minutes before putting them in the oven to help them hold their perfect heart shape.
- Use a gel food coloring for the icing as it provides a more vibrant color with just a tiny amount.
- If the icing starts to get too mixed and loses its marbled look, simply add a fresh drizzle of white icing and a new drop of color.
What to Avoid for Best Results
- Do not overmix the dough once you add the flour, as this can make the cookies tough instead of tender.
- Avoid dipping the cookies while they are still even slightly warm, or the icing will melt and look messy.
- Do not use too much food coloring; the beauty of marbling comes from the white space between the colors.
Nutritional Information
Servings: 24 cookies
Calories per serving: 185 calories
Note: These are approximate values.
Preparation Time
Prep Time: 20 minutes
Cook Time: 10 minutes
Total Time: 30 minutes (plus cooling)
Storage and Freshness Tips
Once the icing is fully set, these cookies can be stored in an airtight container at room temperature for up to 1 week. If you need to stack them, place a piece of parchment paper between the layers to keep the beautiful marbled surfaces from sticking together.
How to Serve
These are perfect for a tea party, served alongside a floral herbal tea or a light coffee. They also look stunning as part of a dessert table at a wedding or bridal shower, arranged in a heart-shaped pattern on a large platter.
Creative Leftover Transformations
If you have a few left over, they can be crumbled over a bowl of Greek yogurt or used as a decorative garnish on top of a simple frosted cake. You can even sandwich two cookies together with a bit of raspberry jam for a “heart sandwich.”
Additional Tips for Success
If you find the dough is too soft to handle, wrap it in plastic and chill it in the fridge for 30 minutes. This makes the rolling and cutting process much easier and more precise. Trust me, it makes a world of difference for the final shape.
Make It a Showstopper
To make these truly stand out, you can add a tiny pinch of edible gold leaf or a few white pearl sprinkles to the icing while it is still wet. This adds a touch of luxury that makes the cookies look like they came from a high-end boutique.
Variations to Try
- Chocolate Hearts: Replace 1/4 cup of flour with cocoa powder for a rich chocolate base.
- Lemon Lavender: Add lemon zest to the dough and use a drop of purple coloring for the marbling.
- Galaxy Marbling: Use navy blue, purple, and black coloring with edible glitter for a space-themed look.
- Mini Hearts: Use a tiny cutter to make bite-sized versions that are perfect for garnishing other desserts.
FAQ’s
- Can I use a different shape?
Absolutely, the marbling technique works on any flat sugar cookie shape. - Why is my icing too runny?
You likely added too much milk; just add a bit more powdered sugar until it thickens back up. - How do I get the marbled look?
Drop the coloring on top of the white icing and swirl it gently with a toothpick before dipping the cookie. - Can I freeze these?
Yes, you can freeze the unglazed cookies for up to 3 months. - What kind of food coloring is best?
Gel coloring is preferred for its intensity and ease of use in marbling. - My cookies spread in the oven, what happened?
The butter was likely too warm or the dough needed to be chilled before baking. - Can I use water instead of milk for the glaze?
Yes, water works perfectly fine and makes the icing a bit more translucent. - How long does the icing take to dry?
Depending on the humidity, it usually takes about 1 to 2 hours to be dry to the touch. - Can I add sprinkles?
Yes, add them right after dipping while the icing is still wet. - Is the almond extract necessary?
It isn’t required, but it provides that specific “bakery” flavor that people love.
Conclusion
Heart Cookies with marbled icing are a beautiful way to show someone you care while showing off your artistic side. They are simple to bake, fun to decorate, and even better to eat. Whether you are making them for a holiday or just to brighten someone’s day, these cookies are a guaranteed hit. Now, gather your cutters and your favorite colors, because you’re going to love making these edible pieces of art!
PrintHeart Cookies

Soft and buttery heart-shaped sugar cookies decorated with a stunning pink and white marbled glaze for a professional bakery look.
Ingredients
- 2.5 cups All-Purpose Flour
- 1 cup Unsalted Butter, softened
- 1 cup Granulated Sugar
- 1 Large Egg
- 1 teaspoon Vanilla Extract
- 0.5 teaspoons Almond Extract
- 2 cups Powdered Sugar
- 2 tablespoons Milk
- 1 drop Pink Food Coloring
- 0.25 teaspoons Salt
Instructions
- Preheat oven to 350°F (175°C) and line baking sheets with parchment paper.
- In a large bowl, cream the softened butter and granulated sugar until light and fluffy. Beat in the egg, vanilla, and almond extract.
- Gradually add the flour and salt, mixing until a soft dough forms.
- Roll dough on a floured surface to 1/4 inch thickness and cut out heart shapes.
- Place cookies on prepared sheets and bake for 8 to 10 minutes until edges are barely golden. Let cool completely.
- For the glaze, whisk together powdered sugar and milk in a shallow wide bowl until smooth.
- Place a tiny drop of pink food coloring on the icing and swirl gently with a toothpick.
- Dip the top of each cooled cookie into the icing, lift, and let excess drip off.
- Place cookies on a wire rack and allow the icing to set completely (about 1 to 2 hours).
Notes
- Chill the cut-out dough for 10 minutes before baking to prevent spreading.
- Use gel food coloring for the best marbling results.
- Do not over-swirl the colors or they will become muddy instead of marbled.