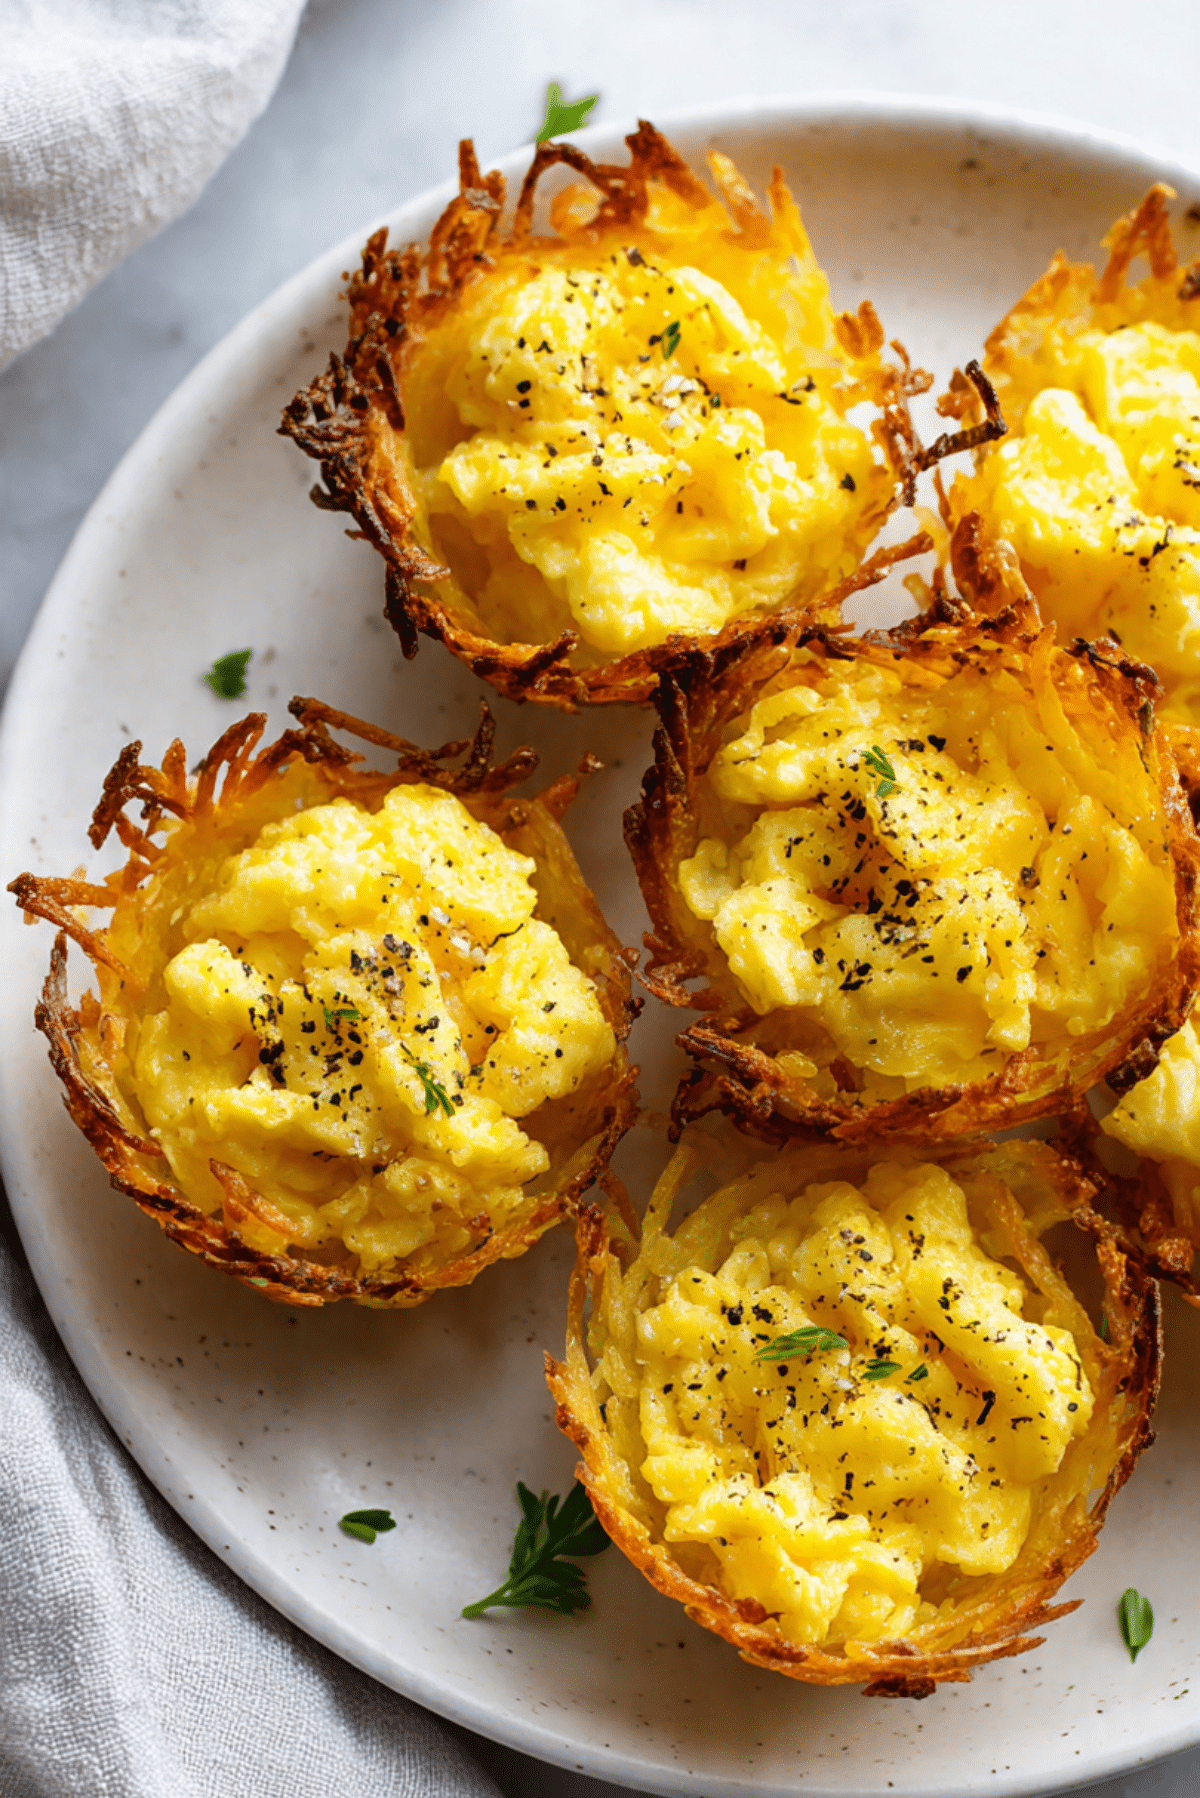
Hash Brown Cups
There’s something incredibly satisfying about crispy potatoes and fluffy eggs coming together in a single handheld bite. These Hash Brown Cups are just that—crunchy on the outside, creamy on the inside, and made to impress. Whether you’re hosting brunch, meal prepping, or just treating yourself to something extra delicious, these little cups of comfort hit all the right notes.
Why These Golden Nests Belong in Your Breakfast Rotation
You know those mornings when you want something hearty but also fun to eat? These crispy hash brown cups come to the rescue. They’re just as delightful to serve as they are to devour. The texture is unbeatable, and that warm, cheesy egg center? Total bliss.
From Diner-Inspired to Homemade Hero
Inspired by classic diner-style hash browns and breakfast egg bakes, these little cups are a modern twist that bring together the best of both. They have that nostalgic crispy edge of skillet potatoes, but with a neat, grab-and-go presentation that feels fresh. Think of them as your favorite breakfast plate, reimagined into one perfect, crispy-edged bite.
Why You’ll Keep Coming Back to This Recipe
Once you try it, you’ll see why it becomes a breakfast staple. Let me break it down:
Versatile: Fill them with eggs, cheese, veggies, or anything else you love.
Budget-Friendly: Potatoes and eggs are as affordable as it gets.
Quick and Easy: Bake the cups while you prep the filling—simple and hands-off.
Customizable: Go classic, go spicy, or go cheesy—whatever fits your mood.
Crowd-Pleasing: Great for brunch buffets or picky eaters.
Make-Ahead Friendly: Prep the cups in advance and fill them fresh.
Great for Leftovers: Just pop them in the oven or air fryer to crisp them back up.
Secrets for Getting That Perfect Crisp
Making these isn’t hard, but a few tips go a long way toward achieving crispy perfection:
- Squeeze excess moisture from the shredded potatoes to prevent sogginess.
- Use a nonstick muffin tin or line with silicone cups for easy release.
- Par-bake the hash brown shells before adding the filling.
- Don’t skip seasoning the potato mixture—it makes a big difference.
- Let the cups cool slightly before removing to help them set and hold shape.
Must-Have Tools for the Job
You won’t need anything fancy—just your regular kitchen tools:
Muffin Tin: A standard 12-cup tin works perfectly to shape the nests.
Box Grater or Food Processor: For grating potatoes if you’re using fresh.
Cheesecloth or Clean Kitchen Towel: Essential for squeezing out water from the shredded potatoes.
Mixing Bowls: To toss the potato mixture and beat the eggs.
Nonstick Spray or Silicone Liners: To keep the cups from sticking.
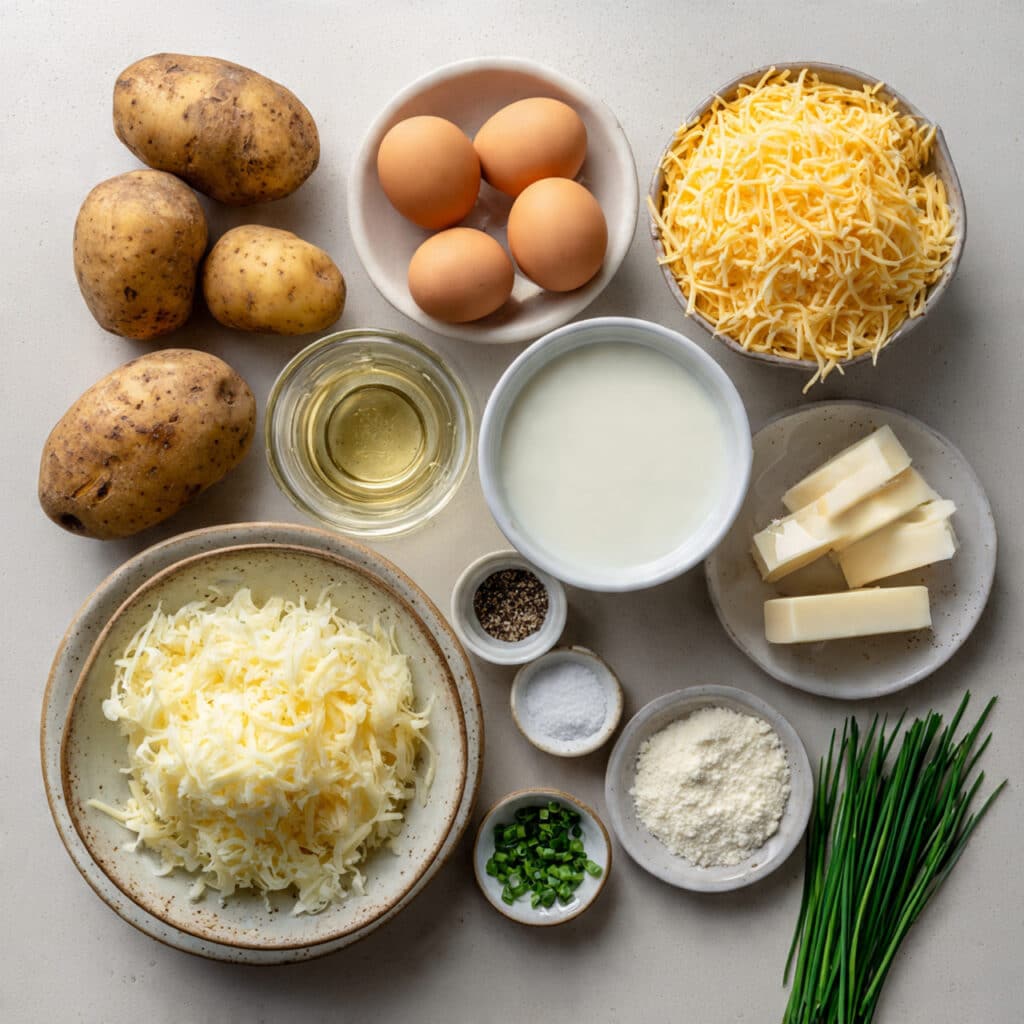
Ingredients You Will Need For These Crispy, Creamy Cups
Here’s what brings it all together—simple ingredients with maximum flavor:
- Russet Potatoes: 3 medium, peeled and grated. These are your base, offering that classic hash brown texture.
- Eggs: 5 large. Used for both binding the hash browns and filling the cups.
- Shredded Cheddar Cheese: 1 cup. Melts beautifully into the egg filling and adds sharpness.
- Milk: 1/4 cup. Lightens the eggs for a fluffier center.
- Salt: 1 teaspoon. Brings all the flavors forward.
- Black Pepper: 1/2 teaspoon. Adds a little kick.
- Olive Oil or Melted Butter: 2 tablespoons. Helps crisp up the potato shells.
- Garlic Powder (Optional): 1/2 teaspoon. For an extra savory touch.
- Chopped Chives or Parsley: 2 tablespoons. Brightens everything at the end.
Easy Ingredient Swaps If You’re Missing Something
Don’t stress if your fridge is a little bare—there are always options.
Russet Potatoes: Frozen shredded hash browns, thawed and squeezed dry.
Cheddar Cheese: Any melty cheese like mozzarella, pepper jack, or Swiss.
Milk: Half-and-half or a splash of cream.
Chives or Parsley: Diced green onions or fresh dill.
Olive Oil: Melted ghee or neutral vegetable oil.
Hero Ingredients That Make the Dish Sing
Russet Potatoes: Their starch content makes them ideal for crisping up and holding shape in the muffin tin.
Cheddar Cheese: This is where the flavor magic happens. Sharp, melty, and just the right amount of salty richness.
Let’s Get Started – Here’s How It All Comes Together
Ready to make your own breakfast beauties? Here’s how:
- Preheat Your Equipment:
Set your oven to 400°F (200°C). Grease a 12-cup muffin tin or line it with silicone liners. - Combine Ingredients:
Grate the potatoes and squeeze out as much moisture as possible. Mix with 1 beaten egg, olive oil, garlic powder (if using), salt, and pepper. - Prepare Your Cooking Vessel:
Press the potato mixture firmly into each muffin cup, shaping up the sides to form a nest. Bake for 15–20 minutes until golden brown. - Assemble the Dish:
While the shells bake, whisk together remaining eggs, milk, and shredded cheese. - Cook to Perfection:
Pour the egg mixture into the par-baked hash brown cups. Return to oven and bake another 10–12 minutes until eggs are set. - Finishing Touches:
Let cool for 5 minutes before removing from tin. Top with chives or parsley. - Serve and Enjoy:
Serve warm, or store and reheat for breakfast throughout the week.
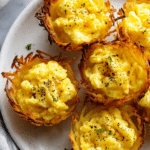
Texture Goals – Crunchy Meets Creamy
These cups are all about balance. You get a golden, crispy exterior from the shredded potato shell and a soft, fluffy egg center that melts in your mouth. A little cheesy pull, a sprinkle of herbs—it’s comfort in every bite.
Handy Tips to Make Your Mornings Smoother
- Freeze grated potato ahead of time and thaw when ready to bake.
- Double the recipe and freeze extras for grab-and-go breakfasts.
- For extra crispiness, broil the cups for 2 minutes at the end.
- Add chopped sautéed veggies or cooked turkey sausage to the egg mix for more flavor.
What to Watch Out For
- Soggy Cups: Always squeeze out potato moisture thoroughly.
- Eggs Overflowing: Don’t overfill the cups—leave a little room.
- Sticking to Tin: Use nonstick spray generously or opt for silicone liners.
- Undercooked Centers: Make sure eggs are fully set before removing.
Nutrition Facts at a Glance
Servings: 6
Calories per serving: 220
Note: These are approximate values.
Time Overview – Quick and Easy
Prep Time: 15 minutes
Cook Time: 30 minutes
Total Time: 45 minutes
Make-Ahead and Storage Tips
These cups were made for prepping ahead. Bake and cool completely, then refrigerate in an airtight container for up to 4 days. Reheat in the oven or air fryer to bring back the crisp. They also freeze beautifully—just thaw overnight before reheating.
How to Serve Them Best
Serve these with a dollop of sour cream, a side of salsa, or fresh fruit for a full brunch plate. They also pair perfectly with a hot cup of coffee or a green smoothie.
Repurpose Those Leftovers Like a Pro
Turn them into:
- Mini breakfast sandwiches with avocado or hummus
- Toppings for a grain bowl
- Crumbled into a wrap with fresh greens and sauce
Extra Tips to Make Them Shine
- Add diced bell peppers or spinach for a veggie boost.
- Sprinkle with hot sauce or smoked paprika for extra zing.
- Let kids customize their own with fun toppings before baking.
Presentation That Wows
Serve on a wood board or slate platter with a sprinkle of fresh herbs. You can even pop them into cupcake wrappers for brunch parties.
Fun Variations to Explore
- Veggie-Packed: Add sautéed spinach, mushrooms, and tomatoes to the egg mix.
- Tex-Mex: Mix in taco seasoning and top with salsa.
- Cheesy Explosion: Combine 3 types of cheese for a gooey center.
- Herb Garden: Add fresh thyme or dill for extra flavor.
- Mini Quiche: Pour egg mixture with diced veggies and bake in smaller molds.
FAQ’s
1. Can I use frozen hash browns?
Yes, just thaw them and squeeze out the moisture first.
2. Do I need to peel the potatoes?
For best texture, yes, but you can leave the peel if you prefer.
3. Can I add meat to the filling?
Sure! Try cooked turkey sausage or chopped chicken.
4. How do I reheat them?
Use the oven or air fryer to restore crispness.
5. Can I make them dairy-free?
Use dairy-free cheese and milk alternatives.
6. Will they stick to the muffin tin?
Not if you grease it well or use silicone liners.
7. Can I freeze these?
Absolutely. Wrap tightly and freeze up to 2 months.
8. What other veggies work well?
Bell peppers, onions, spinach, or zucchini.
9. Can I make mini versions?
Yes! Use a mini muffin tin and reduce bake time slightly.
10. How long will they last in the fridge?
About 4 days in an airtight container.
Conclusion
These Hash Brown Cups are more than just a cute breakfast idea. They’re practical, crave-worthy, and endlessly flexible. From the golden crust to the creamy center, they bring joy to every bite. Let me tell you, it’s worth every minute—and every crumb.
PrintHash Brown Cups
Golden, crispy hash brown cups filled with fluffy scrambled eggs and melted cheese. A fun, portable breakfast that’s perfect for meal prep or brunch gatherings.
Ingredients
- 3 medium Russet potatoes, peeled and grated
- 5 large eggs
- 1 cup shredded Cheddar cheese
- 1/4 cup milk
- 1 teaspoon salt
- 1/2 teaspoon black pepper
- 2 tablespoons olive oil or melted butter
- 1/2 teaspoon garlic powder (optional)
- 2 tablespoons chopped chives or parsley
Instructions
- Preheat oven to 400°F (200°C). Grease a 12-cup muffin tin or line with silicone liners.
- Grate potatoes and squeeze out excess moisture. Mix with 1 beaten egg, olive oil, garlic powder, salt, and pepper.
- Press potato mixture into muffin cups, shaping into nests. Bake for 15–20 minutes until golden.
- In a separate bowl, whisk remaining eggs, milk, and shredded cheese.
- Pour egg mixture into par-baked hash brown cups. Bake 10–12 minutes until eggs are set.
- Let cool for 5 minutes. Top with chives or parsley and serve warm.
Notes
- Use frozen hash browns if needed, just thaw and dry them.
- Add diced veggies or turkey sausage for extra flavor.
- Broil for 2 minutes at the end for a crispier top.