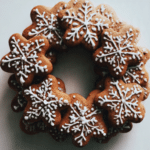
Gingerbread Cookie Wreath
There is something truly captivating about a dessert that doubles as a piece of festive art, and this Gingerbread Cookie Wreath is the ultimate holiday showstopper. Imagine a collection of perfectly spiced, golden-brown cookies arranged in a stunning circular pattern, held together with delicate royal icing and adorned with edible pearls. It brings the warm, nostalgic scent of ginger and cinnamon into your home, creating an edible centerpiece that looks almost too beautiful to eat. Trust me, you’re going to love this, and let me tell you, it’s worth every bite for that satisfying snap of a well-baked cookie followed by a burst of holiday spice.
An Edible Tradition That Radiates Holiday Spirit
While gingerbread has been a staple of winter celebrations for centuries, the concept of an edible wreath takes the tradition of holiday decorating and turns it into a delicious activity for the whole family. Historically, gingerbread was shaped into intricate designs to tell stories or celebrate seasonal festivals, and this wreath continues that legacy of craftsmanship. This version focuses on a sturdy yet tender dough that holds its shape perfectly during baking, ensuring your stars, hearts, or snowflake shapes fit together in a seamless, elegant circle. It is a celebration of geometry and flavor that makes any holiday table feel a bit more magical.
Why This Edible Wreath Is a Total Game-Changer
When you want to impress your guests with your creativity without needing advanced pastry skills, this cookie wreath is the perfect project for a festive afternoon. This one’s a total game-changer because it combines a reliable cookie recipe with a presentation that looks like it came from a professional gallery.
Versatile: You can use any cookie cutter shapes you like, from classic stars and reindeer to modern geometric patterns, to suit your specific style.
Budget-Friendly: The ingredients are simple pantry staples like flour, ginger, and molasses, making it an affordable way to create a high-impact dessert.
Quick and Easy: The dough is very forgiving and easy to work with, and the assembly is as simple as “gluing” the pieces together with icing.
Customizable: You can decorate each individual cookie with different patterns of icing, sprinkles, or even gold leaf for a truly unique look.
Crowd-Pleasing: Everyone loves a classic gingerbread cookie, and the interactive nature of “breaking off” a piece of the wreath is a hit at parties.
Make-Ahead Friendly: These cookies stay crisp for a long time, so you can bake and assemble your wreath several days before your big event.
Great for Leftovers: If any cookies remain, they are perfect for dunking into a cold glass of milk or a hot cup of coffee the next day.
Secrets for a Sturdy and Stunning Cookie Design
The secret to a successful cookie wreath lies in the consistency of your dough and the strength of your icing. You want a gingerbread dough that does not spread much in the oven, which is achieved by chilling the dough thoroughly before rolling and cutting. Using a high proportion of flour to fat helps the cookies maintain those sharp, clean edges that look so professional. For the “glue,” a thick royal icing made with egg whites and powdered sugar is essential, as it dries hard and creates a permanent bond between the cookies. Finally, make sure to bake your cookies until they are just starting to turn dark at the edges to ensure they have the structural integrity to support the weight of the wreath.
Essential Tools for Your Creative Baking
Having these tools ready will help you cut precise shapes and assemble your wreath with ease and confidence.
- Assorted Cookie Cutters: Stars of various sizes work best for creating a layered, dimensional look for your wreath.
- Rolling Pin: Essential for getting an even thickness across your dough, which ensures all cookies bake at the same rate.
- Parchment Paper: Use this to bake the cookies and as a template to draw a perfect circle for your wreath assembly.
- Piping Bag and Small Round Tip: Necessary for both the decorative icing work and the “gluing” of the cookies.
- Large Flat Serving Platter: You will need a completely flat surface to assemble the wreath so it doesn’t crack or lean.
Ingredients You Will Need for This Festive Artwork
A great gingerbread cookie depends on the balance of dark, rich molasses and a bold blend of aromatic spices.
- Unsalted Butter: 150 grams Softened butter provides the base and ensures the cookies have a rich, melt-in-the-mouth quality.
- Dark Brown Sugar: 150 grams Adds a deep sweetness and contributes to the beautiful golden-brown color.
- Molasses: 120 milliliters The essential ingredient for that classic gingerbread flavor and a chewy-yet-crisp texture.
- Large Egg: 1 unit Binds the dough together and adds a bit of richness.
- All Purpose Flour: 450 grams Provides the sturdy structure needed for cookies that will be handled and stacked.
- Ground Ginger: 1 tablespoon The star of the show, providing a sharp and warming spice profile.
- Ground Cinnamon: 1 teaspoon Adds a familiar, sweet warmth that complements the ginger perfectly.
- Ground Cloves: 0.5 teaspoon A small amount adds a deep, aromatic complexity to the spice blend.
- Baking Soda: 1 teaspoon Helps the cookies rise just enough to be light without losing their shape.
- Powdered Sugar: 250 grams The base for the royal icing that will decorate and hold the wreath together.
Simple Swaps for Your Pantry
If you find yourself missing an ingredient, you can easily adapt the recipe while keeping that festive spirit alive.
Dark Brown Sugar: You can use granulated sugar if you prefer a crisper, lighter-colored cookie, or coconut sugar for an earthy flavor.
Molasses: Honey or maple syrup can be used, though the flavor will be milder and the cookies will be lighter in color.
Cloves: If you don’t have cloves, use a pinch of allspice or extra cinnamon to maintain the warmth.
A Closer Look at Our Key Ingredients
Understanding these two components will help you see why they are so vital for a cookie that needs to be both delicious and structural.
Molasses: This thick syrup is what gives gingerbread its identity, providing a robust, slightly bitter sweetness that stands up to the heavy spices.
All Purpose Flour: Using a slightly higher amount than a standard cookie recipe ensures the dough is stiff enough to hold intricate shapes without warping.
Step by Step Guide to Baking Bliss
Follow these steps carefully to ensure your wreath is as sturdy as it is beautiful and delicious.
- Preheat Your Equipment: Get your oven to 350 degrees F and line your baking sheets with parchment paper for a non-stick surface.
- Combine Ingredients: Whisk the flour, ginger, cinnamon, cloves, and baking soda together, then cream the butter and sugar in a separate bowl until smooth.
- Prepare Your Cooking Vessel: Mix the egg and molasses into the butter mixture, then gradually stir in the dry ingredients until a stiff dough forms.
- Assemble the Dish: Roll out the dough and cut out your shapes, then chill them on the tray for fifteen minutes before baking.
- Cook to Perfection: Bake the cookies for 8 to 10 minutes until the edges are firm, then let them cool completely on a wire rack.
- Finishing Touches: Decorate the cooled cookies with royal icing, then arrange them in a circle on your platter, using extra icing to “glue” the layers together.
- Serve and Enjoy: Once the icing is completely hard, your wreath is ready to be displayed and eventually enjoyed piece by piece.
Exploring the Deep Flavors and Textures
The first thing you will notice is the satisfying “snap” as you break off a cookie from the wreath. The flavor is a sophisticated balance of deep molasses sweetness and a sharp, spicy kick from the ginger. The royal icing adds a sweet, crunchy contrast that rounds out the spices beautifully. Because the cookies are baked until firm, they have a wonderful toasted quality that makes them feel like a true cold-weather treat.
Expert Cooking Tips and Tricks
- Draw a circle on a piece of parchment paper to use as a guide when you start laying down the first layer of cookies.
- If your dough gets too soft while rolling, pop it back in the fridge for ten minutes to make cutting easier.
- Use a very thick icing for the assembly so the cookies don’t slide around while the icing is setting.
Common Mistakes and How to Avoid Them
- Warm Dough: If the dough is warm when it goes into the oven, the cookies will spread and lose their sharp edges.
- Thin Icing: If your royal icing is too runny, it won’t act as a strong enough glue to hold the weight of the stacked cookies.
- Overcrowding: Give your cookies space on the baking sheet so the heat can circulate and bake them evenly all the way through.
Nutrition Facts and Servings
Servings: 15
Calories per serving: 240
Note: These are approximate values.
Preparation and Baking Times
Prep Time: 45 minutes
Cook Time: 10 minutes
Total Time: 55 minutes
Storage and Make Ahead Advice
This cookie wreath is incredibly durable. Once the icing has set hard, you can keep the wreath at room temperature, uncovered, for up to three days as a decoration. If you want to keep the cookies fresh for eating, store them in an airtight container for up to two weeks. The unbaked dough can also be frozen for up to a month, allowing you to bake fresh cookies whenever you need them.
Creative Serving and Pairing Ideas
Place your wreath in the center of the table and surround it with fresh pine branches or cinnamon sticks for a beautiful display. It pairs wonderfully with a warm glass of spiced apple cider or a creamy latte. For a fun party activity, you can leave some cookies undecorated and let your guests add their own icing patterns before adding them to a “community” wreath.
Transforming Your Leftovers
If you have leftover cookies, they are excellent when crushed and used as a crust for a cheesecake or a festive tart. You can also layer the broken pieces with whipped cream and poached pears for a quick and easy holiday trifle that looks amazing.
Additional Advice for Success
For the most professional look, try to use at least three different sizes of the same shape to create depth and interest in your wreath. Also, make sure your royal icing is kept covered with a damp cloth while you work, as it dries out very quickly when exposed to the air.
How to Make It a Showstopper
To take the visual appeal to the next level, use edible silver or gold pearls to decorate the points of your stars. You can also tie a beautiful red velvet ribbon around the bottom of the wreath for a classic holiday look. A light dusting of powdered sugar over the finished wreath can give it a magical, “snow-covered” appearance.
Creative Variations to Try
- Snowflake Wreath: Use only snowflake-shaped cutters and white icing for a sophisticated, “winter wonderland” theme.
- Chocolate Gingerbread: Replace 30 grams of flour with cocoa powder for a dark, chocolatey twist on the classic.
- Lemon Glazed: Use a lemon-flavored icing to add a bright, citrusy contrast to the deep spices.
- Nutty Base: Press finely chopped almonds or pecans into the back of the cookies before baking for added crunch.
FAQ’s
- How long does the icing take to dry?
Royal icing usually takes about two to four hours to dry completely hard, depending on the humidity in your kitchen. - Can I hang the wreath on a door?
It is best kept flat on a platter, as the weight of the cookies might cause it to break if hung vertically. - Do I need to use egg whites for the icing?
You can use meringue powder mixed with water as a safer, shelf-stable alternative to raw egg whites. - Why are my cookies soft?
They may be underbaked. Gingerbread for a wreath should be baked until firm to provide structural support. - Can I make this gluten free?
Yes, a 1:1 gluten free flour blend works well, but be extra careful when handling the cookies as they may be more fragile. - How do I get the cookies to stick together?
Apply a generous “dot” of thick royal icing to the back of the top cookie where it overlaps with the bottom layer. - Can I use honey instead of molasses?
Yes, but the color will be much lighter and the flavor will be more floral than spicy. - What if my dough is too crumbly?
Add a teaspoon of water at a time until the dough holds together without being sticky. - How many cookies do I need for a wreath?
Typically, between 20 and 30 cookies of varying sizes are needed to create a full, layered look. - Can I use store-bought dough?
You can, but make sure it is a “stiff” gingerbread variety meant for cut-out cookies rather than soft ginger snaps.
Conclusion
Creating a Gingerbread Cookie Wreath is a beautiful way to bring a touch of handmade charm to your holiday celebrations. From the first scent of spices in the oven to the final decorative pearl, every step is a celebration of the season. I hope you enjoy the process of building this edible masterpiece and sharing it with those you love. This one’s a total game-changer for your holiday decor, and I can’t wait for you to see how much joy it brings to your home.
PrintGingerbread Cookie Wreath
An edible holiday centerpiece made of spiced gingerbread cookies arranged in a decorative wreath pattern and held together with royal icing.
Ingredients
- 150g Unsalted Butter
- 150g Dark Brown Sugar
- 120ml Molasses
- 1 Large Egg
- 450g All Purpose Flour
- 1 tbsp Ground Ginger
- 1 tsp Ground Cinnamon
- 0.5 tsp Ground Cloves
- 1 tsp Baking Soda
- 250g Powdered Sugar
Instructions
- Preheat oven to 350°F (175°C) and line baking sheets with parchment paper.
- Cream butter and dark brown sugar until smooth, then beat in the egg and molasses.
- In a separate bowl, whisk together flour, ginger, cinnamon, cloves, and baking soda.
- Gradually add the dry ingredients to the wet mixture to form a stiff dough.
- Roll out dough to 1/4 inch thickness and cut into various festive shapes.
- Bake cookies for 8-10 minutes until firm at the edges; cool completely on a wire rack.
- Whisk powdered sugar with a small amount of water or egg white to create a thick royal icing.
- Arrange the cookies in a circular wreath pattern on a flat platter, using the icing to secure the layers together.
Notes
- Chill the dough for at least 30 minutes before rolling to prevent the cookies from spreading.
- Ensure the cookies are completely cold before attempting to assemble the wreath with icing.
- Use a very thick icing consistency for the ‘glue’ to ensure a strong bond.