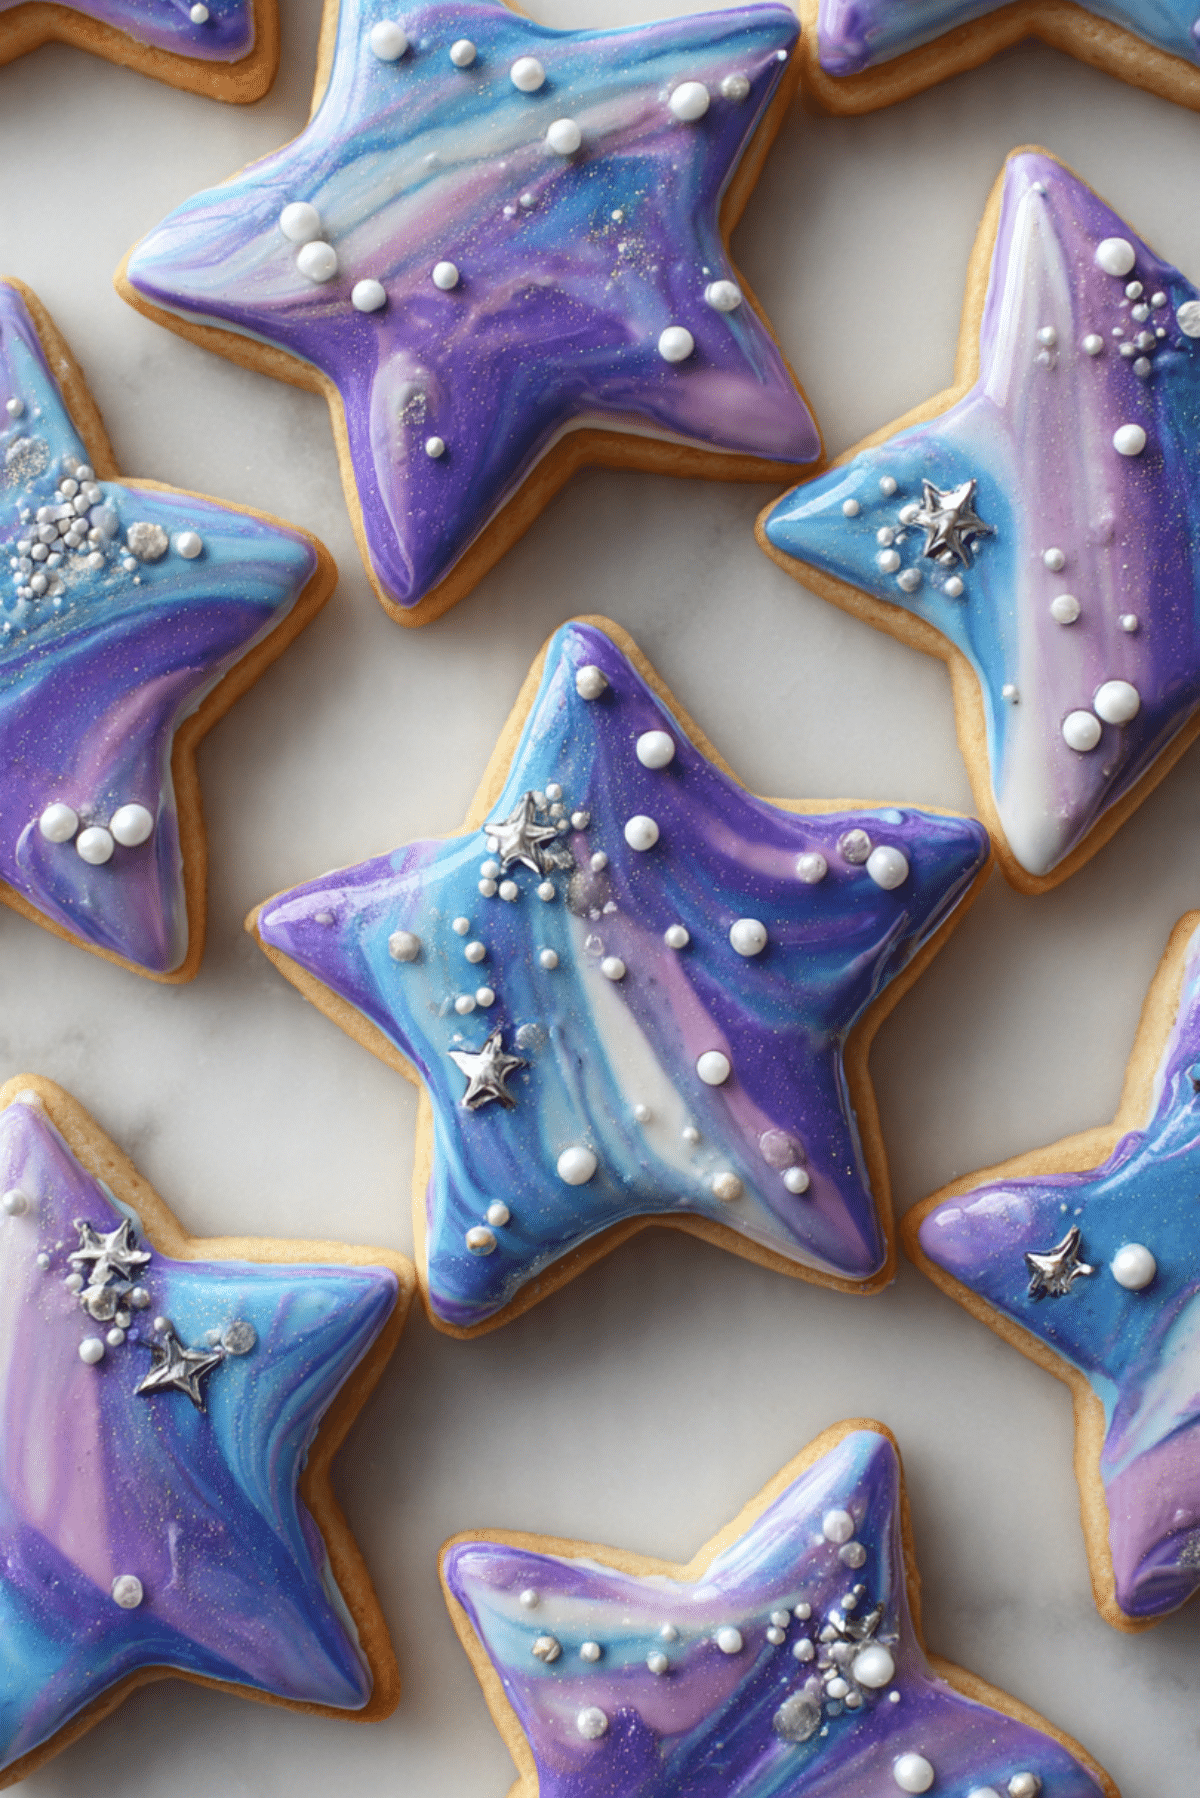
Galaxy Cookies
There is something truly magical about a dessert that looks like it was plucked right out of the night sky. These Galaxy Cookies are not just a treat for your taste buds, but a stunning visual experience that will leave everyone in awe. With their deep chocolate base and swirling nebulae of purple, blue, and white icing, they bring a touch of cosmic wonder to any dessert table. Trust me, you’re going to love this recipe because it combines the comforting crunch of a classic cookie with an artistic flair that is surprisingly easy to achieve.
The Celestial Charm of the Galaxy Cookie
While decorated sugar cookies have been around for generations, the galaxy trend took the culinary world by storm as bakers looked for ways to incorporate vibrant, swirling colors into their art. These cookies are often inspired by stunning images of deep space nebulae and distant stars. Making them feels like a creative exploration, where no two cookies look exactly the same, much like the actual universe. They have become a staple for space themed parties, movie marathons, or simply as a way to brighten up a rainy afternoon with some edible art.
Why This Cosmic Treat is a Total Game-Changer
Let me tell you, it’s worth every bite when you see the joy these cookies bring to people of all ages. They are much more than just a pretty face in the bakery window.
Versatile: These are perfect for birthday parties, school events, or even as a unique holiday gift for the stargazers in your life.
Budget-Friendly: You likely already have most of the pantry staples like flour, cocoa, and sugar ready to go in your kitchen.
Quick and Easy: Despite their intricate appearance, the dipping technique for the icing is fast and requires no professional piping skills.
Customizable: You can easily swap the colors to create different planetary themes or even add edible glitter for extra sparkle.
Crowd-Pleasing: The combination of rich chocolate and sweet vanilla icing is a timeless flavor profile that everyone enjoys.
Make-Ahead Friendly: The dough can be prepared and chilled in advance, making your baking day much more manageable.
Great for Leftovers: These cookies stay crisp and delicious for several days when stored properly in an airtight container.
Pro Tips for Stellar Results
Getting that perfect marbled effect is easier than you think if you follow a few simple rules of the trade. First, ensure your cookies are completely cool before you even think about dipping them, otherwise the icing will melt and run right off. When you are swirling your food coloring into the icing, less is more, as a few gentle pokes with a toothpick create much better “space clouds” than over-mixing. Finally, always have your star sprinkles ready to go so you can drop them onto the wet icing before it sets into a firm glaze.
Essential Tools for Your Space Mission
Preparing for your baking journey requires a few specific items to ensure everything goes smoothly from start to finish.
Star Cookie Cutter: This is essential for getting those iconic celestial shapes that define the recipe.
Rolling Pin: You will need this to get an even thickness for your dough so they all bake at the same rate.
Large Mixing Bowls: One for your dry ingredients and another for creaming your butter and sugar.
Baking Sheets: Use heavy duty pans and line them with parchment paper to prevent any sticking or burning.
Wire Cooling Rack: This allows air to circulate around the cookies so they become crisp rather than soggy.
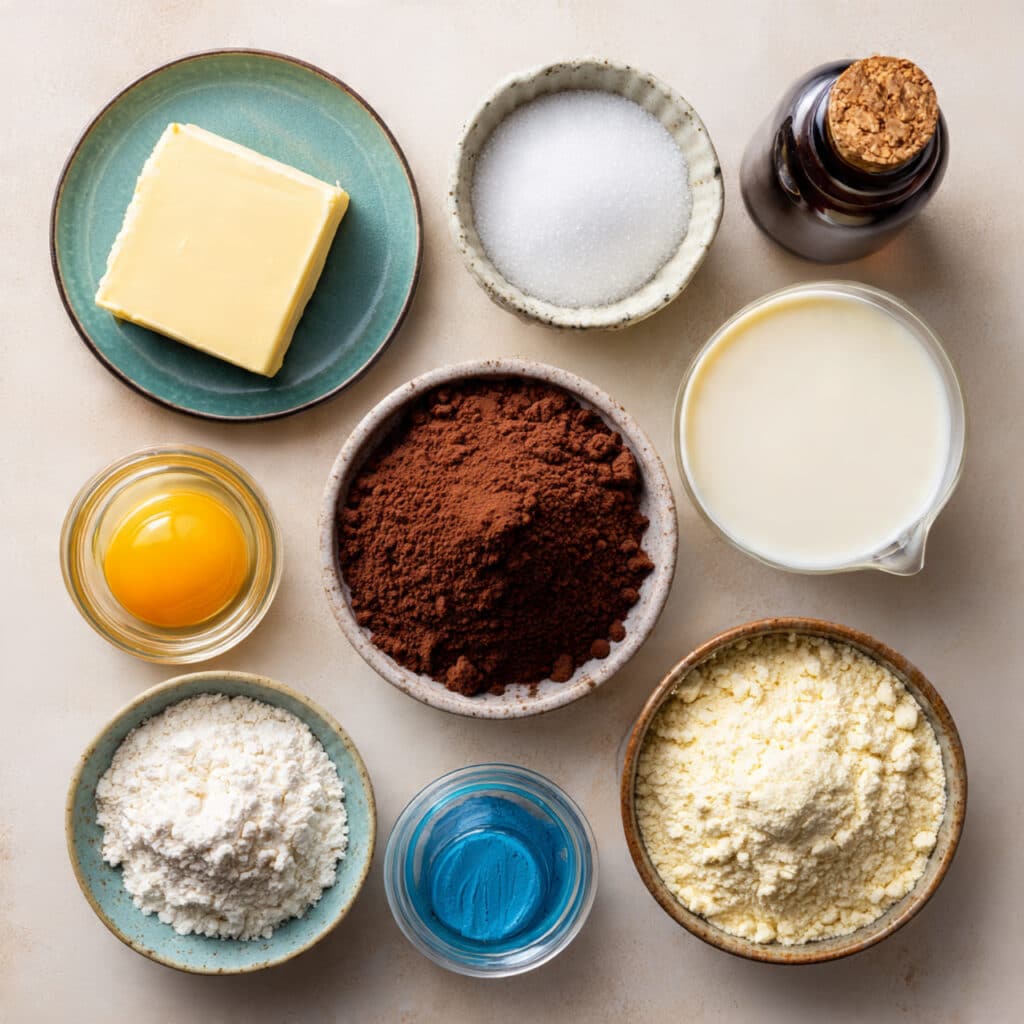
Ingredients You Will Need For Galaxy Cookies
The harmony of these ingredients creates a chocolatey base that stands up perfectly to the sweet, vibrant icing on top.
- Unsalted Butter: 1 cup of softened butter provides the rich, tender base for the cookie dough.
- Granulated Sugar: 1 cup of sugar to sweeten the dough and help create those crisp edges we all love.
- Large Egg: 1 egg to act as the binder that holds all the cosmic goodness together.
- Vanilla Extract: 1 teaspoon of high quality extract to add a warm, floral depth to the flavor.
- All Purpose Flour: 2 and a half cups of flour to provide the necessary structure for the stars.
- Unsweetened Cocoa Powder: half a cup of dark cocoa to give the cookies their deep, space like color and rich flavor.
- Salt: half a teaspoon to balance the sweetness and enhance the chocolate notes.
- Powdered Sugar: 2 cups for the icing base to create a smooth and glossy finish.
- Whole Milk: 2 to 3 tablespoons to thin the icing to the perfect dipping consistency.
- Gel Food Coloring: Purple, blue, and black shades to create the swirling nebula effect.
- Edible Star Sprinkles: Small silver stars to represent the distant suns in your edible galaxy.
Flexible Ingredient Substitutions
If you find yourself missing an item, don’t worry, because the universe of baking is quite forgiving with these swaps.
All Purpose Flour: Gluten free 1 to 1 baking flour.
Unsalted Butter: Vegan butter sticks or coconut oil for a dairy free alternative.
Whole Milk: Any plant based milk like almond or oat milk for the icing.
Granulated Sugar: Coconut sugar for a slightly more caramel like undertone.
Key Ingredients Spotlight
Dark Cocoa Powder: This is the secret to getting that deep, dark background that makes the colorful icing really pop visually. It provides a sophisticated bitterness that pairs beautifully with the sweet glaze.
Gel Food Coloring: Unlike liquid coloring, gel is concentrated and won’t thin out your icing, allowing you to achieve those deep, vibrant galaxy hues without changing the texture.
Step by Step Journey to the Stars
Let’s head into the kitchen and start crafting these beautiful treats with a process that is as fun as it is rewarding.
- Preheat Your Equipment: Set your oven to 350 degrees and line your baking sheets with parchment paper so the cookies don’t stick to the metal.
- Combine Ingredients: Cream together the softened butter and sugar until light and fluffy, then beat in the egg and vanilla before gradually adding the flour, cocoa, and salt.
- Prepare Your Cooking Vessel: Lightly flour your work surface and roll the dough out to about a quarter inch thickness.
- Assemble the Dish: Use your star cutter to stamp out as many shapes as possible and place them an inch apart on the prepared sheets.
- Cook to Perfection: Bake the cookies for 8 to 10 minutes until the edges are set, then let them cool completely on a wire rack.
- Finishing Touches: Mix your powdered sugar and milk into a thick glaze, swirl in drops of food coloring, and dip the tops of the cooled cookies into the mixture.
- Serve and Enjoy: Add your star sprinkles while the icing is wet and let them set for at least an hour before sharing your masterpiece.
Texture and Flavor Development
When you take your first bite, you will notice a delightful contrast between the snap of the chocolate cookie and the smooth, melt in your mouth icing. The dark cocoa provides an earthy richness that is punctuated by the bright, sweet notes of the vanilla glaze. As the cookies sit, the icing hardens into a delicate shell, creating a multi layered texture that makes these feel like a professional bakery find.
Helpful Cooking Tips and Tricks
- Always chill your dough for at least 30 minutes before rolling to prevent the stars from spreading too much in the oven.
- Use a toothpick to swirl the colors in the icing bowl between every three or four cookies to keep the marbled look fresh.
- If your icing is too thick, add milk one drop at a time, because a little bit goes a very long way.
What to Avoid in the Kitchen
- Don’t overwork the dough or the cookies will become tough and lose their tender crumb.
- Avoid using liquid food coloring as it can make the icing too watery and the colors won’t be as intense.
- Never dip a warm cookie, as the heat will cause the icing to become transparent and messy.
Nutritional Facts
Servings: 24 cookies
Calories per serving: 165
Note: These are approximate values.
Timing Your Bake
Prep Time: 45 minutes
Cook Time: 10 minutes
Total Time: 55 minutes
Storage and Make-Ahead Advice
You can easily bake these a day in advance and store them in an airtight container at room temperature before icing. Once iced and fully set, they should be stored in a single layer or separated by parchment paper to keep the designs pristine. They will stay fresh for up to five days, though they rarely last that long around hungry fans!
Creative Serving Suggestions
Serve these on a dark slate platter to really lean into the space theme, or pair them with a cold glass of milk for a classic snack. They also look incredible served alongside a bowl of blackberry sorbet, which mimics the deep purple tones of the galaxy icing.
Repurposing Your Leftovers
If you have extra cookies, you can crush them up and use them as a topping for vanilla bean ice cream. The marbled icing creates beautiful streaks of color in the melted cream, turning a simple bowl of ice cream into a cosmic sundae.
Additional Flavor Tips
For an extra layer of flavor, try adding a tiny pinch of espresso powder to the cookie dough. It won’t make them taste like coffee, but it will significantly deepen the chocolate flavor, making the “space” base even more intense.
Make it a Showstopper
To really wow your guests, use a clean paintbrush to flick a little bit of white food coloring or edible silver luster dust over the cookies once they are dry. This creates a “splatter” effect that looks like distant clusters of stars and galaxies, adding incredible depth to your design.
Variations to Try
- Minty Galaxy: Add a drop of peppermint extract to the dough for a refreshing twist.
- Glitter Stars: Use edible holographic glitter instead of sprinkles for a high shine finish.
- Red Planet: Swap the blues and purples for reds, oranges, and blacks to create a Mars inspired theme.
FAQ’s
- Can I freeze the dough?
Yes, you can freeze the unbaked dough for up to three months if wrapped tightly in plastic. - How do I get the icing to look like a nebula?
Drop the colors onto the white base and use a toothpick to swirl them gently without mixing them completely. - Do I need a special type of cocoa?
Standard unsweetened cocoa works great, but Dutch processed cocoa will give you an even darker color. - Why did my stars lose their shape?
Your dough might have been too warm, so try chilling it longer next time. - Can I use royal icing instead?
Yes, royal icing works perfectly and dries even harder than a milk based glaze. - Are these cookies soft or crunchy?
These are designed to be a slightly crisp shortbread style cookie that holds its shape. - Can I make these without a cutter?
You can cut them into squares or circles, but the star shape really completes the theme. - How long does it take for the icing to dry?
It usually takes about one to two hours depending on the humidity in your kitchen. - Is the black food coloring necessary?
It helps add depth, but you can achieve a great look using just deep blues and purples. - Can kids help with this?
Absolutely, the dipping process is very kid friendly and they love seeing the patterns emerge.
Conclusion
Creating Galaxy Cookies is a wonderful way to bring a bit of the extraordinary into your home. Whether you are an experienced baker or just looking for a fun project to try with the family, the result is always rewarding and undeniably beautiful. The combination of rich chocolate and vibrant art makes every bite a celebration of creativity. So, grab your star cutters and prepare for a baking session that is truly out of this world!
PrintGalaxy Cookies

Stunning chocolate star cookies decorated with a marbled galaxy-themed glaze and silver star sprinkles.
Ingredients
- 1 cup Unsalted Butter, softened
- 1 cup Granulated Sugar
- 1 Large Egg
- 1 tsp Vanilla Extract
- 2 1/2 cups All Purpose Flour
- 1/2 cup Unsweetened Cocoa Powder
- 1/2 tsp Salt
- 2 cups Powdered Sugar
- 3 tbsp Whole Milk
- Gel Food Coloring (Purple, Blue, Black)
- Edible Star Sprinkles
Instructions
- Preheat oven to 350°F and line baking sheets with parchment paper.
- Cream butter and sugar until fluffy, then beat in egg and vanilla.
- Whisk flour, cocoa, and salt together, then gradually add to the wet ingredients to form a dough.
- Roll dough to 1/4 inch thickness on a floured surface and cut into star shapes.
- Bake for 8 to 10 minutes, then cool completely on a wire rack.
- Mix powdered sugar and milk for the icing, then swirl in drops of gel coloring.
- Dip the tops of the cookies into the marbled icing and top with star sprinkles.
Notes
- Chill the dough for 30 minutes before rolling to help cookies hold their shape.
- Use toothpicks to gently swirl the icing colors for a better nebula effect.
- Ensure cookies are 100% cool before dipping.