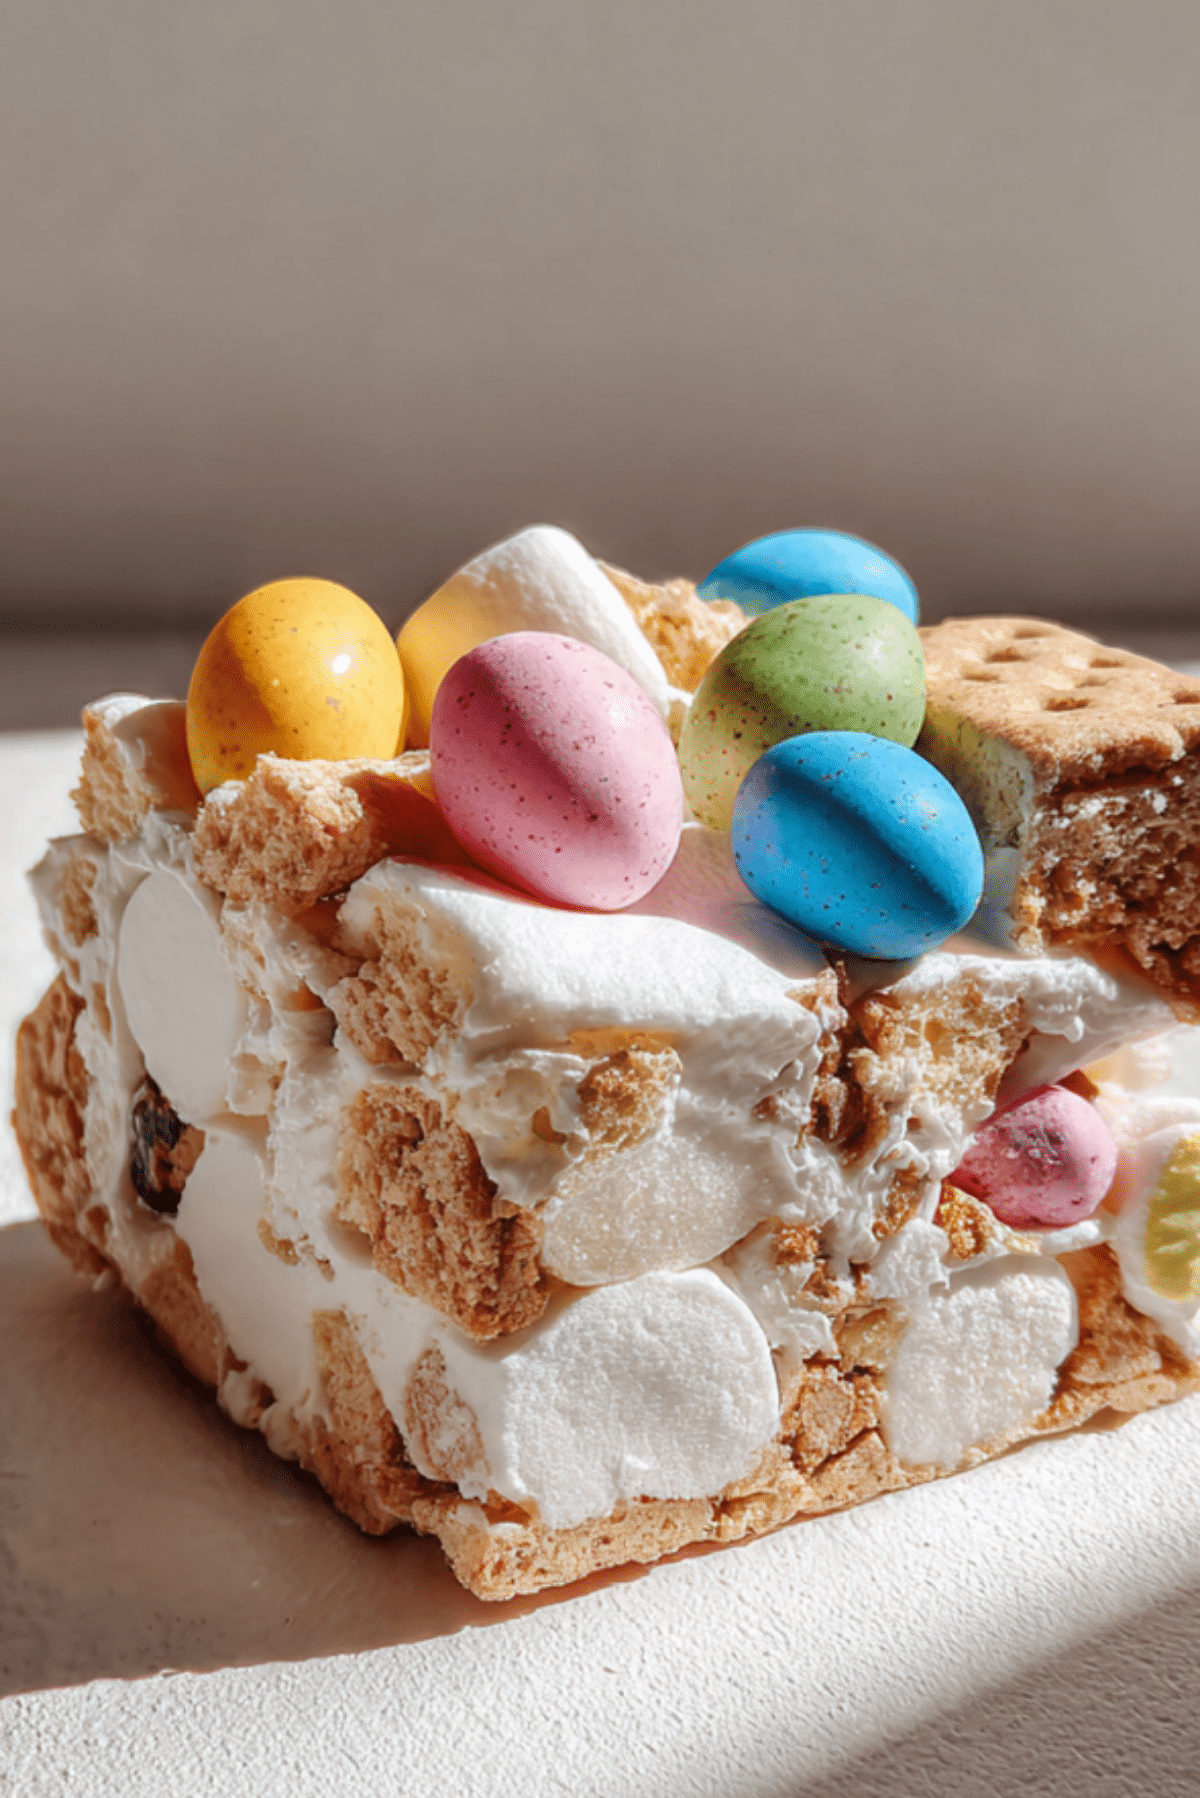
Easter Rocky Road
If you are looking for the ultimate no-bake treat that combines a rich chocolate base with a playful explosion of textures, trust me, you’re going to love this. This Easter Rocky Road is a celebration of spring, featuring fluffy marshmallows, crunchy biscuits, and those iconic candy-coated chocolate eggs. Let me tell you, it’s worth every bite because it is incredibly easy to customize and always brings a festive cheer to any dessert table.
The Joy of Chunky Chocolate and Chewy Treats
There is something wonderfully nostalgic about the combination of smooth chocolate and a variety of crunchy and soft inclusions. This recipe is designed to be thick and satisfying, creating a total game-changer for your holiday gatherings or a fun baking project with the family.
A Seasonal Twist on a Classic British Favorite
While traditional rocky road is a year-round staple, the addition of pastel-colored eggs and seasonal sweets transforms it into a beautiful spring centerpiece. It captures the essence of Easter by mixing rich cocoa with bright, whimsical elements that represent the joy and color of the new season.
Why This Recipe is a Total Crowd-Pleaser
This treat is a standout because it offers a sophisticated balance of flavors with a fun and approachable presentation.
Versatile: These bars are perfect for a picnic, a school bake sale, or as a decadent addition to a holiday brunch spread.
Budget-Friendly: You can use your favorite store-brand biscuits and marshmallows to create a high-end dessert without a high-end price tag.
Quick and Easy: Since there is no actual baking required, you can prepare the entire batch in just a few minutes before letting it set in the cold.
Customizable: You can easily swap the milk chocolate for dark or even white chocolate to create different color palettes and flavor depths.
Crowd-Pleasing: The mixture of textures ensures there is something for everyone, making it an instant hit at large family gatherings.
Make-Ahead Friendly: This keeps beautifully in the fridge, allowing you to prepare your holiday treats well in advance of the big day.
Great for Leftovers: Small pieces are perfect for packing into lunchboxes or enjoying as a sweet pick-me-up with your afternoon tea.
Expert Secrets for the Perfect Texture
The secret to a great rocky road lies in the ratio of chocolate to “stuff.” You want enough chocolate to hold everything together, but not so much that you lose the distinctive crunch of the biscuits and the soft give of the marshmallows.
Essential Tools for Your No-Bake Success
Having a few basic items ready will make the process feel organized and enjoyable.
Square Baking Pan: An 8-inch pan is perfect for creating thick, chunky bars that feel substantial and indulgent.
Parchment Paper: This is essential for ensuring you can lift the entire block of rocky road out of the pan for neat and easy slicing.
Heat-Proof Bowl: A large glass or metal bowl is ideal for melting the chocolate and butter together over a pan of simmering water.
Large Mixing Spoon: You will need a sturdy spoon to fold the heavy biscuits and candies into the thick chocolate mixture.
Ingredients You Will Need For This Masterpiece
The harmony of these ingredients creates a rich and varied treat that is hard to resist.
- Milk Chocolate: 14 ounces of high-quality milk chocolate to provide a sweet and creamy foundation.
- Dark Chocolate: 7 ounces of dark chocolate to add a bit of sophisticated depth and balance the sweetness.
- Unsalted Butter: 1/2 cup of butter to give the chocolate a beautiful glossy sheen and a softer bite.
- Golden Syrup: 3 tablespoons to help bind the ingredients and add a subtle hint of caramel flavor.
- Digestive Biscuits: 7 ounces of roughly broken biscuits for a satisfying and hearty crunch.
- Mini Marshmallows: 1.5 cups of soft marshmallows to provide a light and chewy contrast.
- Chocolate Mini Eggs: 1 cup of candy-coated eggs, keeping some whole for the top and crushing others for the interior.
- Shredded Coconut: 1/4 cup to add a hint of tropical flavor and extra texture that mimics a spring nest.
Flexible Ingredient Substitutions
If you want to tailor the recipe to your pantry, these alternatives work wonderfully.
Digestive Biscuits: Graham crackers or shortbread cookies are excellent substitutes that offer a different type of crunch.
Golden Syrup: You can use honey or maple syrup, though they will add a more distinct flavor to the chocolate base.
Milk Chocolate: For a very rich version, use all dark chocolate, or try white chocolate for a “White Rocky Road.”
Mini Marshmallows: If you only have large marshmallows, simply snip them into smaller pieces with kitchen scissors.
Spotlight on Key Ingredients
Golden Syrup: This is the “glue” of the recipe, ensuring the chocolate doesn’t set too hard, which makes the bars much easier to bite into.
Chocolate Mini Eggs: These provide the essential visual appeal and a satisfying “snap” that defines the Easter theme.

Welcome to Your Quickest Kitchen Project
Let’s get started on this chocolatey adventure. I promise you will be amazed at how quickly this comes together.
- Preheat Your Equipment: There is no oven needed, so simply line your 8-inch square pan with parchment paper and set it aside.
- Combine Ingredients: Place the milk chocolate, dark chocolate, butter, and golden syrup in a heat-proof bowl.
- Prepare Your Cooking Vessel: Melt the mixture over a pot of simmering water, stirring gently until everything is smooth and glossy.
- Assemble the Dish: Remove from heat and fold in the broken biscuits, marshmallows, and half of the mini eggs until everything is coated.
- Cook to Perfection: Pour the mixture into your pan and smooth it down, then press the remaining whole eggs into the top for decoration.
- Finishing Touches: Place the pan in the refrigerator for at least 2 to 3 hours until the chocolate is completely firm.
- Serve and Enjoy: Lift out of the pan and slice into generous squares using a sharp knife that has been warmed in hot water.
A Symphony of Sweet Textures
With every bite, you first experience the smooth, melting richness of the dual chocolates. This is immediately followed by the crisp snap of the biscuits and the pillowy softness of the marshmallows, creating a complex and delightful mouthfeel.
Pro Cooking Tips and Tricks
- Don’t crush the biscuits too small; you want chunky pieces to provide a good structural contrast to the soft marshmallows.
- Allow the chocolate mixture to cool for a few minutes before adding the marshmallows so they don’t melt away entirely.
- For an even more festive look, sprinkle some extra pastel-colored sprinkles over the top before the chocolate sets.
What to Avoid for the Best Result
- Using high heat: Always melt chocolate slowly to prevent it from seizing or becoming bitter and grainy.
- Over-mixing: Stir just enough to coat the ingredients so you keep the distinct shapes of the inclusions.
- Slicing cold: Let the rocky road sit at room temperature for ten minutes before cutting to prevent the chocolate from cracking.
Nutrition Facts
Servings: 12
Calories per serving: 340
Note: These are approximate values.
Preparation and Setting Time
Prep Time: 15 minutes
Cook Time: 5 minutes
Total Time: 2 hours 20 minutes (including chilling)
Storage and Make-Ahead Advice
This Easter Rocky Road is the perfect make-ahead option as it stays fresh in an airtight container for up to a week in the fridge. You can also freeze the bars for up to two months, though the mini eggs might lose a bit of their vibrant color upon thawing.
Creative Serving and Pairing Suggestions
Serve these chunky bars on a rustic platter alongside fresh fruit or a pot of hot cocoa. They are also wonderful when broken into smaller pieces and used as a decadent topping for a simple vanilla cheesecake.
Creative Leftover Transformations
If you have a few pieces left, chop them up and stir them into a batch of brownie batter for an “over-the-top” chocolate experience. You can also melt them down and drizzle the mixture over waffles for a special holiday breakfast.
Additional Tips for Success
Using a combination of milk and dark chocolate is key for a flavor that isn’t too cloying. If you find the mixture is too thick to spread, add another tablespoon of butter or golden syrup to loosen it up.
Make It a Showstopper
To give your rocky road a professional “wow” factor, drizzle some melted white chocolate in a zig-zag pattern across the top before adding the final eggs. This creates a beautiful contrast and makes the colors of the eggs truly pop.
Creative Variations to Try
- Salted Caramel Rocky Road: Drizzle salted caramel over the top and add a pinch of sea salt for a sophisticated twist.
- Fruit and Nut Easter Road: Add 1/2 cup of dried cranberries and chopped pistachios for a more adult-friendly flavor profile.
- White Chocolate Spring Road: Use all white chocolate and add freeze-dried strawberries for a beautiful pink and white look.
FAQ’s
- Can I use a microwave to melt the chocolate?
Yes, use 30-second intervals and stir well in between to ensure the chocolate melts evenly without burning. - Why is my rocky road falling apart?
This usually means there wasn’t enough chocolate “glue” to hold the chunky ingredients together. - What can I use instead of Digestive biscuits?
Rich Tea biscuits, shortbread, or even vanilla wafers are great alternatives. - Do I have to use golden syrup?
It is recommended for the best texture, but you can leave it out if you prefer a much harder, snappier bar. - How do I get the marshmallows to stay whole?
Ensure the melted chocolate has cooled slightly before you fold them in. - Can I make this dairy-free?
Yes, use dairy-free chocolate and a plant-based butter substitute. - How long does it stay fresh?
It will keep for up to 7 days in an airtight container in the refrigerator. - Can I add nuts to this?
Absolutely, walnuts or hazelnuts add a wonderful extra crunch that pairs beautifully with the chocolate. - Why is my chocolate cloudy?
This is likely “bloom” from the fridge moisture; it doesn’t affect the taste, only the appearance. - How do I cut it without it breaking?
Use a hot, sharp knife and cut with a firm, steady downward pressure rather than a sawing motion.
Conclusion
This Easter Rocky Road is a delightful and stress-free way to bring some chocolatey joy to your holiday table. Its incredible mix of textures and festive appearance make it a favorite for bakers of all ages. Gather your favorite treats, start mixing, and enjoy every chunky, chocolatey bite.
PrintEaster Rocky Road

A festive no-bake chocolate treat packed with crunchy biscuits, fluffy marshmallows, and candy-coated Easter eggs.
Ingredients
- 14 oz milk chocolate
- 7 oz dark chocolate
- 1/2 cup unsalted butter
- 3 tbsp golden syrup
- 7 oz digestive biscuits, roughly broken
- 1.5 cups mini marshmallows
- 1 cup chocolate mini eggs, some crushed
- 1/4 cup shredded coconut
Instructions
- Line an 8-inch square pan with parchment paper.
- Melt chocolates, butter, and golden syrup together over low heat until smooth.
- Remove from heat and let cool for 2-3 minutes.
- Fold in broken biscuits, marshmallows, coconut, and half of the mini eggs.
- Press into the prepared pan and top with remaining whole mini eggs.
- Refrigerate for at least 2 hours until firm before slicing.
Notes
- Let the chocolate cool slightly so the marshmallows don’t melt.
- Use a warm knife for clean, easy slicing.
- Store in the fridge to keep the chocolate and candy shells crisp.