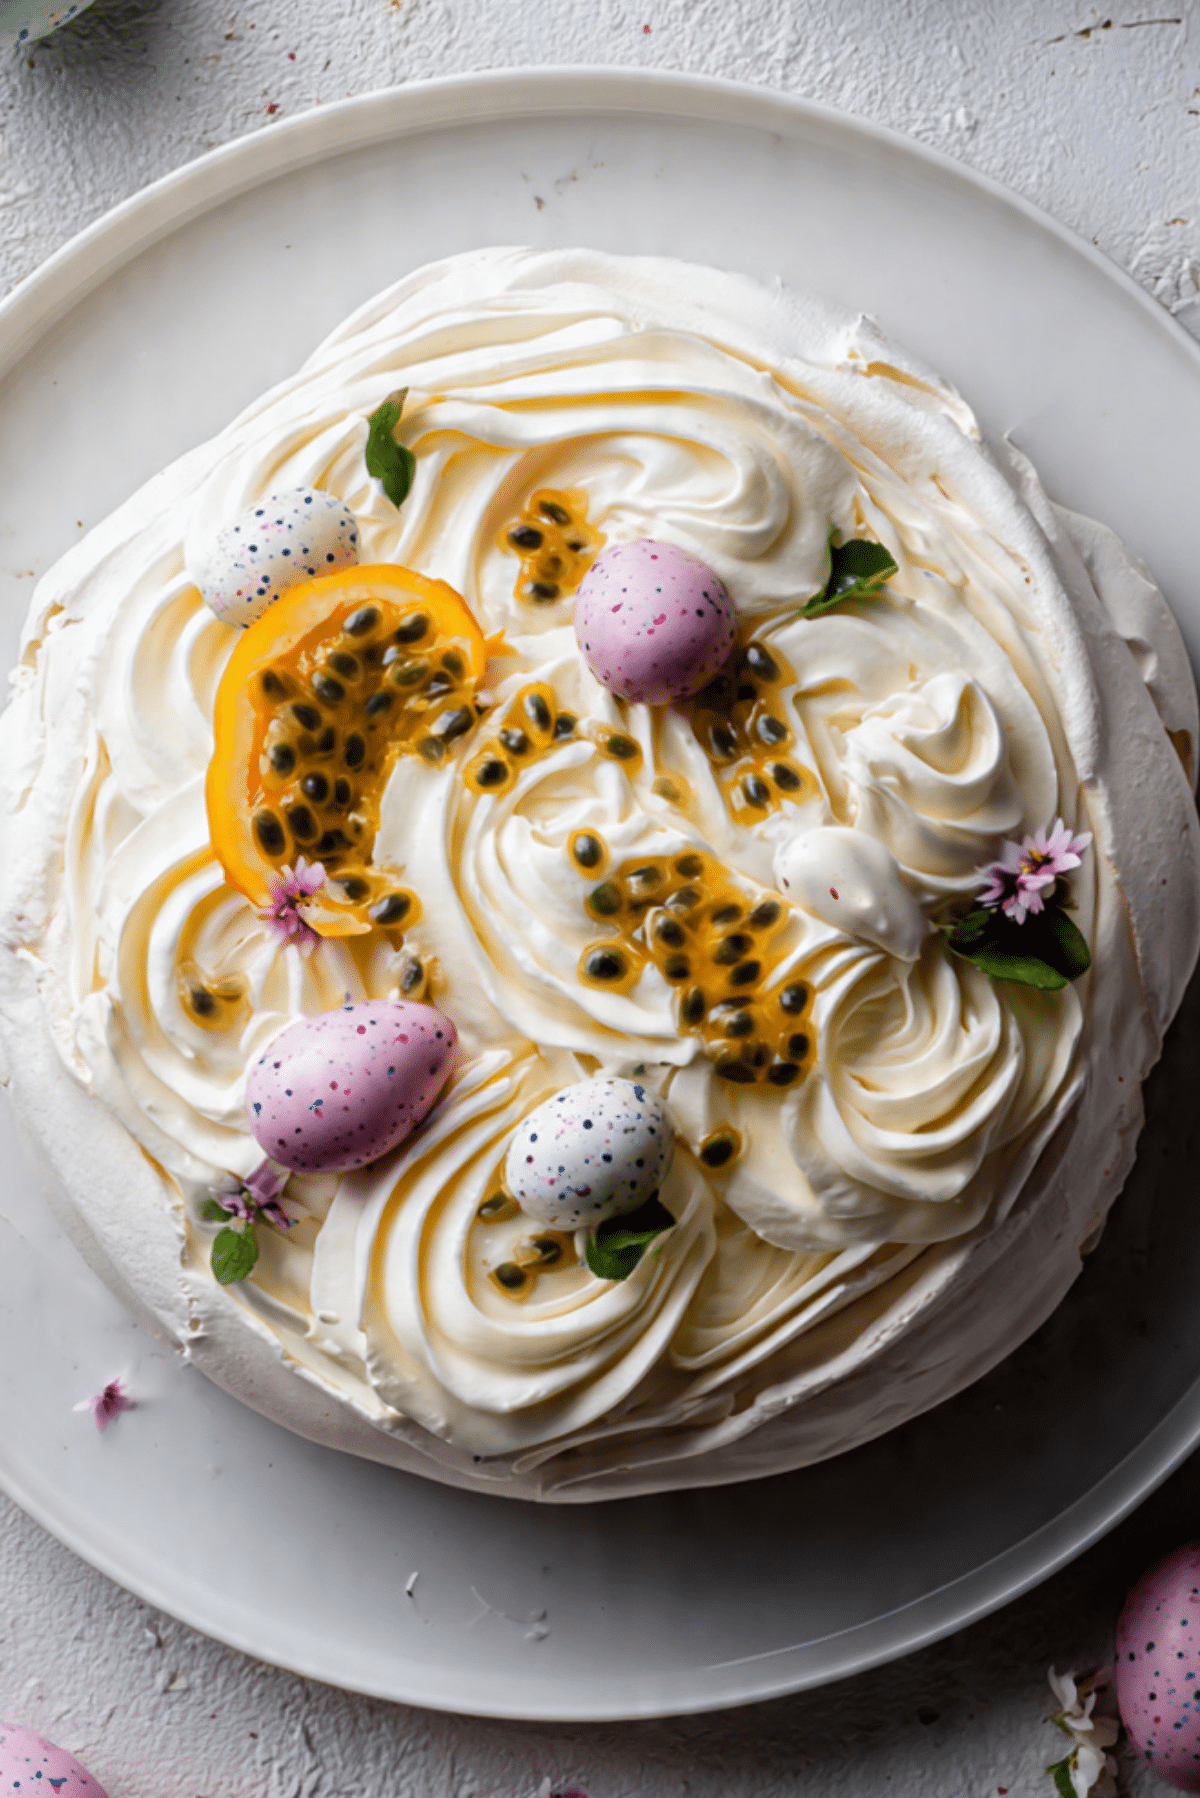
Easter Pavlova
If you are looking for a dessert that defines elegance and lightness for your spring table, this Easter Pavlova is the ultimate showstopper. It features a crisp, delicate outer shell that gives way to a soft, marshmallow-like center, all topped with clouds of whipped cream and festive speckled eggs. Trust me, you’re going to love this recipe because it provides a dramatic visual impact while remaining surprisingly airy and light after a heavy holiday meal.
A Cloud-Like Centerpiece for Your Celebration
This pavlova is a true celebration of texture and simple, high-quality ingredients. Let me tell you, it’s worth every bite when you experience the crunch of the meringue followed by the cool, silky cream and the tart pop of fresh fruit. It is a total game-changer for anyone who wants a dessert that feels grand without being overly dense or heavy.
The Graceful History of the Meringue Cake
Named after the famous Russian ballerina Anna Pavlova, this dessert was created to be as light and ethereal as her dancing. While it is a staple in both Australia and New Zealand, it has become a worldwide favorite for spring and summer gatherings. By swapping traditional dairy for whipped coconut cream, we have created an inclusive version that still honors the graceful heritage of this iconic dish.
Why This Pavlova Is the Ultimate Spring Dessert
I have found that a pavlova is often the highlight of the entire Easter menu. Here is why this recipe is a must-make for your next family gathering:
Versatile: You can top this with any combination of spring berries, tropical fruits, or chocolate decorations to suit your theme.
Budget-Friendly: The base is made from very simple and inexpensive ingredients like sugar and chickpea liquid or eggs.
Quick and Easy: While it requires some patience for baking and cooling, the active preparation time is quite short.
Customizable: You can easily change the flavor of the meringue by adding a touch of cocoa or different extracts.
Crowd-Pleasing: Its impressive size and beautiful toppings make it a hit with everyone, and it is naturally gluten-free.
Make-Ahead Friendly: The meringue shell can be baked a day in advance and kept in an airtight spot until you are ready to assemble.
Great for Leftovers: Even if it softens slightly, the broken pieces make an incredible “Eton Mess” style dessert the next day.
Insider Secrets for a Perfect Meringue
Achieving that perfect balance of a crisp shell and a soft interior requires a bit of finesse and the right environment.
- Ensure your mixing bowl and whisk are completely free of any grease or oil to allow the meringue to reach full volume.
- Add your sugar very slowly, one tablespoon at a time, to ensure it dissolves completely and creates a stable structure.
- Let the pavlova cool completely inside the oven with the door slightly ajar to prevent it from cracking due to sudden temperature changes.
Essential Tools for Your Kitchen
Using the right equipment is key to getting that signature height and airy texture that makes a pavlova so special.
- Stand Mixer: This is essential for the long whipping process required to reach stiff, glossy peaks.
- Parchment Paper: This ensures the delicate meringue doesn’t stick to the baking sheet and makes it easy to move.
- Offset Spatula: Perfect for shaping the meringue into a beautiful mound with decorative swirls.
- Fine Mesh Sifter: Use this to ensure your starch is lump-free before folding it into the mixture.
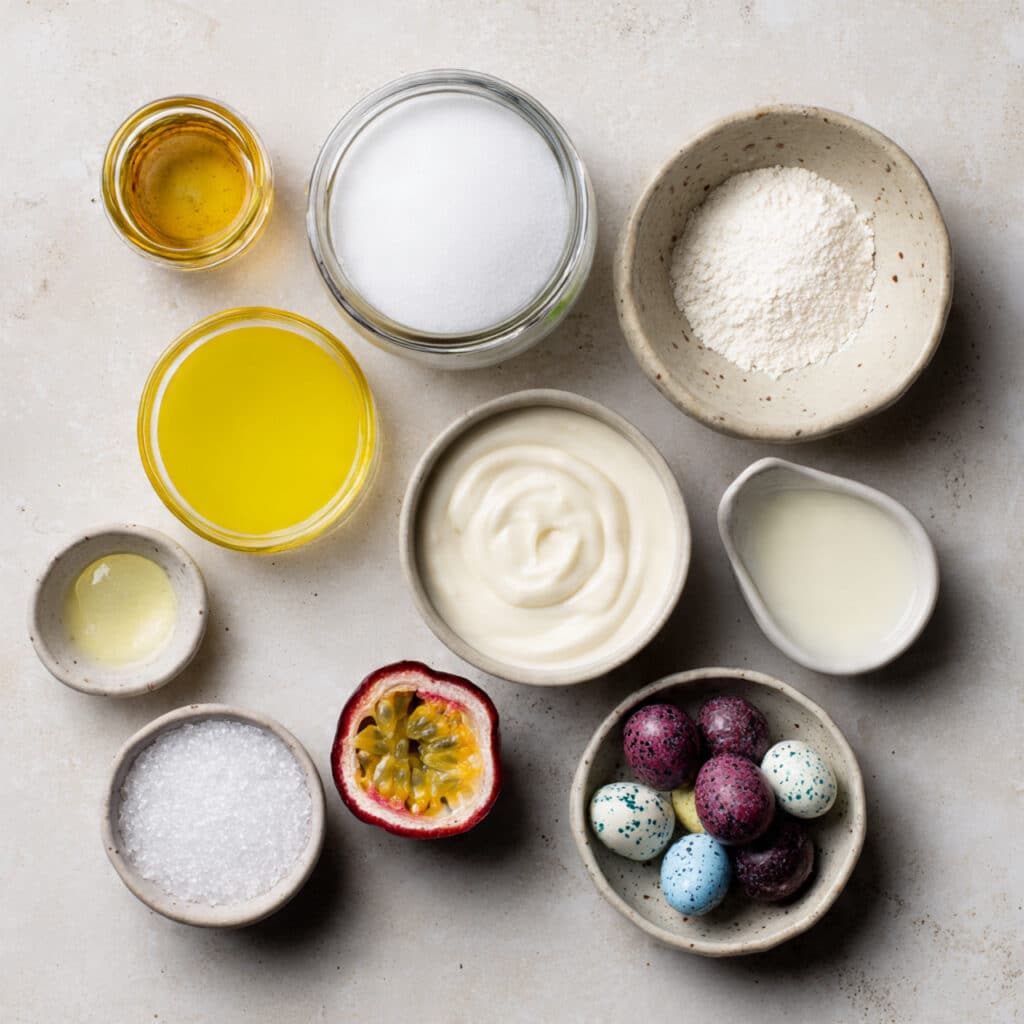
Ingredients You Will Need For Easter Pavlova
Each ingredient is chosen to build a stable structure that stays light and crisp throughout the baking process.
- Aquafaba: 3/4 cup of liquid from canned chickpeas to create a stable, plant-based meringue base.
- Superfine Sugar: 1 1/2 cups to provide sweetness and stabilize the meringue peaks.
- Cream of Tartar: 1/2 teaspoon to help the proteins in the aquafaba bond and hold air.
- Vanilla Extract: 1 tablespoon for a sweet, comforting aroma that balances the sugar.
- Cornstarch: 2 teaspoons to help create that signature marshmallow-like center.
- Lemon Juice: 1 teaspoon to add a tiny bit of acidity that aids in the stability of the meringue.
- Coconut Cream: 1 can (14 ounces) of chilled full-fat cream for a thick and silky topping.
- Fresh Passion Fruit: 2 pieces to add a bright, tart contrast to the sweet meringue.
- Speckled Candy Eggs: 1/2 cup of chocolate eggs for a festive and crunchy holiday finish.
Flexible Ingredient Substitutions
If you need to make changes based on what you have available, these options work beautifully.
Aquafaba: 4 large egg whites (if you are not avoiding eggs).
Coconut Cream: Heavy whipping cream (if dairy is not a concern).
Passion Fruit: Fresh raspberries or sliced strawberries for a classic berry topping.
Spotlighting Our Star Ingredients
Aquafaba: This incredible ingredient is a plant-based miracle, whipping up into a thick and glossy foam that mimics egg whites perfectly for a vegan-friendly pavlova.
Coconut Cream: When chilled and whipped, this provides a rich and dairy-free alternative that holds its shape beautifully under the weight of the fruit and candy eggs.
Step Into the Kitchen
Follow these steps carefully to ensure your pavlova rises high and stays crisp until the very last bite.
- Preheat Your Equipment: Set your oven to 250 degrees and line a large baking sheet with parchment paper, drawing an 8 inch circle as a guide.
- Combine Ingredients: In a stand mixer, whip the aquafaba and cream of tartar on high speed until soft peaks form.
- Prepare Your Cooking Vessel: Continue whipping while adding the superfine sugar one tablespoon at a time until the mixture is thick, glossy, and holds stiff peaks.
- Assemble the Dish: Gently fold in the vanilla, cornstarch, and lemon juice, then pile the mixture onto the parchment circle and shape into a mound with high sides.
- Cook to Perfection: Bake for 90 minutes, then turn off the oven and let the pavlova cool completely inside for at least three hours without opening the door.
- Finishing Touches: Whip the chilled coconut cream until fluffy and spread it over the center of the cooled meringue.
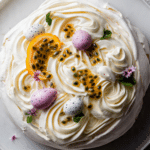
- Serve and Enjoy: Drizzle with fresh passion fruit and scatter the speckled eggs over the top right before bringing it to the table.
Texture and Flavor Development
The beauty of the pavlova is the evolution of texture as it sits. The meringue provides a sugary crunch that shatters on impact, while the center remains soft and light. The tartness of the passion fruit cuts through the sweetness of the sugar, creating a perfectly balanced flavor profile.
Helpful Cooking Tips and Tricks
- For the best results, use aquafaba that has been chilled in the fridge overnight.
- If you don’t have superfine sugar, you can pulse regular granulated sugar in a blender for a few seconds.
- Assemble the pavlova just before serving to keep the meringue from softening too quickly under the cream.
What to Avoid for a Perfect Result
- Do not open the oven door during the baking or cooling process, as the draft can cause the meringue to collapse.
- Avoid making pavlova on a very rainy or humid day, as the sugar will absorb moisture from the air and become sticky.
- Don’t over-whip the coconut cream or it may separate and become oily rather than fluffy.
Nutritional Information
Servings: 8 servings
Calories per serving: 215
Note: These are approximate values.
Timing Your Prep
Prep Time: 20 minutes
Cook Time: 90 minutes (plus cooling time)
Total Time: 110 minutes (active)
Storage and Freshness Advice
The baked meringue shell can be stored in an airtight container in a dry place for up to 24 hours. Once the pavlova is assembled with cream and fruit, it should be eaten within a few hours for the best texture.
How to Serve Your Pavlova
Place the pavlova on a large, flat serving platter to highlight its impressive size. It looks beautiful when garnished with a few edible flowers or a light dusting of cocoa powder for an extra touch of elegance.
Repurposing Your Leftovers
If the pavlova starts to lose its crunch, you can break it into pieces and layer it with more cream and fruit in small glasses for a delicious dessert the next day. This “mess” style serving is a traditional and well-loved way to enjoy every last bit.
Additional Pro Tips
To ensure the meringue stays white and doesn’t brown, you can lower the oven temperature to 225 degrees and bake it for an extra 15 minutes. This slow and low approach helps preserve that pristine, snowy look.
Make It a Showstopper
When shaping your meringue, use the back of a spoon to create deep vertical grooves up the sides. These ridges will catch the light and create beautiful shadows, making the pavlova look like a piece of edible art.
Variations to Try
- Chocolate Swirl: Fold a tablespoon of cocoa powder into the meringue at the very last second for a marbled look.
- Berry Blast: Use a mix of blueberries, blackberries, and strawberries for a vibrant and colorful topping.
- Lemon Curd: Spread a layer of dairy-free lemon curd under the whipped cream for an extra punch of citrus flavor.
FAQ’s
- Can I use regular sugar?
Superfine sugar is best as it dissolves faster, preventing a grainy texture in the meringue. - Why did my pavlova collapse?
This usually happens if the oven door was opened too early or if the sugar wasn’t added slowly enough. - Can I make this egg-free?
Yes, this recipe uses aquafaba which makes it completely egg-free and vegan-friendly. - How do I know when it is done?
The outside should feel dry and firm to the touch, and it should easily peel away from the parchment paper. - Can I freeze pavlova?
No, pavlova does not freeze well as the texture will change significantly when thawed. - What is aquafaba?
It is the liquid found in a can of chickpeas, which contains proteins that mimic egg whites when whipped. - My meringue is weeping, why?
This is often caused by undissolved sugar or high humidity in the kitchen. - Can I use a different starch?
Arrowroot powder can be used as a substitute for cornstarch if needed. - How do I store the leftovers?
Store them in the fridge, but be aware the meringue will soften and become chewy. - Can I make individual pavlovas?
Yes, just pipe smaller circles and reduce the baking time to about 45 to 60 minutes.
Conclusion
This Easter Pavlova is the perfect way to end your holiday meal on a light and festive note. Its combination of airy meringue, rich cream, and tart fruit is a timeless classic that never fails to impress. Give it a try and watch it become the most requested dessert for all your future spring gatherings.
PrintEaster Pavlova
A light and airy showstopper dessert featuring a crisp meringue shell with a soft center, topped with whipped coconut cream, tart passion fruit, and festive eggs.
Ingredients
- 3/4 cup aquafaba
- 1 1/2 cups superfine sugar
- 1/2 teaspoon cream of tartar
- 1 tablespoon vanilla extract
- 2 teaspoons cornstarch
- 1 teaspoon lemon juice
- 1 can (14 oz) full-fat coconut cream (chilled)
- 2 fresh passion fruits
- 1/2 cup speckled candy eggs
Instructions
- Preheat oven to 250°F (120°C) and line a baking sheet with parchment paper.
- Whip aquafaba and cream of tartar in a stand mixer until soft peaks form.
- Slowly add superfine sugar, one tablespoon at a time, whipping until thick, glossy, stiff peaks form.
- Fold in vanilla, cornstarch, and lemon juice. Mound the mixture onto the parchment and shape into a circle with high sides.
- Bake for 90 minutes. Turn off the oven and let the pavlova cool completely inside with the door slightly ajar.
- Whip chilled coconut cream until fluffy. Spread over the cooled pavlova.
- Top with fresh passion fruit and speckled candy eggs right before serving.
Notes
- Ensure all equipment is grease-free for a successful meringue.
- Add sugar very slowly to ensure it dissolves completely.
- Assemble just before serving to maintain the meringue’s crispness.