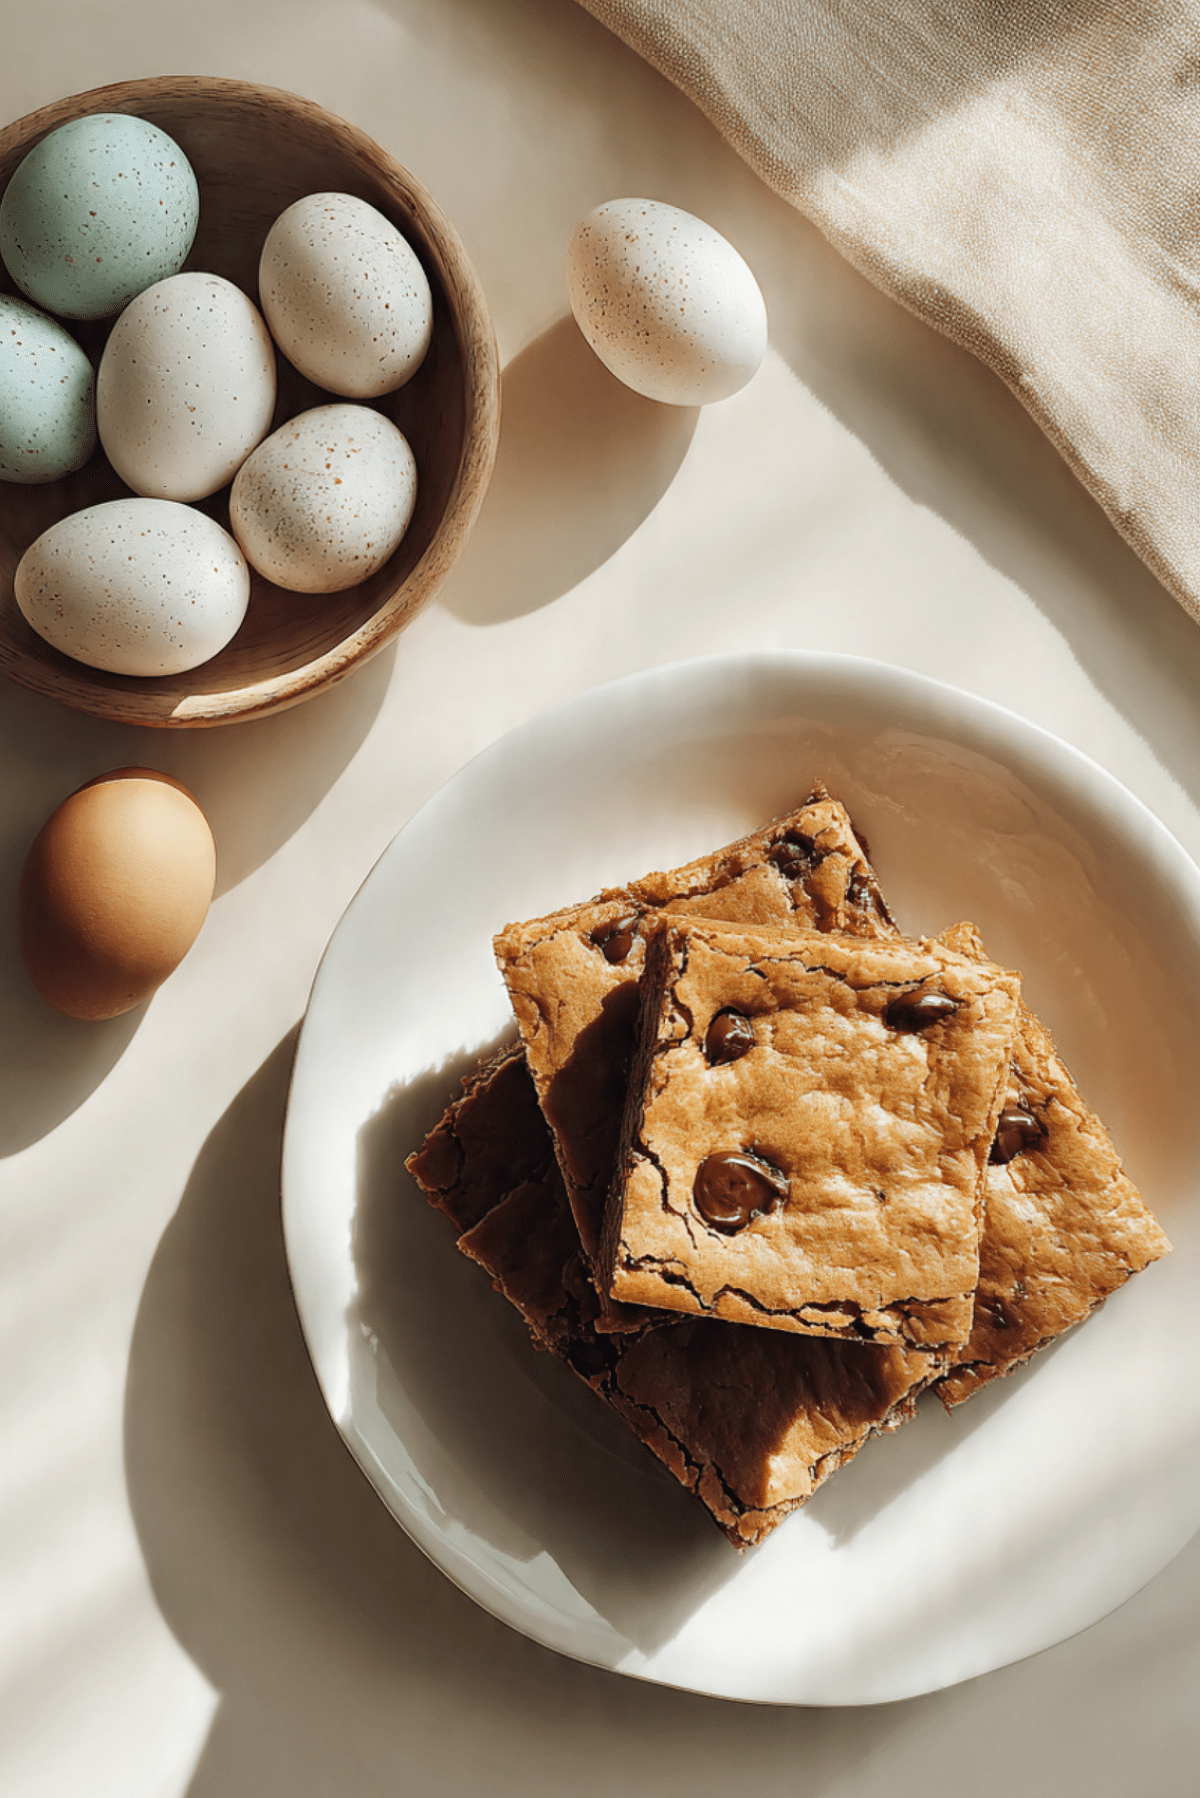
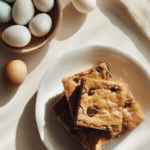
Easter Blondies
If you are looking for a dessert that offers all the chewy satisfaction of a brownie but with a rich, buttery vanilla profile, you have found it. These blondies are the ultimate spring treat, featuring a dense, fudgy base packed with white chocolate chunks and colorful candy-coated eggs. Every bite is a delightful mix of textures, from the crackly, paper-thin top to the soft, melt-in-your-mouth center. Trust me, you’re going to love this because it is incredibly easy to whip up and brings a bright, cheerful energy to any holiday gathering. This one’s a total game-changer for anyone who appreciates the deep flavor of browned butter and brown sugar. Let me tell you, it’s worth every bite.
The Secret to That Perfect Chewy Texture
There is a fine line between a cake and a blondie, and the secret lies in the lack of leavening. By skipping the baking powder and focusing on a high ratio of brown sugar to flour, we create a bar that is dense and almost truffle-like in consistency. The addition of festive chocolate eggs adds a satisfying snap that contrasts perfectly with the soft dough. It is a simple concept that results in a sophisticated, addictive snack that will have everyone reaching for the corners.
A Brief History of the Blondie
While their chocolate cousins often get all the fame, blondies actually appeared in cookbooks long before the brownie became a staple. Originally known as “butterscotch brownies,” these treats relied on the combination of butter and molasses-rich sugar to create a deep, caramel-like flavor. Over the decades, they evolved to include vanilla and white chocolate, making them a perfect canvas for seasonal additions. Incorporating Easter chocolates is a modern way to keep this classic recipe feeling fresh and exciting for the holiday season.
Why This Recipe is a Kitchen Staple
You will find yourself making these blondies for every occasion because they are just so reliable and delicious.
Versatile: You can stir in any type of nut, dried fruit, or seasonal candy to match the theme of your event.
Budget-Friendly: Most of the ingredients are basic pantry staples like flour, sugar, and butter that you likely already have on hand.
Quick and Easy: The batter comes together in a single bowl with a whisk, so there is no need to drag out the heavy stand mixer.
Customizable: You can experiment with different types of chocolate or even add a swirl of peanut butter for a different flavor profile.
Crowd-Pleasing: Their sweet, vanilla-forward flavor is a universal favorite that appeals to both children and adults.
Make-Ahead Friendly: These bars actually stay moist and chewy for several days, making them perfect for gifting or prepping in advance.
Great for Leftovers: Even after a few days, a quick warm-up makes them taste just like they came out of the oven.
Tips for a Bakery-Style Finish
Getting that professional, glossy look on top of your blondies is all about the sugar and the cooling process.
- Whisk Thoroughly: When you combine the melted butter and sugar, whisk them vigorously for a minute or two to help create that iconic shiny, crackly top.
- Don’t Overbake: Pull the blondies out when the edges are set but the middle still has a slight wobble to ensure they stay fudgy.
- Let Them Cool: Resisting the urge to cut into them immediately is hard, but letting them cool completely in the pan helps the structure set and makes for cleaner slices.
Essential Tools for Blondie Success
Having the right tools ensures your bars are evenly baked and easy to serve.
8×8 Inch Square Pan: A metal pan is best for achieving those perfectly golden-brown edges.
Parchment Paper: Always leave an overhang on two sides so you can easily lift the entire block of blondies out for slicing.
Sturdy Whisk: A good whisk is essential for incorporating the air needed to create the light, crackly crust.
Rubber Spatula: Perfect for folding in your delicate chocolate eggs without crushing them or overworking the batter.
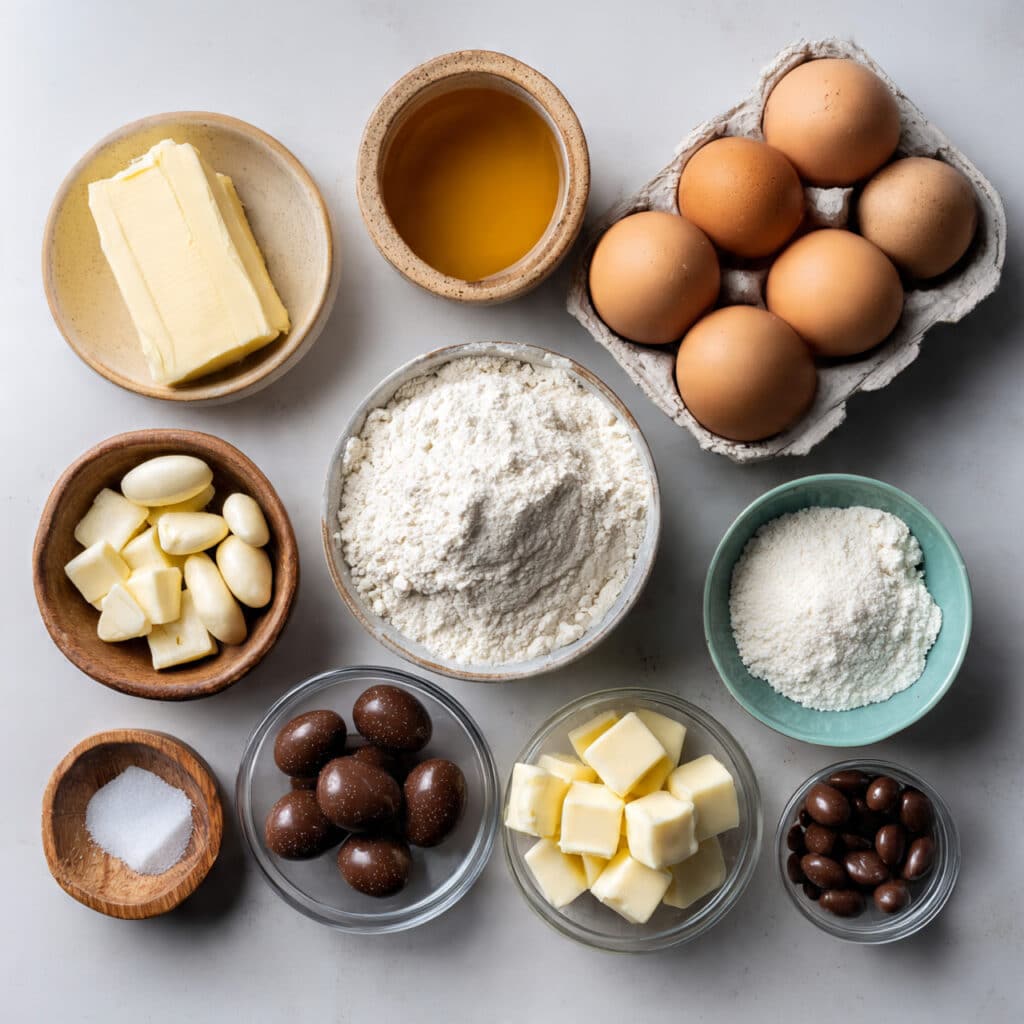
Ingredients You Will Need For Easter Blondies
The harmony of these ingredients creates a base that is rich in butter and vanilla with pops of chocolate.
- Unsalted Butter: 1 cup (225 grams). Melted butter provides the fat needed for that dense, chewy, and rich texture.
- Light Brown Sugar: 1.5 cups (300 grams). This is the key to the caramel flavor and the soft, moist crumb.
- Large Eggs: 2 eggs. These provide the structure and help bind the sugar and butter into a cohesive batter.
- Vanilla Extract: 1 tablespoon. A generous amount of vanilla is what sets a blondie apart and gives it that classic aroma.
- All-Purpose Flour: 2 cups (250 grams). The structural foundation that holds all the chocolate eggs in place.
- Salt: 1/2 teaspoon. A crucial ingredient to balance the high sugar content and enhance the vanilla notes.
- White Chocolate Chunks: 1/2 cup. These melt into the batter to create pockets of creamy sweetness.
- Mini Chocolate Eggs: 1.5 cups. The star ingredient that provides color, crunch, and a festive Easter flair.
Flexible Ingredient Substitutions
If you are missing something, these alternatives will work perfectly in this forgiving recipe.
Light Brown Sugar: Dark brown sugar can be used for an even deeper, more molasses-heavy flavor.
White Chocolate Chunks: Milk chocolate or even butterscotch chips are excellent substitutes.
Mini Chocolate Eggs: Any candy-coated chocolate or even chopped chocolate bars can be used.
Unsalted Butter: You can use salted butter, just remember to omit the extra half teaspoon of salt from the dry ingredients.
Spotlight on Key Ingredients
Light Brown Sugar: This is the most important element for flavor. The molasses in the sugar reacts with the butter during baking to create a butterscotch-like taste that is the hallmark of a good blondie.
Vanilla Extract: Since there is no cocoa powder in this recipe, vanilla takes center stage. Using a high-quality extract or even vanilla bean paste will elevate these from simple bars to gourmet treats.
Let’s Get Cooking
It is time to head into the kitchen and bake up a batch of these cheerful holiday bars.
- Preheat Your Equipment: Set your oven to 175°C and line your square baking pan with parchment paper.
- Combine Ingredients: In a large bowl, whisk the melted butter and brown sugar together until the mixture is smooth and glossy.
- Prepare Your Cooking Vessel: Add the eggs and vanilla, whisking again until the batter is well-combined and slightly thickened.
- Assemble the Dish: Gently stir in the flour and salt using a spatula, being careful not to overmix.
- Cook to Perfection: Fold in the white chocolate chunks and one cup of the mini chocolate eggs, then spread the batter into the pan.
- Finishing Touches: Scatter the remaining chocolate eggs over the top and press them in slightly before placing in the oven.
- Serve and Enjoy: Bake for 25 to 30 minutes, then let them cool completely in the pan before lifting out and slicing into squares.
Developing Texture and Flavor
As the blondies bake, the sugar and butter create a dense network that traps the chocolate eggs. The white chocolate chunks melt slightly, infusing the dough with creaminess, while the mini eggs keep their shape, providing a crisp snap. The result is a bar that feels indulgent and complex, with the vanilla acting as the perfect backdrop for the milk chocolate.
Helpful Cooking Tips and Tricks
- The Toothpick Test: When you insert a toothpick, it should come out with a few moist crumbs attached, not clean and not wet.
- Brown the Butter: For an even deeper flavor, cook the butter on the stove until it turns amber and smells nutty before adding it to the sugar.
- Freeze the Eggs: If you want your chocolate eggs to stay very whole and not bleed color, chill them in the freezer for ten minutes before folding them in.
Common Mistakes to Avoid
- Overmixing the flour: This will activate the gluten and make your blondies tough and bready instead of fudgy.
- Using a glass pan: Glass pans retain heat differently and can lead to burnt bottoms and undercooked centers in this recipe.
- Cutting while warm: If you slice them before they are cool, the centers will be gooey and the bars will fall apart.
Estimated Nutrition Facts
Servings: 16 squares
Calories per serving: 280
Note: These are approximate values.
Preparation and Timing
Prep Time: 15 minutes
Cook Time: 30 minutes
Total Time: 45 minutes
Storage and Freshness Tips
Store these blondies in an airtight container at room temperature for up to five days. They also freeze exceptionally well; simply wrap individual squares in plastic wrap and store them in a freezer bag for up to three months. To enjoy after freezing, let them thaw at room temperature for an hour.
Creative Serving Suggestions
Serve these blondies on a bright pastel plate to highlight the festive colors of the chocolate eggs. They look wonderful when paired with a scoop of lemon sorbet for a refreshing contrast, or with a glass of cold milk. For a true dessert experience, serve them warm with a drizzle of white chocolate sauce.
Leftover Transformations
If you have a few blondies left, you can crumble them up and use them as a mix-in for a batch of homemade vanilla fudge. You could also use them as a decadent base for a trifle, layering them with whipped cream and fresh strawberries.
Extra Advice for Success
For the best texture, make sure your eggs are at room temperature before adding them to the butter and sugar. This ensures the batter emulsifies properly and leads to a more uniform crumb. Also, pay close attention to the bake time, as even two extra minutes in the oven can turn a fudgy blondie into a dry one.
Make It a Showstopper
To make these blondies look like they came from a high-end bakery, save a few chocolate eggs to press into the top of the batter halfway through the baking time. This ensures they stay bright and visible on the surface. You can also finish them with a light dusting of powdered sugar just before serving.
Variations to Try
- Salted Caramel Blondies: Drizzle a little caramel sauce over the batter before baking for a salty-sweet twist.
- Lemon and White Chocolate: Add the zest of one lemon to the batter for a bright, citrusy spring flavor.
- Nutty Crunch: Stir in half a cup of chopped macadamia nuts or pecans for added texture.
- M&M Variation: Use pastel-colored M&Ms if you can’t find mini chocolate eggs.
FAQ’s
- Why are my blondies cakey? You likely overmixed the batter or used too much flour; always measure your flour carefully.
- Can I make these in a 9×13 pan? Yes, but you will need to double the recipe and increase the bake time by about ten minutes.
- Do I need baking powder? No, blondies are meant to be dense and fudgy, so no leavening agent is required.
- Can I use dark chocolate? Absolutely, dark chocolate chips are a great way to cut through the sweetness of the blondie base.
- How do I get clean edges? Use a sharp, warm knife and wipe it clean after every slice.
- Can I use margarine? Butter provides the best flavor and texture, but a hard block margarine can work in a pinch.
- Why did the chocolate eggs melt? If the batter was too warm when you folded them in, they might have softened too much.
- Are these gluten-free? You can make them gluten-free by using a high-quality 1:1 gluten-free flour blend.
- How long do they take to cool? Usually about an hour at room temperature, though two hours is even better for perfect slices.
- Can I add sprinkles? Yes, adding pastel sprinkles to the batter adds even more festive color.
Conclusion
Easter Blondies are a celebration of simplicity and seasonal joy. They are a reminder that you don’t need a complicated recipe to create a dessert that everyone will love. The combination of rich butter, sweet vanilla, and festive chocolate makes every square feel like a special occasion. I hope you enjoy the process of baking these and sharing them with the people you care about most.
PrintEaster Blondies
Dense, fudgy, and buttery vanilla bars packed with white chocolate chunks and colorful mini chocolate eggs for a festive spring treat.
Ingredients
- 1 cup Unsalted Butter
- 1.5 cups Light Brown Sugar
- 2 Large Eggs
- 1 tablespoon Vanilla Extract
- 2 cups All-Purpose Flour
- 1/2 teaspoon Salt
- 1/2 cup White Chocolate Chunks
- 1.5 cups Mini Chocolate Eggs
Instructions
- Preheat your oven to 175°C and line an 8×8 inch square baking pan with parchment paper, leaving an overhang on the sides.
- In a large bowl, whisk the melted butter and light brown sugar together for about a minute until smooth and glossy.
- Add the eggs and vanilla extract, whisking vigorously until well combined.
- Gently stir in the flour and salt with a spatula until just combined. Do not overmix.
- Fold in the white chocolate chunks and 1 cup of the mini chocolate eggs.
- Spread the batter evenly into the prepared pan.
- Press the remaining 0.5 cup of mini chocolate eggs into the top of the batter.
- Bake for 25 to 30 minutes, or until the edges are golden and the center is just set but still slightly soft.
- Allow the blondies to cool completely in the pan before using the parchment overhang to lift them out and slice into 16 squares.
Notes
- Measure the flour by spooning it into the cup and leveling it off to avoid a cakey texture.
- Use room temperature eggs for a smoother batter.
- For a deeper flavor, you can brown the butter before mixing it with the sugar.