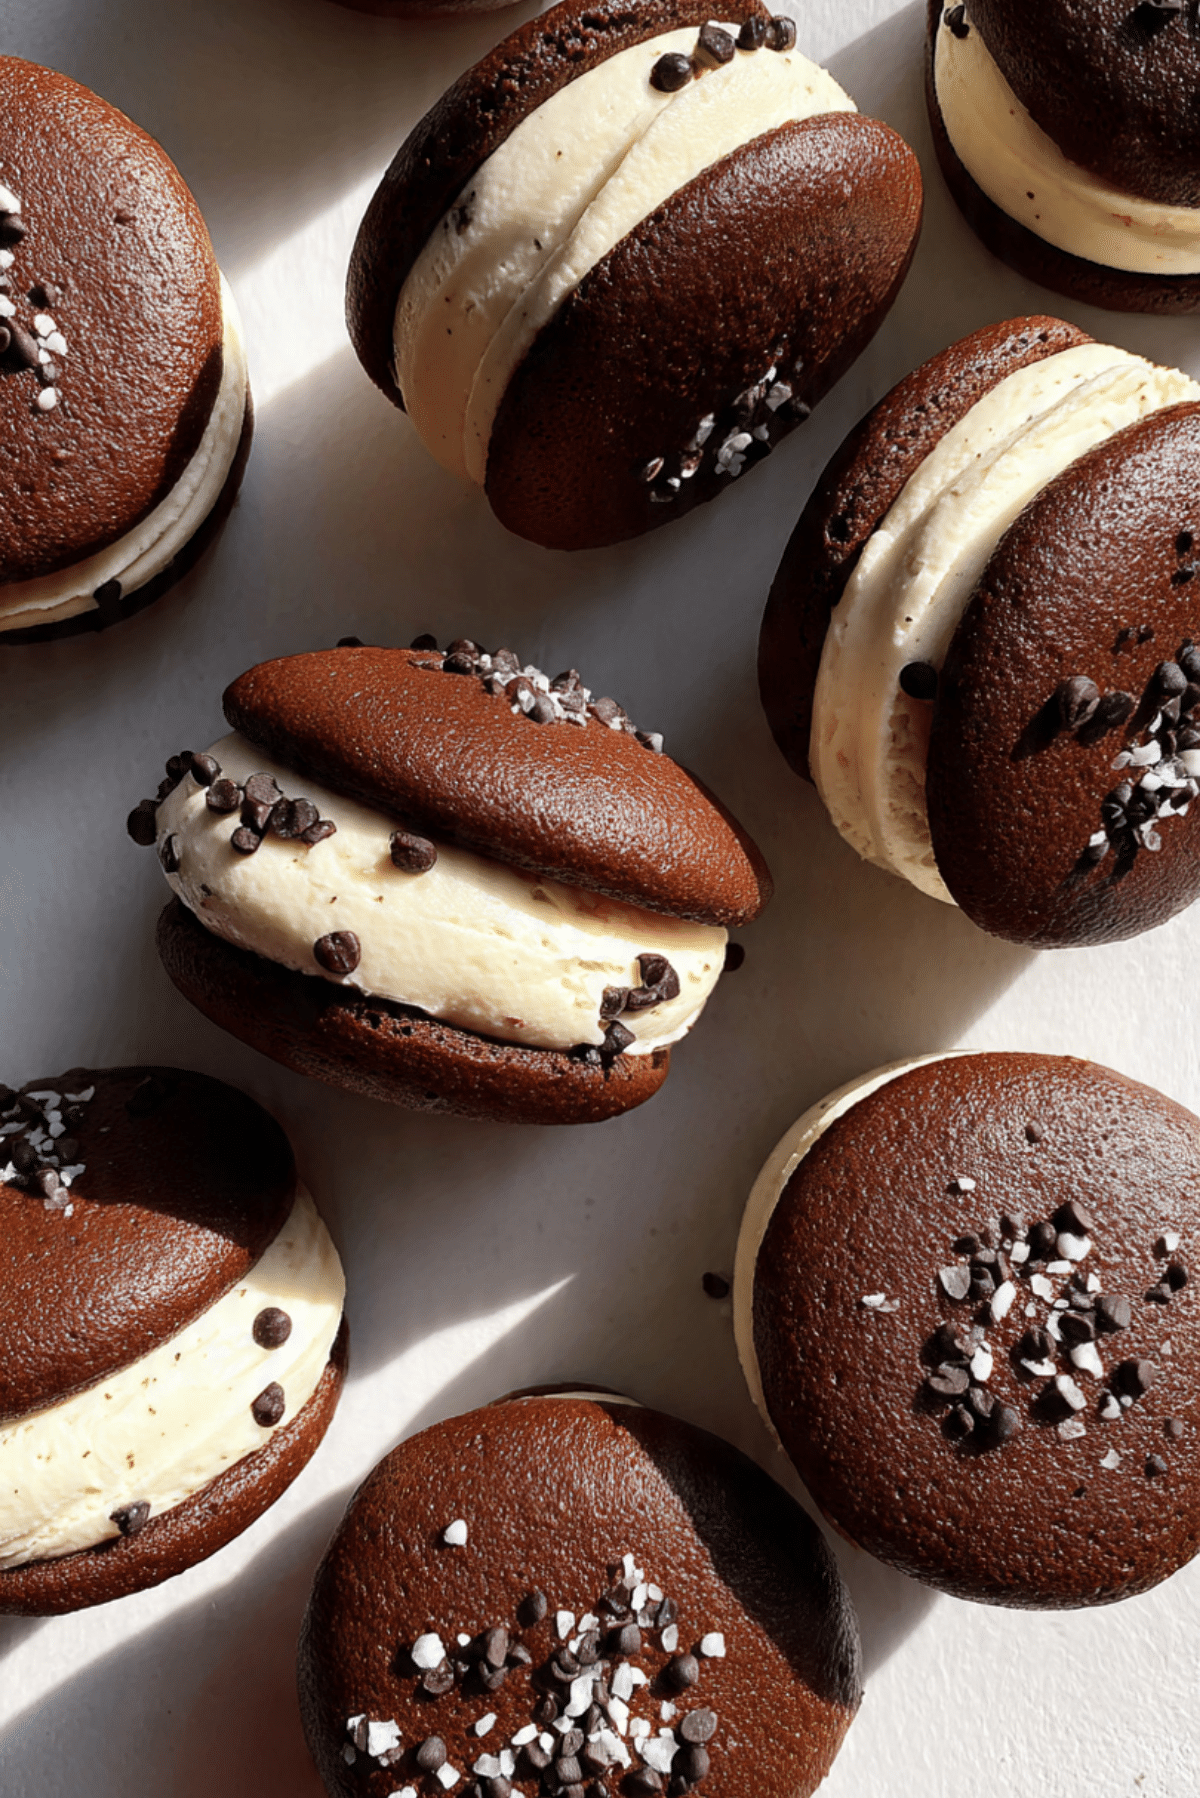
Cookie Dough Whoopie Pies
There is a special kind of magic that happens when two childhood favorites collide, and these Cookie Dough Whoopie Pies are the ultimate proof. Imagine the softest, most pillowy chocolate cake rounds hugging a thick, decadent center of eggless cookie dough that tastes exactly like the real thing. Trust me, you’re going to love this because it combines the comfort of a classic whoopie pie with the irresistible allure of raw cookie dough.
A Double Dose of Dessert Nostalgia
While a traditional whoopie pie usually features a marshmallow or buttercream filling, substituting it with edible cookie dough is a total game changer. This recipe is designed to satisfy the deepest of sweet tooth cravings, offering a delightful contrast between the airy cake and the dense, slightly gritty texture of the dough. The addition of mini chocolate chips provides just the right amount of crunch, and let me tell you, it’s worth every bite.
From New England Roots to Modern Delights
The whoopie pie has long been a staple of New England and Pennsylvania Dutch baking traditions, originally serving as a clever way for bakers to use up leftover cake batter. By infusing this classic shape with the flavors of a chocolate chip cookie, we are paying homage to the past while embracing one of the most popular dessert trends of today. These treats have become a modern icon at bake sales and parties, symbolizing pure, unadulterated fun.
Why You Will Love These Whoopie Pies
You will find that these handheld treats are as reliable as they are delicious, making them a standout addition to your baking repertoire.
Versatile: These are perfect for everything from a casual backyard barbecue to a festive birthday celebration.
Budget-Friendly: Most of the ingredients are basic baking staples you likely already have in your pantry, like flour, sugar, and cocoa.
Quick and Easy: The cakes bake in mere minutes, and the filling comes together in a single bowl without any complex techniques.
Customizable: You can easily swap the mini chocolate chips for peanut butter chips or even colorful sprinkles to match a theme.
Crowd-Pleasing: I have never met a person who can turn down the combination of chocolate cake and cookie dough.
Make-Ahead Friendly: These pies actually taste even better the next day after the flavors have had a chance to meld together.
Great for Leftovers: If you have any extra filling, it makes a fantastic dip for pretzels or graham crackers.
Pro Tips for the Perfect Pillowy Cake
Achieving that signature domed shape and soft texture is the secret to a great whoopie pie, so keep these expert tricks in mind.
The biggest tip I can give you is to avoid overmixing your cake batter once you add the dry ingredients, as this can lead to a tough and flat cake rather than a fluffy one. When scooping the batter onto your baking sheet, use a uniform measure like a cookie scoop to ensure all your rounds are the same size for easy pairing. Also, make sure to heat-treat your flour for the cookie dough filling to ensure it is completely safe to eat in its raw state.
Essential Tools for Success
Having the right equipment on hand will make the assembly process much smoother and ensure consistent results for every batch.
Medium Cookie Scoop: This is the easiest way to portion out perfect, uniform rounds of both cake batter and cookie dough filling.
Electric Stand Mixer: Essential for creaming the butter and sugar for the dough to achieve that light, fluffy, and spreadable consistency.
Parchment Paper: Prevents the delicate chocolate cakes from sticking to the pan and ensures an easy release every time.
Wire Cooling Rack: Allows air to circulate around the baked cakes so they cool quickly and don’t become soggy.
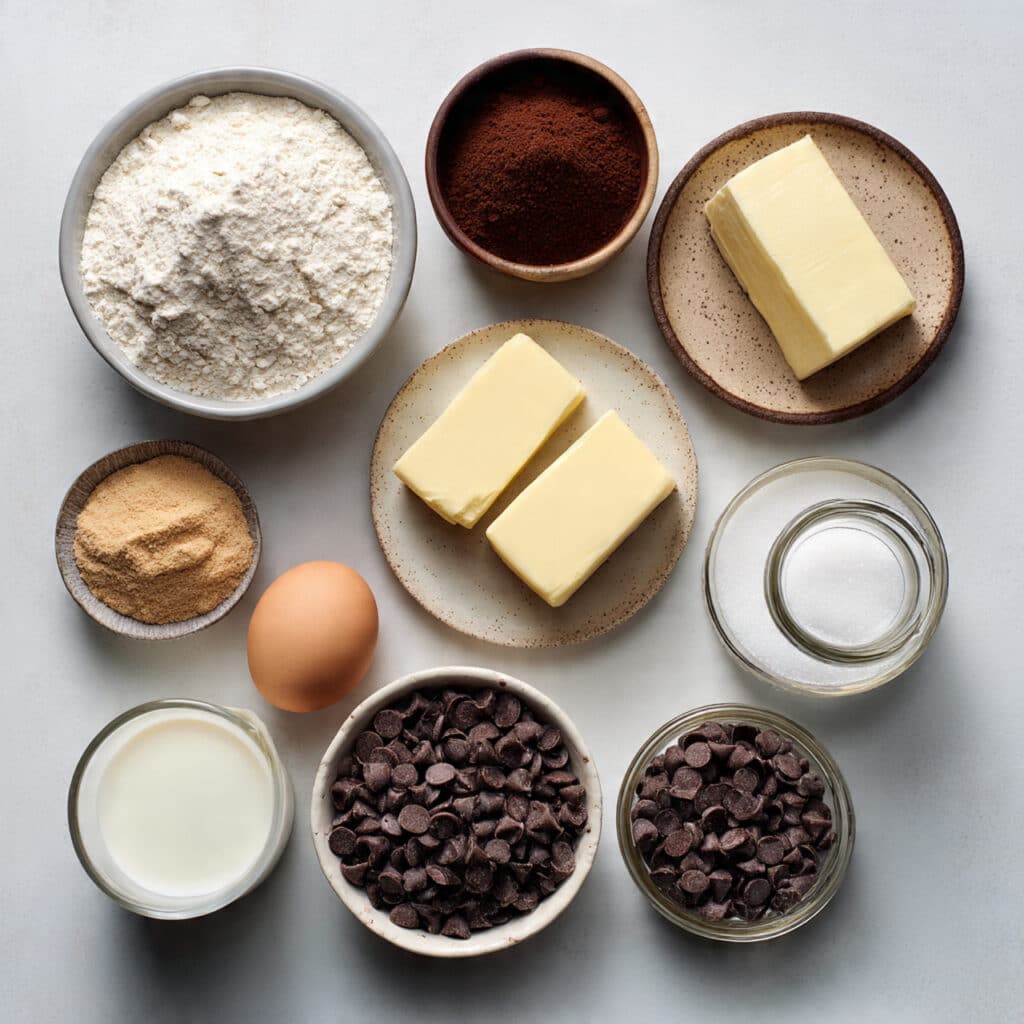
Ingredients You Will Need For Success
Each element of this recipe has been selected to create a harmonious balance of chocolate richness and sweet, buttery dough.
- All-Purpose Flour: 2 cups for the cake batter and 1 1/2 cups (heat-treated) for the cookie dough filling.
- Unsweetened Cocoa Powder: 1/2 cup of high-quality dark cocoa to give the cakes their deep chocolate flavor and color.
- Unsalted Butter: 1/2 cup softened for the cake and 1 cup for the rich cookie dough center.
- Brown Sugar: 1 cup packed to provide a deep molasses sweetness and moisture to the filling.
- Heavy Cream: 1/4 cup to thin the cookie dough to a spreadable consistency and add a touch of luxury.
- Mini Semi-Sweet Chocolate Chips: 1 cup to ensure every bite of the filling is loaded with chocolatey goodness.
Flexible Ingredient Substitutions
If you find yourself missing an item, there are several ways to pivot while keeping the essence of the treat intact.
Heavy Cream: Whole milk or even a splash of almond milk can be used to adjust the filling consistency.
Brown Sugar: If you only have white sugar, add a teaspoon of molasses to mimic the depth of brown sugar.
Cocoa Powder: In a pinch, you can use melted semi-sweet chocolate in the cake batter for a different type of richness.
Spotlight on Our Star Ingredients
Unsweetened Cocoa Powder: This is the soul of the cake rounds, providing the intense chocolate base that balances the sweet filling.
Mini Chocolate Chips: These are essential for the authentic cookie dough experience, providing texture and bursts of flavor in every bite.
Let Us Start the Baking Process
Whipping up these pies is a fun and rewarding process that will fill your kitchen with the most incredible aromas, so let’s get started.
- Preheat Your Equipment: Set your oven to 350°F and line your baking sheets with parchment paper so they are ready for the batter.
- Combine Ingredients: Whisk your dry ingredients together in one bowl while creaming the butter and sugars in another until they are light and fluffy.
- Prepare Your Cooking Vessel: Gradually mix the dry ingredients into the wet ones, alternating with milk or water, until a thick chocolate batter forms.
- Assemble the Dish: Scoop rounded tablespoons of batter onto the sheets and bake for about 10 minutes until the tops spring back when touched.
- Cook to Perfection: While the cakes cool, prepare the edible cookie dough by beating butter, brown sugar, heat-treated flour, cream, and mini chips.
- Finishing Touches: Pair up the cooled cakes and spread or pipe a generous mound of cookie dough onto the flat side of one cake.
- Serve and Enjoy: Press the second cake on top to create a sandwich and serve immediately or store them for a later treat.
Flavor and Texture Development
As the whoopie pies rest, the moisture from the cookie dough filling slightly softens the inner surface of the chocolate cakes, creating a unified dessert experience. The flavor of the dark cocoa becomes more pronounced over time, standing up beautifully against the buttery, brown sugar notes of the dough. Each bite offers a progression from the soft, yielding cake to the satisfyingly dense and chip-filled center.
Helpful Cooking Tips and Tricks
- To heat-treat your flour, bake it at 350°F for 5-7 minutes or microwave it until it reaches an internal temperature of 160°F.
- If your cookie dough filling is too stiff to pipe, add an extra tablespoon of heavy cream until it reaches your desired texture.
- Use a damp finger to gently smooth out any peaks on your scooped cake batter before baking for a more uniform, rounded appearance.
What to Avoid for Best Results
- Do not assemble the pies while the chocolate cakes are still warm, or the butter-based cookie dough filling will melt and run out the sides.
- Avoid overbaking the cakes; they should be soft and moist, not dry and crumbly like a traditional cookie.
- Don’t forget to sift your cocoa powder to remove any lumps, ensuring a smooth batter and a consistent chocolate flavor.
Nutritional Information
Servings: 12 whoopie pies
Calories per serving: 420
Note: These are approximate values.
Preparation Time
Prep Time: 30 minutes
Cook Time: 10 minutes
Total Time: 40 minutes
Make-Ahead and Storage Tips
These whoopie pies are perfect for prepping in advance because they hold up so well. You can store them in an airtight container at room temperature for up to two days, or in the refrigerator for up to a week if you prefer a firmer filling. For long-term storage, wrap individual pies in plastic wrap and freeze them for up to three months; just thaw them in the fridge before serving.
How to Serve
For a classic look, serve these on a rustic wooden board or a simple white platter to let the dark chocolate and creamy filling pop. They are best enjoyed with a glass of cold milk or a hot cup of coffee to balance the richness. If you are serving them at a party, consider cutting them in half to show off the beautiful layered interior.
Creative Leftover Transformations
If you have leftover whoopie pies that are starting to get a bit dry, you can crumble them up and use them as a spectacular topping for a chocolate sundae. Alternatively, you can blend a whole whoopie pie with vanilla ice cream and a splash of milk to create the most indulgent “Cookie Dough Cake Shake” imaginable.
Additional Tips
Always ensure your butter is truly softened at room temperature for the filling to ensure you don’t end up with lumps of butter in your cookie dough. If you want a more decorative look, you can roll the edges of the assembled pies in extra mini chocolate chips or sprinkles.
Make It a Showstopper
To turn these into a true dessert masterpiece, drizzle the tops of the assembled pies with melted white chocolate or a dark chocolate ganache. You can also use a star tip to pipe the cookie dough filling in a decorative swirl, making the center look as impressive as it tastes.
Variations to Try
- Peanut Butter Dough: Swap the mini chips for peanut butter chips and add a tablespoon of peanut butter to the filling.
- Red Velvet Whoopie: Use a red velvet cake recipe for the rounds for a vibrant, festive look that pairs perfectly with the dough.
- Salted Caramel: Drizzle a little bit of salted caramel sauce over the cookie dough before adding the top cake layer.
- Oreo Crunch: Fold crushed Oreo cookies into the filling instead of chocolate chips for a “cookies and cream” twist.
FAQ’s
- Why is it called a whoopie pie?
Legend has it that children would shout “Whoopie!” whenever they found these treats in their lunchboxes. - Is the raw flour safe to eat?
Only if you heat-treat it first to kill any potential bacteria, which is a crucial step in this recipe. - Can I use a cake mix for the rounds?
Yes, a boxed devil’s food cake mix works as a great shortcut if you are short on time. - How do I stop the cakes from sticking to the pan?
Always use parchment paper or a silicone baking mat for the best and easiest release. - Why are my cakes flat?
This can happen if your baking powder is old or if you overmixed the batter, which deflates the air. - Can I make these mini-sized?
Absolutely, just use a smaller scoop and reduce the baking time by a few minutes. - Do I need to refrigerate them?
While they can stay at room temperature for a couple of days, refrigeration keeps the dough filling stable for longer. - Can I use milk chocolate instead of dark?
Yes, though the dark cocoa provides a better contrast to the sweet filling. - What if I don’t have a cookie scoop?
Two spoons will work just fine, though your rounds might be a little less uniform. - Can I use this dough for actual cookies?
No, this filling is designed to be eaten raw and doesn’t contain the leavening agents or eggs needed for baking.
Conclusion
Cookie Dough Whoopie Pies are more than just a dessert; they are a celebration of everything we love about baking. With their soft, chocolatey exterior and that unforgettable cookie dough core, they are guaranteed to bring a smile to anyone’s face. I hope you enjoy every moment of making and eating these as much as I do. Now, grab your whisk and let’s make some memories!
PrintCookie Dough Whoopie Pies
Soft, pillowy chocolate cake rounds filled with a thick, eggless chocolate chip cookie dough center for the ultimate nostalgic treat.
Ingredients
- 2 cups + 1 1/2 cups All-Purpose Flour (divided)
- 1/2 cup Unsweetened Cocoa Powder
- 1 1/2 cups Unsalted Butter (softened, divided)
- 1 cup Granulated Sugar
- 1 cup Brown Sugar (packed)
- 1 Egg
- 1 cup Milk
- 1 teaspoon Baking Powder
- 1 teaspoon Baking Soda
- 1 teaspoon Vanilla Extract
- 1/4 cup Heavy Cream
- 1 cup Mini Semi-Sweet Chocolate Chips
Instructions
- Preheat oven to 350°F and line baking sheets with parchment paper.
- For the cakes: Whisk 2 cups flour, cocoa, baking powder, and baking soda. In another bowl, cream 1/2 cup butter and granulated sugar, then beat in the egg and vanilla.
- Gradually add dry ingredients to wet, alternating with milk, until smooth. Scoop tablespoons onto sheets and bake for 10 minutes; cool completely.
- For the filling: Heat-treat the remaining 1 1/2 cups flour by microwaving or baking until it reaches 160°F.
- Beat the remaining 1 cup butter and brown sugar until fluffy. Mix in the heat-treated flour, heavy cream, and mini chocolate chips.
- Spread or pipe a thick layer of cookie dough onto the flat side of half the cakes, then top with the remaining cakes to form sandwiches.
Notes
- Always heat-treat your flour to make the raw cookie dough filling safe to eat.
- Let the cakes cool completely before filling to prevent the dough from melting.
- Use a cookie scoop for perfectly uniform cakes and filling portions.