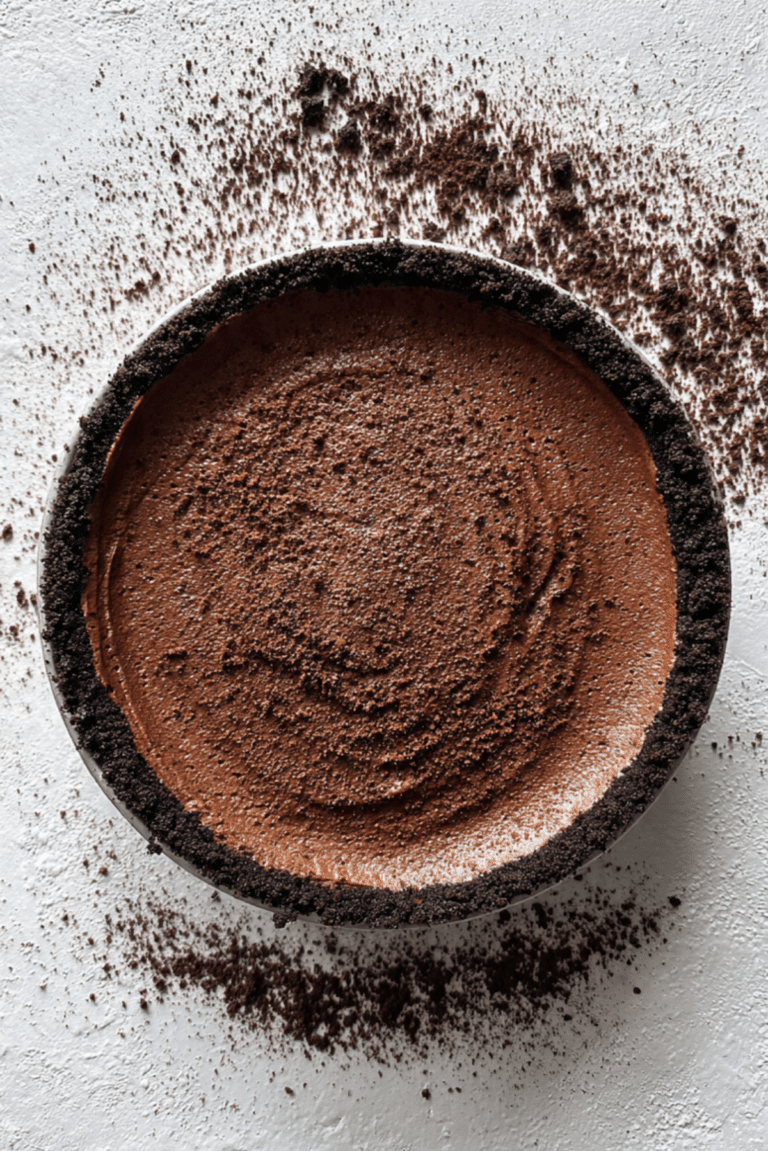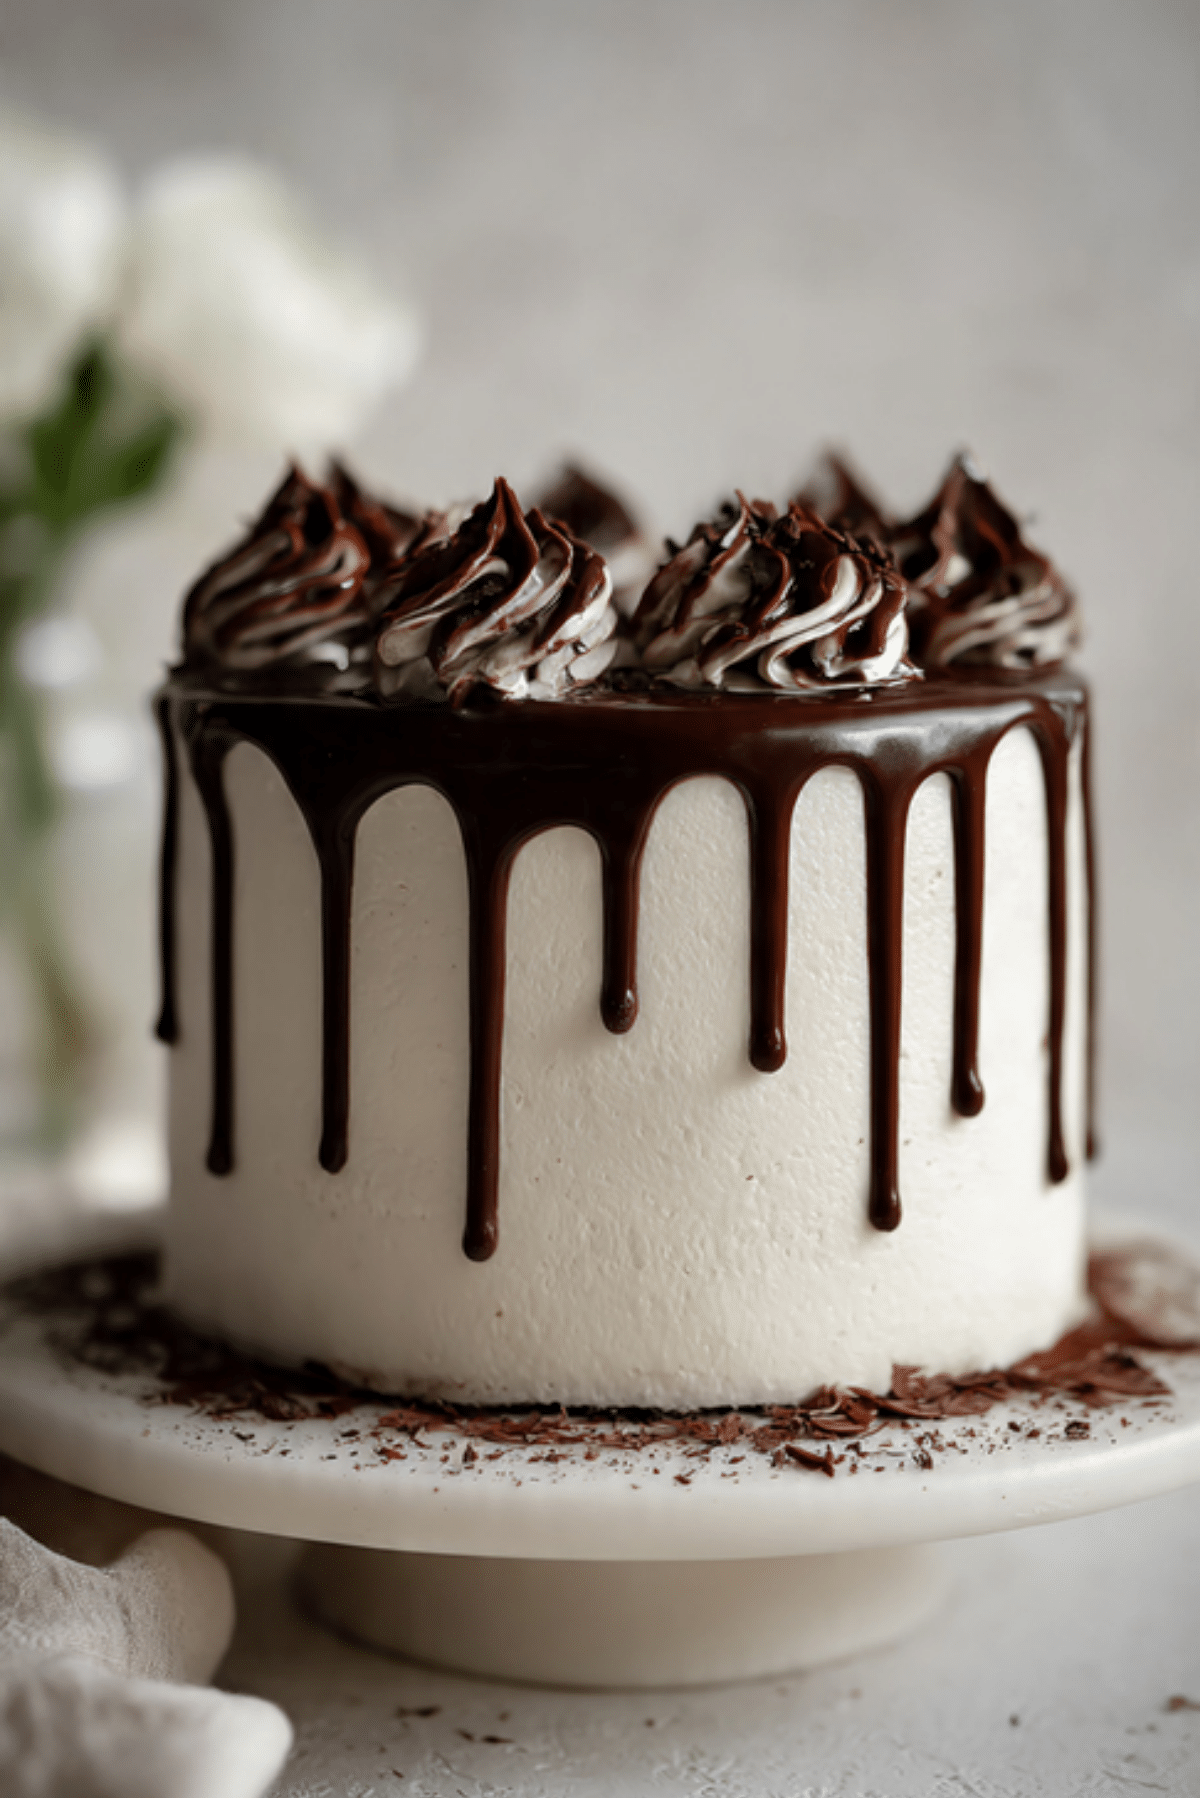
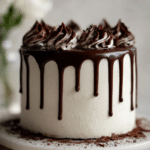
Chocolate Drip Cake
If you have ever wanted to create a dessert that looks like it walked straight out of a professional patisserie window, this Chocolate Drip Cake is your ultimate guide. This recipe is the perfect marriage of a rich, moist cocoa sponge and a glossy, decadent ganache that cascades down the sides in perfect droplets. Every slice offers a deep, chocolatey intensity that is balanced by a silky frosting, making it the dream centerpiece for any celebration. Trust me, you’re going to love this because it simplifies a high-end technique into manageable steps that anyone can master. It is a total game-changer for your birthday cake game, and let me tell you, it’s worth every bite.
The Art of the Perfect Chocolate Cascade
There is something mesmerizing about watching chocolate ganache slowly drip down the side of a perfectly smooth cake. This “back to basics” version focuses on getting the temperatures and textures just right so you can achieve those iconic, uniform drips without the stress. The beauty of this cake lies in the contrast between the matte finish of the frosting and the high-shine glaze of the chocolate. It is the kind of dessert that makes guests pause for a photo before they even pick up a fork, and the flavor is just as impressive as the visual impact.
From Humble Sponge to Modern Showstopper
The drip cake trend has taken the baking world by storm over the last decade, turning traditional layered cakes into playful works of art. While the concept seems modern, it relies on the classic French technique of making ganache, a simple yet luxurious emulsion of chocolate and cream. By mastering this foundation, you can transform a standard chocolate cake into a contemporary masterpiece that feels fresh and exciting. This recipe honors the traditional roots of baking while embracing the fun, gravity-defying aesthetics that define modern dessert culture.
Why This Drip Cake is a Baker’s Dream
Creating a showstopper doesn’t have to mean spending hours on complicated decorations when you have a reliable drip recipe.
Versatile: You can top this cake with anything from fresh berries and macarons to gold leaf and chocolate shards for any theme.
Budget-Friendly: The ingredients are simple pantry staples like cocoa powder, flour, and sugar, with the quality of the chocolate being the only investment.
Quick and Easy: Once your cake is frosted, the actual dripping process takes less than five minutes but adds a massive amount of “wow” factor.
Customizable: You can use white chocolate or milk chocolate for the drip, or even add a touch of food coloring for a vibrant, colorful effect.
Crowd-Pleasing: Everyone loves chocolate, and the combination of different textures in this cake ensures it is a hit with guests of all ages.
Make-Ahead Friendly: The chocolate sponges can be baked and frozen weeks in advance, making the assembly day much more relaxed.
Great for Leftovers: The ganache drip actually helps to seal the cake, keeping it moist and delicious for several days after the first slice is cut.
Expert Secrets for Flawless Chocolate Drips
The biggest secret to a successful drip is the temperature of both the cake and the ganache. One of the best tips I can give you is to ensure your cake is chilled for at least an hour before you start, which helps the chocolate slow down as it travels. Another secret is to test your drip on the back of a cold glass or the edge of the pan first to check the consistency. If the chocolate is too runny, let it cool for a few more minutes, and if it is too thick, a tiny splash of warm cream will bring it back to the perfect flow.
Essential Tools for a Professional Finish
Having a few specific items will make the assembly and the dripping process much more controlled and professional.
Turntable: A rotating cake stand is essential for achieving a smooth frost and for keeping a consistent pace as you apply the chocolate drips.
Squeeze Bottle or Spoon: A small squeeze bottle gives you the most control over the size of the drips, though a spoon works perfectly for a more organic look.
Offset Spatula: This tool is your best friend for smoothing the top and sides of the cake to create a clean canvas for the chocolate.
Cake Scraper: A tall metal or plastic scraper helps you get those sharp, straight edges that make a drip cake look truly high-end.
Small Heat-Proof Bowl: You will need this to melt your chocolate and cream together gently without burning the delicate cocoa solids.
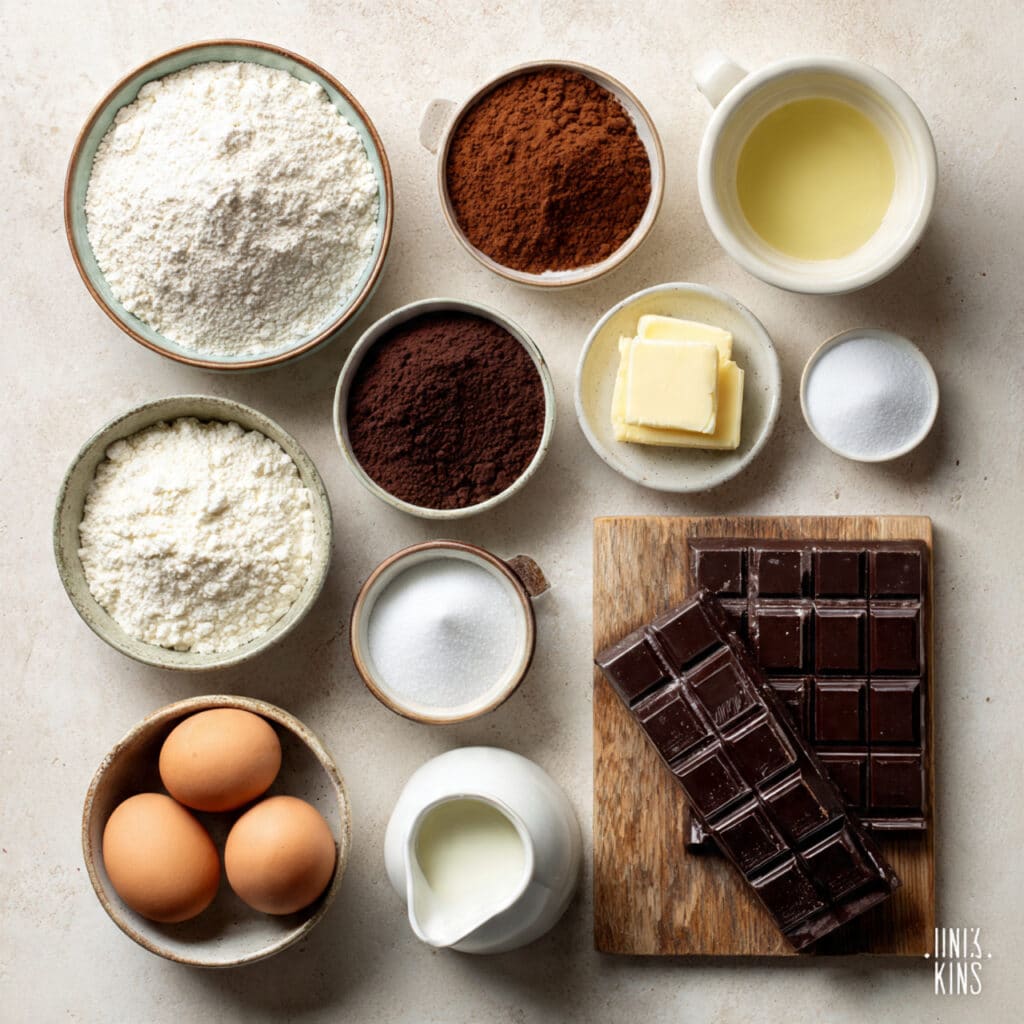
Ingredients for a Rich and Decadent Chocolate Cake
The harmony of dark cocoa and fresh cream is what creates the deep, satisfying flavor profile of this masterpiece.
- All-Purpose Flour: 250 grams provides the structure for a sturdy sponge that can handle the weight of the frosting and ganache.
- Granulated Sugar: 350 grams sweetens the cocoa and helps to create a soft, moist crumb that melts in your mouth.
- Unsweetened Cocoa Powder: 75 grams of high-quality Dutch-processed cocoa gives the cake its deep, dark color and intense flavor.
- Baking Powder and Soda: 1.5 teaspoons of each provide the necessary lift for a light and airy texture.
- Large Eggs: 2 eggs at room temperature help to bind the batter and provide richness to the sponge.
- Whole Milk: 250 milliliters adds moisture and fat for a tender result.
- Vegetable Oil: 120 milliliters ensures the cake stays moist for days, unlike cakes made with butter alone.
- Boiling Water: 250 milliliters is the secret to blooming the cocoa powder and creating an incredibly smooth, liquid batter.
- Dark Chocolate: 100 grams of chopped chocolate for the ganache provides a rich, glossy finish for the drips.
- Heavy Cream: 100 milliliters is combined with the chocolate to create the perfect pourable emulsion.
- Vanilla Extract: 2 teaspoons enhances the chocolate flavor and adds a beautiful aromatic depth.
Flexible Ingredient Substitutions
You can easily adapt this recipe based on what you have in your cupboard while still achieving a stunning result.
Vegetable Oil: Melted coconut oil or a light olive oil can be used for a slightly different flavor and healthy fat profile.
Whole Milk: You can use a dairy-free alternative like soy or almond milk, which works perfectly with the cocoa.
Boiling Water: Replace the water with hot coffee to intensify the chocolate notes and add a sophisticated depth to the cake.
Dark Chocolate: Milk chocolate can be used for the drip, though you may need to reduce the amount of cream slightly for it to set.
Key Ingredients to Spotlight
Boiling Water: This is the magic step that dissolves the cocoa powder fully, releasing all the flavor and ensuring a perfectly smooth batter.
Dark Chocolate Ganache: Using a chocolate with at least 50 percent cocoa solids will give you the best shine and a rich, professional taste.
A Shared Journey Through the Baking Process
Following these numbered steps will take you from a bowl of flour to a stunning, professional-looking celebration cake.
- Preheat Your Equipment: Set your oven to 180°C and grease two 8-inch round cake tins, lining the bottoms with parchment paper.
- Combine Ingredients: Whisk the dry ingredients together in a large bowl, then add the eggs, milk, oil, and vanilla, mixing until smooth.
- Prepare Your Cooking Vessel: Carefully stir in the boiling water by hand, the batter will be very thin but this is exactly what you want.
- Assemble the Dish: Pour the batter into the tins and bake for 30 to 35 minutes until a toothpick comes out clean.
- Cook to Perfection: Let the cakes cool completely before frosting them with your favorite chocolate or vanilla buttercream.
- Finishing Touches: Chill the frosted cake, then melt the chocolate and cream together to create the ganache for the drips.
- Serve and Enjoy: Apply the drips around the edge of the cake, fill in the top, and decorate with your favorite toppings before serving.
Mastering Texture and Flavor Development
The magic of a chocolate cake happens when the fats from the oil and the moisture from the boiling water interact with the cocoa. This results in a “fudgy” texture that is neither too heavy nor too dry. As the ganache cools on the chilled cake, it sets into a soft, biteable consistency that doesn’t shatter when you cut it, providing a rhythmic contrast to the light sponge and the creamy frosting.
Helpful Cooking Tips and Tricks
- For the smoothest frosting, do a “crumb coat” first and chill the cake before adding the final thick layer of buttercream.
- Use a spoon to do a “test drip” on the side of the cake that will be at the back to ensure your ganache is the right temperature.
- If you want your drips to stop halfway down the cake, make sure the ganache has cooled to about 30°C before applying.
Mistakes to Avoid for the Best Result
- Dripping on a Warm Cake: The frosting will melt and the drips will slide straight off into a puddle at the base.
- Over-Whisking the Ganache: If you stir the ganache too vigorously, you will create air bubbles that spoil the smooth, glossy finish.
- Using Chocolate Chips for Drips: Many chocolate chips contain stabilizers that prevent them from melting into a perfectly smooth liquid.
Nutritional Information
Servings: 16
Calories per serving: 380
Note: These are approximate values.
Preparation Time
Prep Time: 40 minutes
Cook Time: 35 minutes
Total Time: 75 minutes
Make-Ahead and Storage Tips
The sponges for this cake are incredibly resilient. You can bake them, wrap them in plastic, and store them at room temperature for two days or freeze them for up to a month. Once the cake is fully assembled and the drip has set, it is best kept in a cool place or the refrigerator. If you refrigerate the cake, make sure to take it out at least an hour before serving so the buttercream and the ganache can soften back to their best texture.
How to Serve
This cake is a showstopper on its own, but it pairs beautifully with a scoop of vanilla bean ice cream or a handful of fresh raspberries. For a truly professional look, slice the cake while it is cold using a hot knife, wiping the blade between every cut to keep the layers clean and visible.
Creative Leftover Transformations
If you have leftovers, you can turn them into “drip cake jars” by layering cubes of the cake with extra frosting and a drizzle of warmed ganache. You can also blend a slice into a decadent chocolate milkshake for a treat that feels like a complete indulgence.
Additional Pro Advice
To get that ultra-glossy ganache look, add a tiny teaspoon of corn syrup or honey to the chocolate and cream mixture. This adds a beautiful shine that stays even after the chocolate has set in the fridge.
Make It a Showstopper
To take the visual appeal to the next level, pile the top of the cake high with chocolate-dipped strawberries, gold-sprinkled truffles, and a few shards of dark chocolate. The height and variety of textures on top will complement the vertical lines of the drips, making the cake look architectural and exciting.
Variations to Try
- White Chocolate Raspberry: Use a white chocolate drip colored with a tiny bit of pink and fill the cake with fresh raspberry jam.
- Salted Caramel Drip: Replace the chocolate ganache with a thick, homemade salted caramel for a golden, indulgent look.
- Peanut Butter Twist: Add a layer of smooth peanut butter between the chocolate sponges for a classic flavor combination.
FAQ’s
- Why is my ganache too thin?
This usually happens if there was too much cream or if the ganache is still too warm. Let it sit for ten minutes and it should thicken up. - Can I use a microwave to melt the chocolate?
Yes, just use short 20-second bursts and stir in between to avoid burning the chocolate. - How do I get my frosting perfectly smooth?
Using a metal cake scraper and dipping it in hot water before the final pass will help melt the surface of the frosting into a glass-like finish. - Is the boiling water really necessary?
Yes, it is the most important step for “blooming” the cocoa and ensuring the cake has a moist, professional crumb. - Can I make this as a single layer?
You can, but the drip effect looks much more impressive on a taller, double-layered cake. - What chocolate is best for the drip?
A dark chocolate with around 50 to 60 percent cocoa solids provides the best balance of flavor and flow. - How long does the drip take to set?
On a chilled cake, the drips will set enough to move the cake within about fifteen to twenty minutes. - Can I use a different oil?
Any neutral-flavored oil like sunflower or canola is perfect; avoid strong-flavored oils like extra virgin olive oil. - My cake layers are domed, what should I do?
Simply use a serrated knife to trim the tops flat so your cake stacks evenly and doesn’t lean. - Can I add sprinkles to the drip?
Yes, but add them immediately after dripping before the chocolate sets so they stick properly.
Conclusion
Creating a Chocolate Drip Cake is a rewarding experience that combines the science of baking with the creativity of art. By following these basic principles, you can produce a dessert that is as delicious as it is visually stunning. Whether it is for a milestone birthday or just a weekend project, the satisfaction of seeing those perfect drips form is second to none. So grab your spatula and get ready to create a masterpiece that everyone will be talking about!
PrintChocolate Drip Cake
A moist and fudgy chocolate layer cake featuring a glossy dark chocolate ganache drip and a silky smooth finish.
Ingredients
- 250g All-Purpose Flour
- 350g Granulated Sugar
- 75g Unsweetened Cocoa Powder
- 1.5 tsp Baking Powder
- 1.5 tsp Baking Soda
- 2 Large Eggs
- 250ml Whole Milk
- 120ml Vegetable Oil
- 2 tsp Vanilla Extract
- 250ml Boiling Water
- 100g Dark Chocolate (chopped)
- 100ml Heavy Cream
Instructions
- Preheat oven to 180°C and line two 8-inch cake tins with parchment paper.
- Whisk together flour, sugar, cocoa, baking powder, and baking soda in a large bowl.
- Add eggs, milk, oil, and vanilla. Beat on medium speed for 2 minutes.
- Stir in the boiling water by hand (batter will be thin).
- Pour into tins and bake for 30-35 minutes. Cool completely.
- Frost the cake with buttercream and chill for at least 1 hour.
- To make the drip: Heat cream until simmering, pour over chopped chocolate, let sit for 5 minutes, then stir until smooth.
- Allow ganache to cool to a lukewarm temperature (about 30°C).
- Use a spoon or squeeze bottle to create drips around the edge of the chilled cake, then fill in the center.
Notes
- A chilled cake is the secret to stopping the drips halfway down.
- Bloom the cocoa with boiling water for maximum flavor.
- Test your drip consistency on a cold glass before applying to the cake.