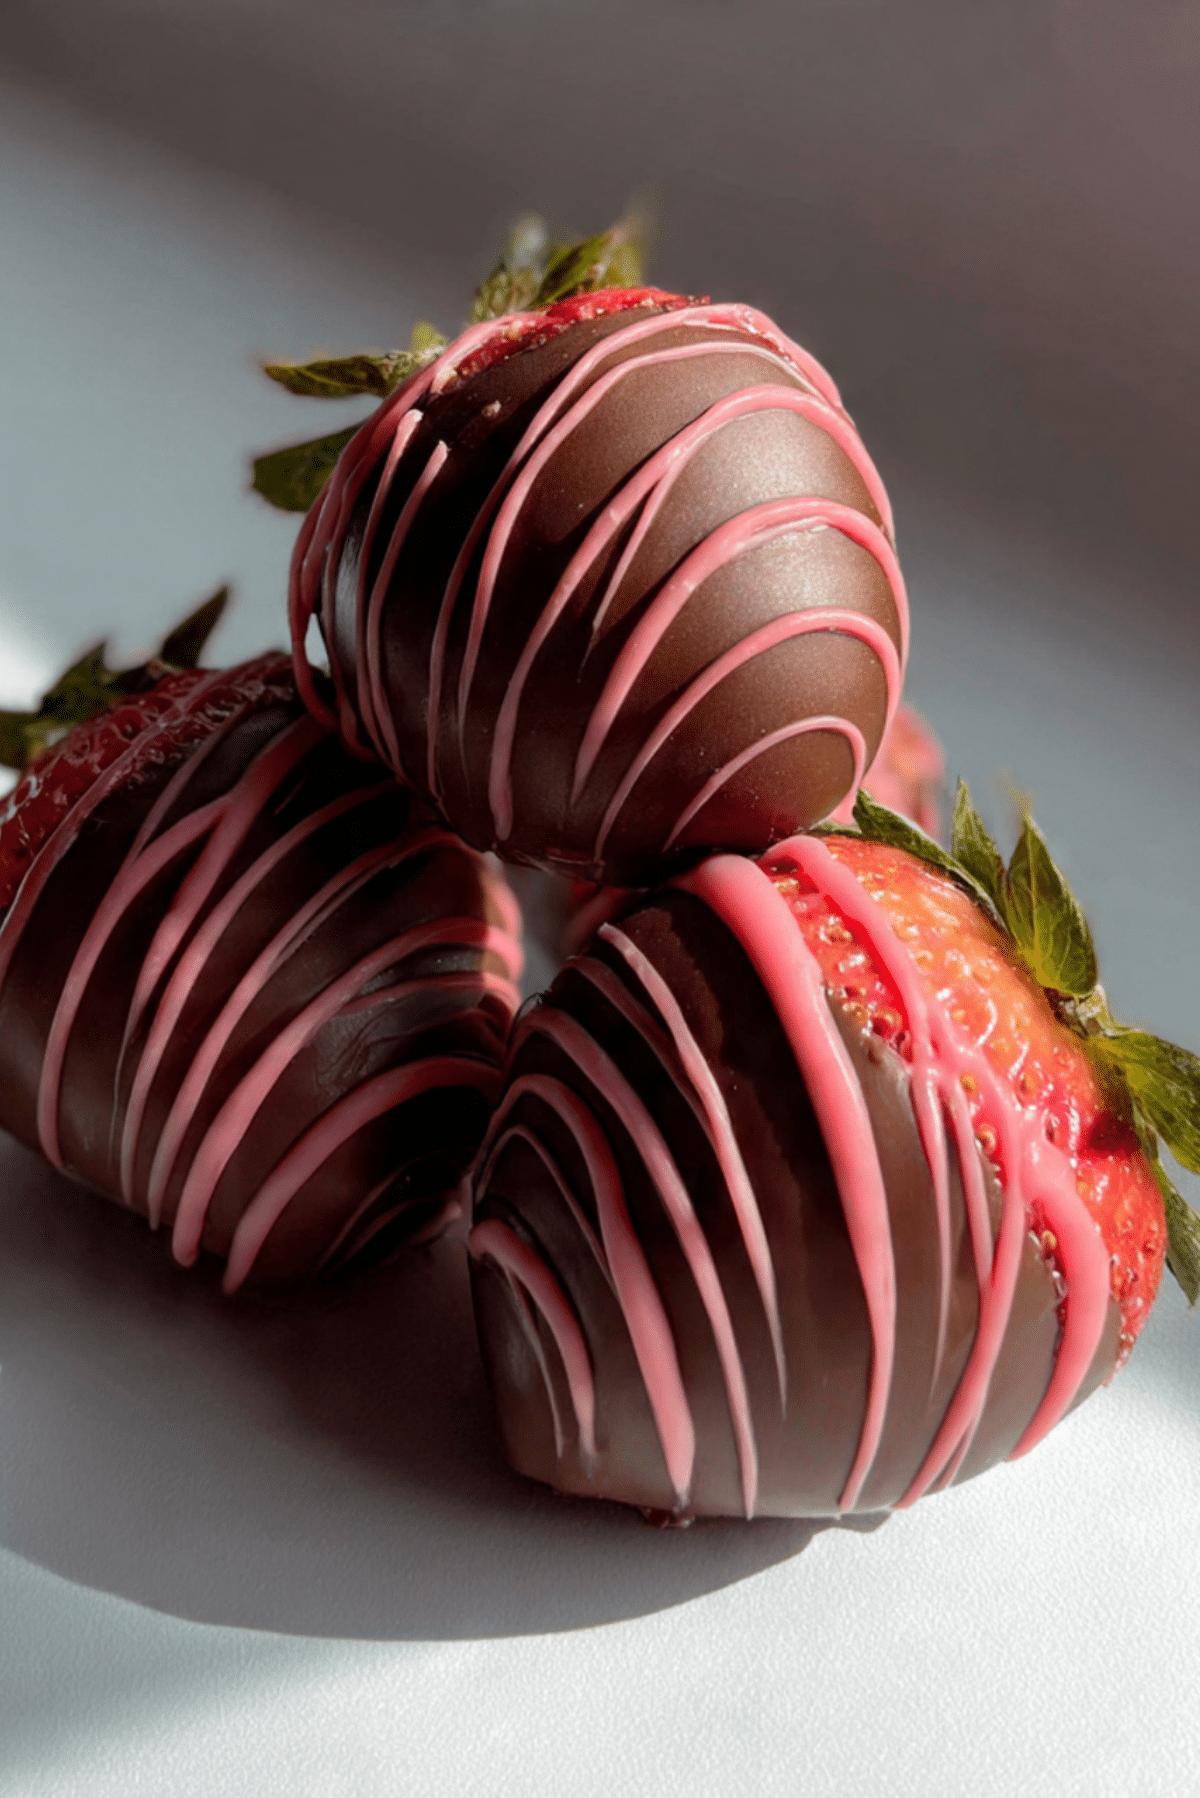
Chocolate Covered Strawberry Buttercream Candies
There is a timeless elegance in the combination of ripe fruit and rich cocoa, but these Chocolate Covered Strawberry Buttercream Candies take that romance to a whole new level. Imagine a velvety, pink strawberry center that melts on your tongue, encased in a snap of dark, decadent chocolate. Trust me, you’re going to love this because it captures the essence of a gourmet confectionary right in your own kitchen.
A Luxurious Twist on a Classic Pairing
When we think of indulgence, chocolate-dipped fruit is usually at the top of the list, yet these candies offer a more structured and creamy experience. This recipe is designed for those moments when you want a bite-sized explosion of flavor that feels sophisticated and heartfelt. The smooth buttercream interior provides a lush contrast to the firm chocolate shell, and let me tell you, it’s worth every bite.
From Confectionary Roots to Modern Delights
The art of making buttercream filled candies dates back to the traditional European chocolatiers who mastered the balance of sugar, fat, and flavor. By infusing the classic buttercream with the bright, tart notes of strawberries, we create a bridge between old-world candy making and modern flavor palettes. These treats have become a favorite for celebrations of love and friendship, symbolizing sweetness in every layer.
Why You Will Love These Buttercream Candies
You will find that these homemade truffles are far superior to anything you can find in a store-bought box.
Versatile: These are just as appropriate for a high-end dessert platter as they are for a sweet afternoon snack.
Budget-Friendly: Using simple ingredients like butter and sugar allows you to create an expensive-tasting gift for very little cost.
Quick and Easy: Once your centers are chilled, the dipping process goes by in a flash, making it a stress-free project.
Customizable: You can experiment with different types of chocolate or add a pinch of sea salt for a savory edge.
Crowd-Pleasing: I have yet to meet anyone who can resist the allure of a pink-centered chocolate truffle.
Make-Ahead Friendly: These candies store exceptionally well in the fridge, allowing you to prepare for events days in advance.
Great for Leftovers: Any extra buttercream can be used as a delicious frosting for cupcakes or cookies.
Pro Tips for the Perfect Chocolate Shell
Achieving that professional, glossy finish on your chocolate is the secret to a high-quality candy, so keep these expert tricks in mind.
The biggest tip I can give you is to ensure your buttercream centers are frozen solid before you start the dipping process, as this prevents them from melting into the warm chocolate. When melting your chocolate, do it slowly and stir constantly to maintain a smooth, dipping consistency. Also, use a dipping fork or a toothpick to submerge the candies, which helps keep your fingers clean and results in a more uniform coating.
Essential Tools for Success
Having the right tools will transform your kitchen into a professional candy shop and make the assembly much more precise.
Electric Stand Mixer: Essential for whipping the butter and sugar into a light, airy, and smooth consistency.
Baking Sheet with Parchment Paper: Provides a non-stick surface for your candies to set and prevents the chocolate from sticking.
Microwave-Safe Bowls: Used for melting your chocolate wafers or bars gently in short intervals.
Small Cookie Scoop: This helps you portion out the buttercream into perfectly even spheres every time.
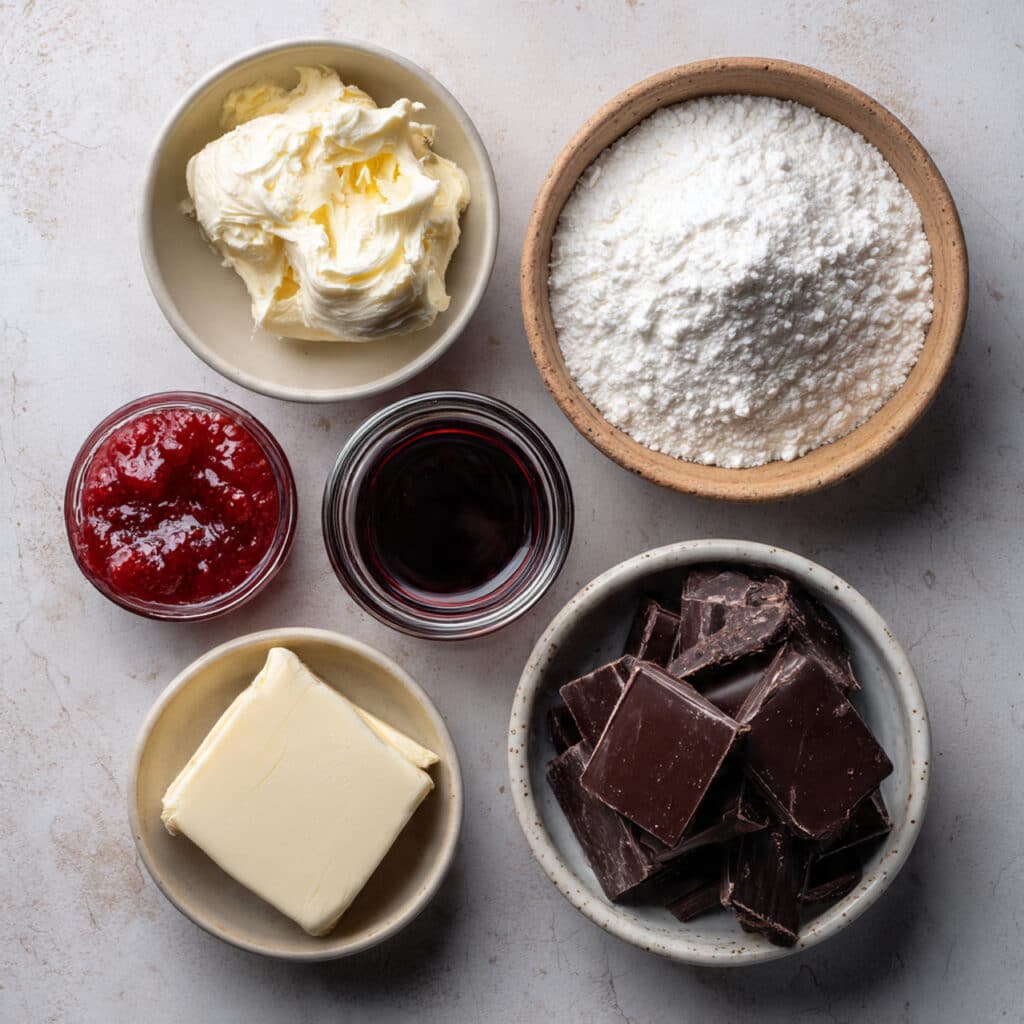
Ingredients You Will Need For Success
Each ingredient is chosen to provide a specific layer of flavor and texture that builds into the ultimate sweet treat.
- Unsalted Butter: 1/2 cup softened to create a rich and creamy base for the buttercream centers.
- Powdered Sugar: 3 cups to provide structure and sweetness to the strawberry filling.
- Strawberry Preserves: 1/4 cup of high-quality jam to infuse the centers with authentic fruit flavor and a natural pink hue.
- Vanilla Extract: 1 teaspoon to add a warm, floral note that balances the sweetness of the sugar.
- Semi-Sweet Chocolate Melting Wafers: 12 ounces of smooth chocolate designed for easy melting and a firm snap.
- Freeze-Dried Strawberry Powder: 1 tablespoon (optional) to intensify the strawberry flavor and color without adding extra moisture.
Flexible Ingredient Substitutions
If you need to swap something out, these alternatives will still yield a delicious and beautiful result.
Strawberry Preserves: Raspberry or blackberry preserves for a different berry twist.
Melting Wafers: High-quality chocolate chips mixed with a teaspoon of coconut oil for a similar shine.
Vanilla Extract: Almond extract, which pairs wonderfully with both chocolate and berries.
Spotlight on Our Star Ingredients
Strawberry Preserves: This ingredient is responsible for the vibrant flavor and beautiful pink color inside every candy.
Semi-Sweet Chocolate: This provides the structural shell and the deep, bitter contrast that keeps the candies from being overly sweet.
Let Us Start the Cooking Process
Getting your hands a little messy is part of the charm of candy making, so let’s jump into the assembly. This one’s a total game-changer.
- Preheat Your Equipment: While no oven is needed, make sure your mixing bowl and baking sheet are clean and ready to go.
- Combine Ingredients: Beat the softened butter, strawberry preserves, and vanilla in your mixer until smooth and well-incorporated.
- Prepare Your Cooking Vessel: Gradually add the powdered sugar one cup at a time until a stiff dough forms that can be easily rolled.
- Assemble the Dish: Scoop small portions of the strawberry dough and roll them into balls, then place them on a parchment-lined sheet.
- Cook to Perfection: Place the baking sheet in the freezer for at least 30 minutes to ensure the centers are firm enough for dipping.
- Finishing Touches: Melt the chocolate until smooth and dip each chilled ball into the chocolate, tapping off any excess before returning to the parchment.
- Serve and Enjoy: Allow the chocolate to set completely at room temperature or in the fridge before serving these delightful treats.
Flavor and Texture Development
The experience of eating these candies starts with the firm, slightly bitter snap of the chocolate. As the shell breaks, you are met with the cool, creamy, and intensely fruity buttercream that spreads across the palate. Because we use real preserves, you might even find tiny bits of strawberry, adding a natural texture that proves these are truly homemade and made with love.
Helpful Cooking Tips and Tricks
- If the buttercream dough is too soft to roll, add an extra quarter cup of powdered sugar to stiffen it up.
- Use a toothpick to dip the balls and then “patch” the small hole with a tiny drop of chocolate after you set them down.
- For a beautiful garnish, sprinkle a bit of crushed freeze-dried strawberries or white chocolate drizzle over the top before the shell sets.
What to Avoid for Best Results
- Do not skip the freezing step, as dipping room-temperature buttercream into warm chocolate will result in a messy, melted blob.
- Avoid getting any water in your melting chocolate, as even a single drop can cause the chocolate to “seize” and become lumpy.
- Don’t roll the balls too large; these are meant to be bite-sized candies, and smaller portions make for a better ratio of chocolate to filling.
Nutritional Information
Servings: 24 candies
Calories per serving: 165
Note: These are approximate values.
Preparation Time
Prep Time: 20 minutes
Cook Time: 10 minutes (melting/dipping)
Total Time: 1 hour (including chilling)
Make-Ahead and Storage Tips
These candies are exceptionally sturdy and can be made up to a week in advance if kept in an airtight container in the refrigerator. To keep the chocolate from sweating, you can place a piece of paper towel in the container to absorb any excess moisture. If you prefer to serve them at room temperature, take them out about 30 minutes before your guests arrive to let the buttercream soften slightly.
How to Serve
For a high-end presentation, place each candy in a small paper truffle liner and arrange them on a tiered dessert stand. They look stunning when paired with fresh strawberries on the side or a glass of sparkling cider. If you are giving them as a gift, a simple white box with a red ribbon makes for a professional and elegant look.
Creative Leftover Transformations
If you have leftover melted chocolate, dip some pretzel rods or dried apricots into it so nothing goes to waste. Any extra strawberry buttercream can be rolled into smaller bits and mixed into vanilla ice cream for a homemade “strawberry truffle” flavor.
Additional Tips
Always use the best quality chocolate you can afford, as it is the primary flavor you will taste first. If your chocolate is too thick for dipping, stir in half a teaspoon of vegetable shortening or coconut oil to thin it out without affecting the flavor.
Make It a Showstopper
To make these truly stand out, you can paint a thin stripe of edible gold luster dust across each candy once set. Alternatively, dipping only half of the candy in a contrasting white chocolate can create a modern, “tuxedo” look that is sure to impress any audience.
Variations to Try
- White Chocolate Strawberry: Use white chocolate for the shell for a much sweeter, creamier profile.
- Dark Chocolate Balsamic: Add a tiny drop of balsamic glaze to the buttercream for a sophisticated, gourmet depth.
- Nutty Strawberry: Roll the chocolate-dipped candies in crushed toasted almonds or pistachios before they set.
- Spiced Berry: Add a pinch of cinnamon to the buttercream to warm up the strawberry flavor.
FAQ’s
- Why is my buttercream too sticky to roll?
It likely needs more powdered sugar or a longer time in the fridge to firm up. - Can I use fresh strawberries instead of preserves?
Preserves are better because they have less moisture; fresh berries might make the buttercream too runny. - What is the best way to melt the chocolate?
The microwave in 20-second bursts is the most convenient, but a double boiler provides the most even heat. - Do I have to store these in the fridge?
Yes, because of the butter content in the filling, they are best kept cold for food safety and texture. - How long do they last?
They stay fresh and delicious for up to 7 days in an airtight container. - Can I use chocolate chips?
Yes, but add a little coconut oil to help them melt smoothly and set with a shine. - My chocolate is lumpy, what happened?
It likely overheated or a bit of water got into it; try stirring in a little oil to save it. - Can I make these vegan?
Yes, by using vegan butter and dairy-free chocolate wafers. - Can I freeze the finished candies?
Yes, they freeze well for up to a month, just thaw them in the fridge before serving. - How do I get the “snap” in the chocolate?
Using melting wafers or properly tempered chocolate is the key to that perfect snap.
Conclusion
Creating these Chocolate Covered Strawberry Buttercream Candies is a rewarding journey into the world of homemade confectionery. They are a beautiful reminder that with a little patience and a lot of love, you can create something truly spectacular from scratch. I hope these sweet treats bring a little extra joy to your next celebration. Now, go grab your mixer and let the candy-making magic begin!
PrintChocolate Covered Strawberry Buttercream Candies
Velvety strawberry-infused buttercream centers encased in a decadent and snappy chocolate shell, perfect for gifting or special occasions.
Ingredients
- 1/2 cup Unsalted Butter, softened
- 3 cups Powdered Sugar
- 1/4 cup Strawberry Preserves
- 1 teaspoon Vanilla Extract
- 12 ounces Semi-Sweet Chocolate Melting Wafers
- 1 tablespoon Freeze-Dried Strawberry Powder (optional)
Instructions
- In a large bowl, cream together softened butter, strawberry preserves, and vanilla extract until smooth.
- Gradually add powdered sugar and strawberry powder, mixing until a firm dough forms.
- Roll the dough into 1-inch balls and place them on a baking sheet lined with parchment paper.
- Freeze the balls for at least 30 minutes until very firm.
- Melt the chocolate wafers in a microwave-safe bowl in 30-second increments, stirring until smooth.
- Using a fork, dip each chilled buttercream ball into the melted chocolate, letting the excess drip off.
- Place back on the parchment paper and let set at room temperature for 20 minutes or in the fridge for 10 minutes.
- Store in an airtight container in the refrigerator.
Notes
- Make sure the centers are frozen before dipping to prevent them from losing their shape in the warm chocolate.
- If the dough is too soft to roll, chill it for 15 minutes before forming balls.
- Add a tiny bit of coconut oil to the chocolate if it feels too thick for dipping.