Chicken Nuggets
There is something about crispy chicken nuggets that instantly brings comfort to the table. Golden on the outside, tender on the inside, and impossible to resist when they are still warm, this recipe delivers that familiar joy with simple ingredients and reliable results. Trust me, you’re going to love this, because these nuggets hit that perfect balance between crunchy coating and juicy chicken every single time.
Why These Nuggets Are Always a Favorite
These nuggets are all about texture and flavor without unnecessary steps. They feel nostalgic, yet fresh, making them just as welcome at a family dinner as they are on a party platter.
A Quick Look at the Story of Chicken Nuggets
Chicken nuggets became popular as an easy, bite-sized way to enjoy fried chicken, especially in busy households. Over time, home cooks started recreating them with better texture and seasoning, turning them into a homemade classic. Making them from scratch gives you control over flavor while keeping that familiar comfort intact.
Why This Recipe Works So Well
This one checks all the boxes, which is why it is so dependable.
Versatile: Perfect as a snack, appetizer, or main meal.
Budget-Friendly: Uses basic pantry staples and simple cuts of chicken.
Quick and Easy: Straightforward steps that fit into busy days.
Customizable: Easy to adjust seasoning or coating style.
Crowd-Pleasing: Loved by kids and adults alike.
Make-Ahead Friendly: Nuggets can be prepped ahead before cooking.
Great for Leftovers: Reheat well and stay crisp.
Pro Tips for Extra Crispy Nuggets
Before we start cooking, a few small details make a big difference.
- Cut chicken into even pieces so everything cooks at the same speed.
- Pat the chicken dry before coating to help breading stick.
- Let coated nuggets rest briefly before cooking for better crunch.
- Cook in batches to avoid overcrowding.
Kitchen Tools You’ll Need
Having everything ready keeps the process smooth.
Mixing Bowls: For coating and seasoning the chicken.
Tongs: Helpful for turning nuggets safely.
Baking Sheet or Skillet: Depending on your cooking method.
Wire Rack: Optional, but great for keeping nuggets crisp after cooking.
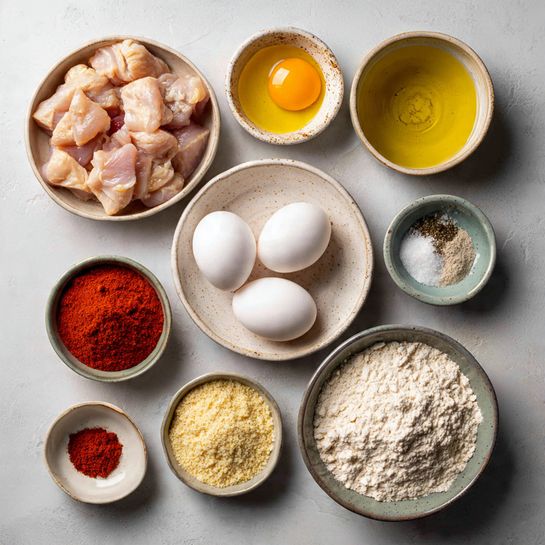
Ingredients You Will Need For This Recipe
Each ingredient plays a role in flavor and crunch.
- Chicken Breast: 1 pound, cut into bite-sized pieces for even cooking.
- All-Purpose Flour: 1 cup, forming the base of the coating.
- Eggs: 2 large, beaten, helping the coating adhere.
- Breadcrumbs: 1 1/2 cups, creating a crispy outer layer.
- Garlic Powder: 1 teaspoon, adding savory depth.
- Paprika: 1 teaspoon, bringing mild warmth and color.
- Salt: 1 teaspoon, enhancing overall flavor.
- Black Pepper: 1/2 teaspoon, adding gentle spice.
- Vegetable Oil: 3 tablespoons, used for cooking and browning.
Easy Ingredient Substitutions
You can adapt these nuggets easily.
Breadcrumbs: Use panko for extra crunch.
Chicken Breast: Chicken thighs can be used for juicier nuggets.
Paprika: Smoked paprika adds deeper flavor if desired.
Ingredients That Really Shine
Chicken Breast: Lean, tender, and perfect for bite-sized pieces.
Breadcrumbs: Responsible for that irresistible crunch.
Let’s Make These Chicken Nuggets Together
Now let’s dive into the cooking process step by step.
- Preheat Your Equipment: Preheat oven to 400°F or heat a skillet over medium heat.
- Combine Ingredients: Mix flour, garlic powder, paprika, salt, and black pepper in a bowl.
- Prepare Your Cooking Vessel: Line a baking sheet or lightly oil the skillet.
- Assemble the Dish: Dip chicken into flour mixture, then eggs, then breadcrumbs.
- Cook to Perfection: Bake for 18 to 22 minutes or pan-cook until golden and cooked through.
- Finishing Touches: Let nuggets rest for a few minutes after cooking.
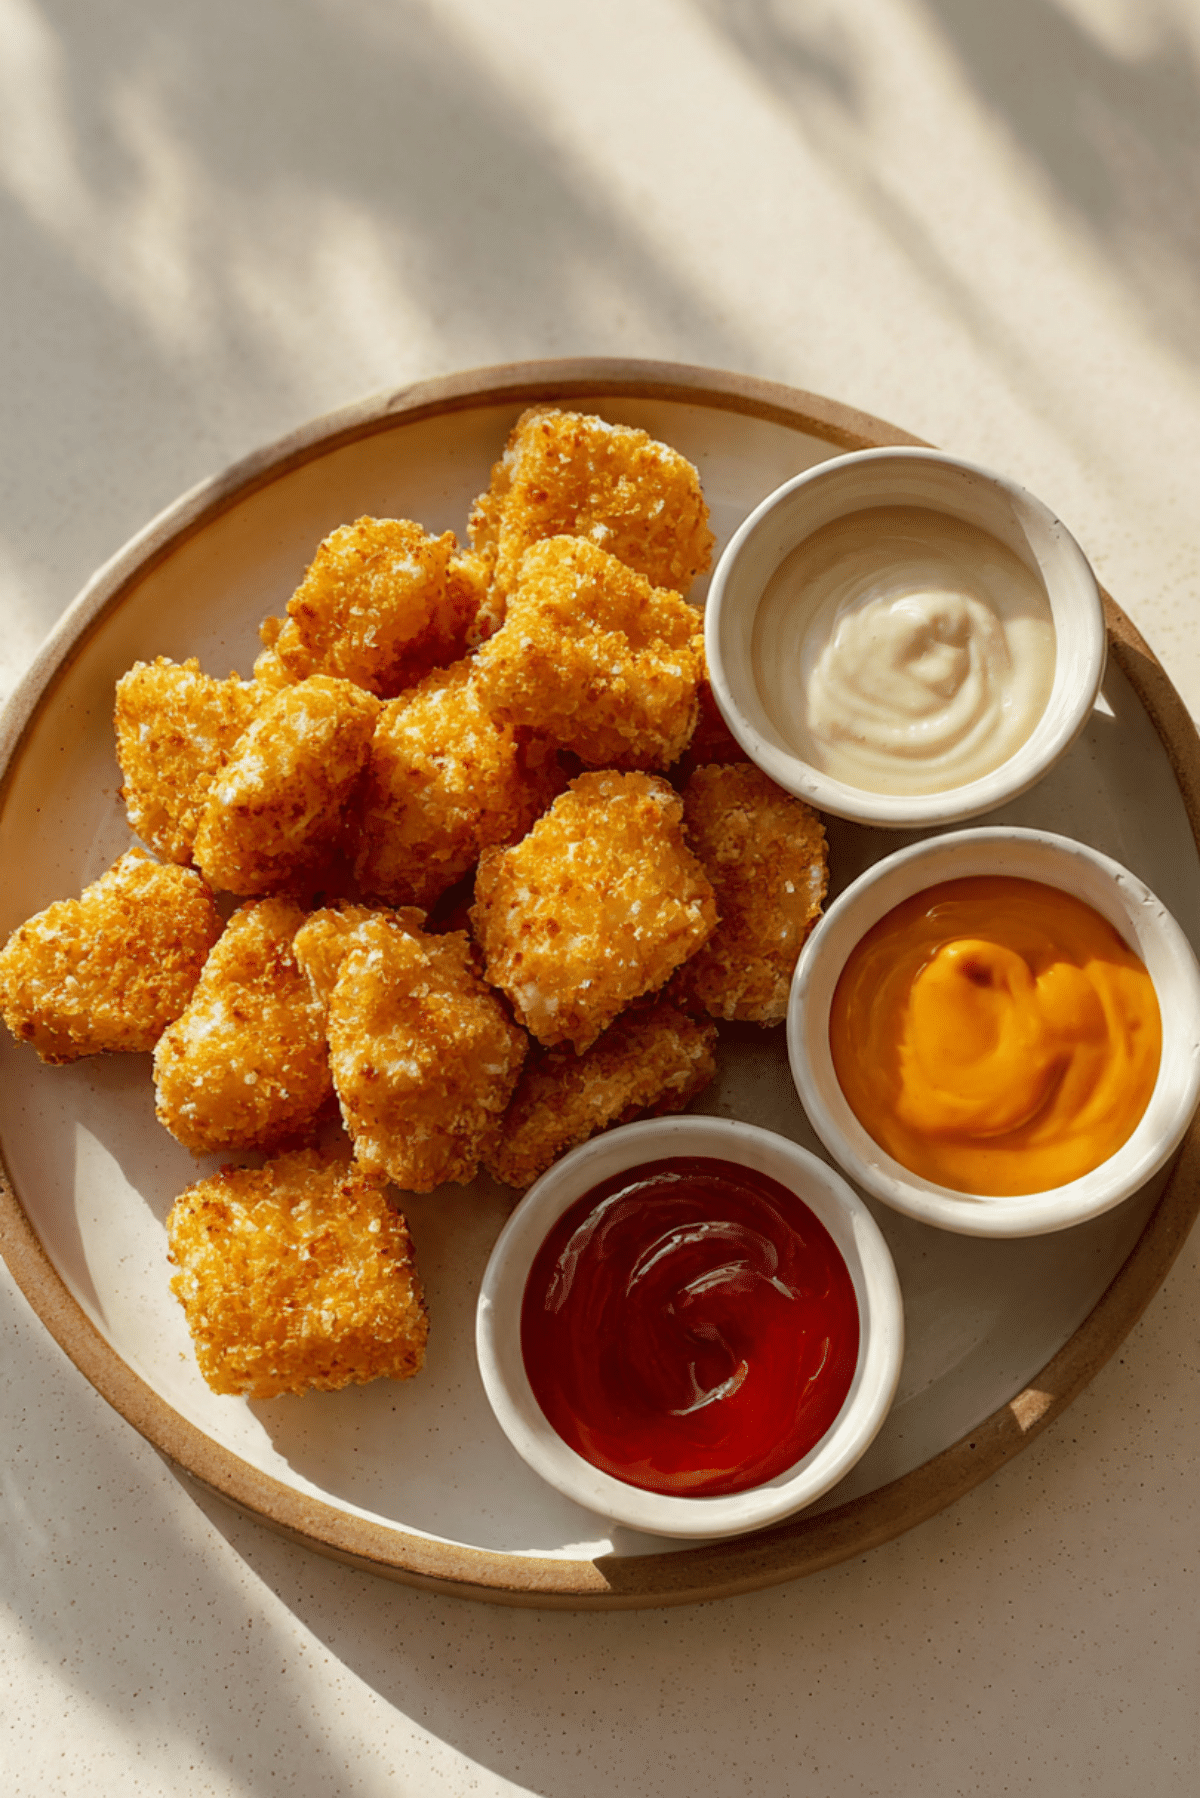
- Serve and Enjoy: Serve warm with your favorite dipping sauces.
Texture and Flavor Development
As the nuggets cook, the coating turns crisp and golden while the chicken stays tender and juicy. The seasoning blooms gently, giving every bite a balanced, savory flavor without overpowering the chicken itself.
Helpful Cooking Tips and Tricks
A few extra tips can help guarantee success.
- Flip nuggets halfway through baking for even browning.
- Use a wire rack to prevent soggy bottoms.
- Keep cooked nuggets warm in a low oven if cooking in batches.
What to Avoid While Making Them
Avoid these common issues for best results.
- Overcrowding the pan, which causes steaming.
- Skipping seasoning in the coating.
- Overcooking, which dries out the chicken.
Nutrition Facts You Should Know
Servings: 4
Calories per serving: 390
Note: These are approximate values.
Time Breakdown at a Glance
Prep Time: 15 minutes
Cook Time: 20 minutes
Total Time: 35 minutes
Make-Ahead and Storage Tips
You can bread the nuggets and refrigerate them for up to one day before cooking. Leftovers store well in the fridge for three days and reheat best in the oven to restore crispness.
How to Serve Them Best
Serve these nuggets with simple sides like roasted vegetables, fries, or a fresh salad. Dipping sauces like creamy herb sauce or tomato-based sauce pair beautifully.
Creative Leftover Transformations
Chop leftover nuggets and add them to wraps, salads, or grain bowls for an easy next day meal.
Additional Tips for Great Results
Using fresh breadcrumbs and evenly sized chicken pieces helps ensure consistent texture and flavor.
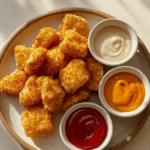
Make It a Showstopper
Arrange nuggets on a platter with small bowls of dipping sauces spaced evenly for a clean, inviting presentation.
Variations to Try
- Add grated cheese to the breadcrumb mixture.
- Use whole wheat breadcrumbs for a heartier bite.
- Add a pinch of chili powder for mild heat.
- Bake instead of pan-cooking for a lighter option.
FAQ’s
Q1: Can I bake these instead of frying?
Yes, baking works very well and keeps them crisp.
Q2: Can I freeze chicken nuggets?
Yes, freeze them after cooking and reheat in the oven.
Q3: How do I keep them crispy?
Avoid stacking and reheat in the oven.
Q4: Can I use chicken thighs?
Yes, they stay extra juicy.
Q5: Are these kid friendly?
Absolutely, they are mild and customizable.
Q6: What sauces go best?
Creamy herb, tomato-based, or mild spice sauces work well.
Q7: Can I air fry them?
Yes, air frying produces great crunch.
Q8: How big should the pieces be?
About bite-sized for even cooking.
Q9: Can I make them gluten free?
Use gluten free flour and breadcrumbs.
Q10: How long do leftovers last?
Up to three days refrigerated.
Conclusion
These chicken nuggets are crispy, comforting, and endlessly satisfying. Simple to make and full of familiar flavor, they are the kind of recipe that quickly becomes a household favorite. Let me tell you, it’s worth every bite.
PrintChicken Nuggets
Crispy homemade chicken nuggets with a golden crunchy coating and tender, juicy chicken inside, easy to make and perfect for dipping, snacking, or serving as a family-friendly meal.
Ingredients
- Chicken breast (1 pound, cut into bite-sized pieces)
- All-purpose flour (1 cup)
- Eggs (2 large, beaten)
- Breadcrumbs (1 1/2 cups)
- Garlic powder (1 teaspoon)
- Paprika (1 teaspoon)
- Salt (1 teaspoon)
- Black pepper (1/2 teaspoon)
- Vegetable oil (3 tablespoons)
Instructions
- Preheat the oven to 400°F or heat a skillet over medium heat.
- In a bowl, mix the flour, garlic powder, paprika, salt, and black pepper.
- Place beaten eggs in a second bowl and breadcrumbs in a third bowl.
- Dip each piece of chicken into the seasoned flour, then into the eggs, then coat fully with breadcrumbs.
- Arrange the coated chicken on a lined baking sheet or place carefully into the lightly oiled skillet.
- Bake for 18 to 22 minutes, flipping halfway, or pan-cook until golden and fully cooked through.
- Remove from heat and let rest for a few minutes before serving.
Notes
- For extra crunch, use panko breadcrumbs.
- Do not overcrowd the pan to keep nuggets crispy.
- Serve immediately for best texture.