Candied Almonds
There is something deeply nostalgic and undeniably festive about the scent of Candied Almonds wafting through the air. Whether you associate them with holiday markets, local fairs, or cozy winter evenings at home, these little gems are the ultimate snack for anyone with a sweet tooth. Imagine biting into a perfectly toasted almond encased in a brittle, crunchy shell of cinnamon and sugar that shatters delightfully with every chew. I remember the first time I made these in my own kitchen, the way the entire house filled with a warm, toasted aroma that felt like a giant hug. Let me tell you, it’s worth every bite, and once you start snacking, it is nearly impossible to stop.
A Sweet and Nutty Classic for Every Occasion
While we often see these at specialized kiosks, making them at home is surprisingly simple and much more rewarding. This recipe takes a handful of basic pantry staples and transforms them into a gourmet treat that rivals any high-end confectionary. The magic happens during the stovetop process where the sugar crystallizes and then slightly melts again to create that iconic, bumpy texture. Trust me, you’re going to love this because it brings that magical carnival atmosphere right into your living room with minimal effort and maximum flavor.
The Global Heritage of Sugar Coated Nuts
The tradition of coating nuts in sugar dates back centuries and spans across many cultures, from French “Pralines” to the “Burnt Almonds” found in European Christmas markets. Historically, sugar was a luxury, and these treats were reserved for special celebrations and royal courts. In many parts of the world, specifically in Germany and Scandinavia, these are known as “Gebrannte Mandeln,” and they remain a symbol of togetherness and holiday cheer. By following this recipe, you are participating in a long-standing culinary tradition that celebrates the simple harmony of earth-grown nuts and sweet cane sugar.
Why This Snack is a Total Game-Changer
Once you master this technique, you will find yourself reaching for this recipe every time you need a quick gift or a party snack.
Versatile: These are perfect for holiday gifting, topping a fresh salad, or just keeping in a jar for a mid-day energy boost.
Budget-Friendly: Almonds bought in bulk and a bit of sugar are far cheaper than buying pre-made candied nuts at the store.
Quick and Easy: The entire process takes less than twenty minutes on the stovetop, making it a great last-minute preparation.
Customizable: You can easily add a pinch of cayenne for heat or a splash of orange zest for a bright, citrusy twist.
Crowd-Pleasing: I have never met a person who could turn down a bowl of warm, cinnamon-scented nuts.
Make-Ahead Friendly: They stay crunchy and delicious for weeks when stored properly, so you can prep large batches in advance.
Great for Leftovers: Even the sugary crumbs at the bottom of the jar are fantastic when sprinkled over vanilla ice cream or oatmeal.
Expert Secrets for the Perfect Crunch
To get that authentic, crystallized coating rather than a smooth caramel, you need to understand the stages of sugar cooking.
The biggest secret is the “sandy” stage; as the water evaporates, the sugar will turn white and grainy, looking like you have ruined the batch. Do not panic, this is exactly what you want, as continuing to stir over heat will cause just enough of that sugar to melt back down and stick to the almonds in a thick, crunchy crust. Also, make sure your almonds are raw and unsalted to start, which allows the toasted flavor to develop perfectly alongside the sugar. Finally, a tiny splash of vanilla extract added right at the end provides a professional depth of flavor that sets these apart from amateur versions.
Essential Tools for Candied Success
Having the right equipment will make the stirring process easier and prevent the sugar from burning.
Heavy-Bottomed Skillet or Saucepan: This ensures even heat distribution so the sugar melts consistently without hot spots.
Wooden Spoon or Silicone Spatula: Essential for constant stirring, as sugar can be very sticky and heat-intensive.
Parchment Paper: You will need this to spread the nuts out immediately after cooking so they don’t cool into one giant clump.
Baking Sheet: Provides a flat surface for the nuts to air-dry and harden into their individual shells.
Airtight Glass Jar: The best way to store your finished treats to keep moisture out and maintain that signature crunch.
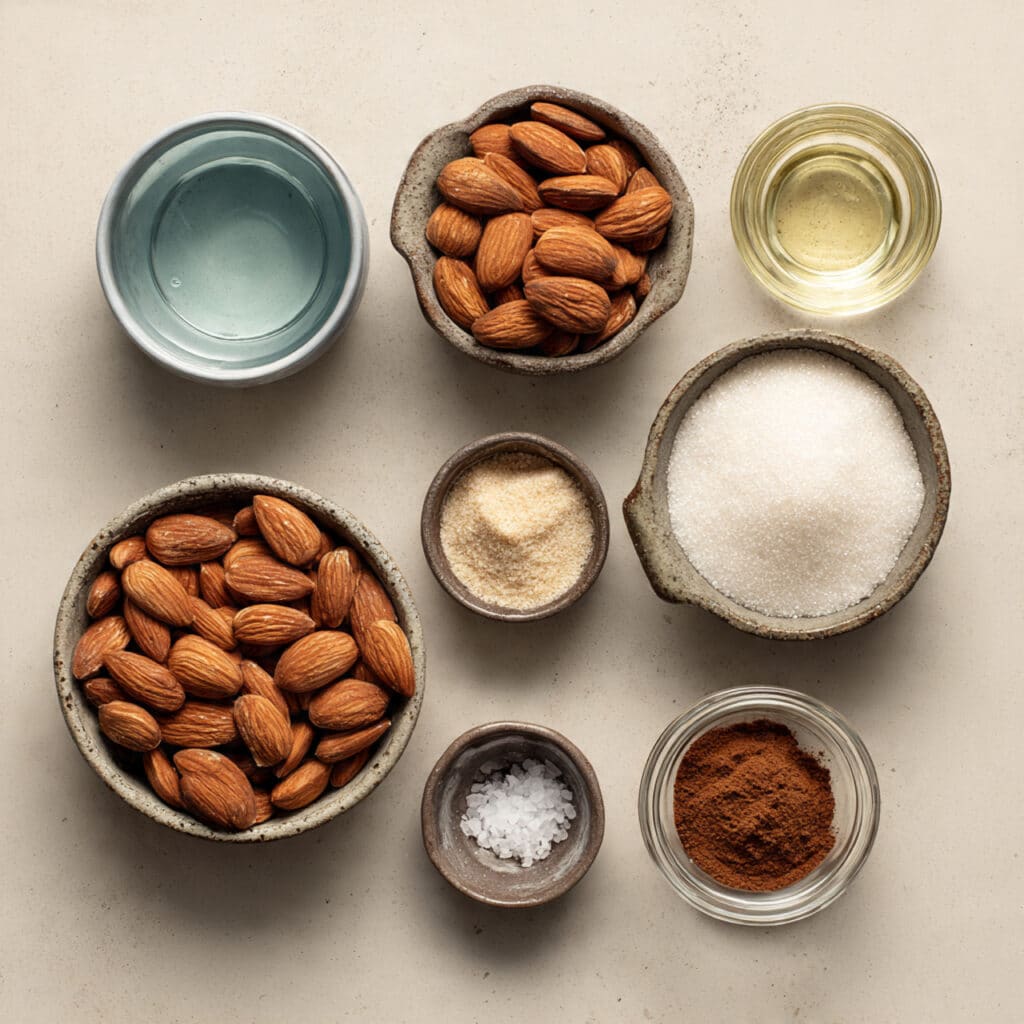
Ingredients You Will Need For The Snack
The beauty of this recipe lies in how a few simple ingredients work together to create a complex, addictive flavor.
- Raw Whole Almonds: 2 cups providing the crunchy, nutty heart of the snack.
- Granulated Sugar: 1 cup which creates the sweet, crystallized shell.
- Water: 1/2 cup to dissolve the sugar and help it coat the nuts evenly during the initial cook.
- Ground Cinnamon: 1 tablespoon for that iconic, warm spice that defines traditional candied nuts.
- Vanilla Extract: 1 teaspoon to add a layer of aromatic sweetness and depth.
- Salt: 1/4 teaspoon to balance the sugar and make the toasted almond flavor really pop.
Flexible Ingredient Substitutions
If you want to vary the recipe or are missing an ingredient, these swaps work beautifully.
Raw Whole Almonds: You can use pecans, walnuts, or even cashews following the exact same method.
Granulated Sugar: Light brown sugar can be used for a more molasses-rich, chewy coating.
Ground Cinnamon: Pumpkin pie spice or ground ginger are excellent alternatives for a different flavor profile.
Water: For a very rich version, some people use an egg white foam, but the water-stovetop method is more traditional and creates a harder crunch.
Spotlight on Key Ingredients
Raw Almonds: Using raw nuts is vital because they toast as the sugar cooks, resulting in a much fresher and more intense nut flavor than using pre-roasted ones.
Cinnamon: This isn’t just a background note, it is a primary flavor. Using a high-quality, fresh cinnamon makes a world of difference in the final aroma and taste of your candied snack.
Step-by-Step Candied Almonds Instructions
Follow these steps with a steady hand and a bit of patience to achieve that perfect carnival-style finish.
- Preheat Your Equipment: Set a wide, heavy-bottomed skillet over medium heat and line a large baking sheet with parchment paper nearby.
- Combine Ingredients: Add the granulated sugar, water, and ground cinnamon to the skillet, stirring until the sugar is mostly dissolved and the mixture begins to bubble.
- Prepare Your Cooking Vessel: Once the syrup is bubbling, stir in the raw almonds and the salt, ensuring every nut is well-coated in the dark cinnamon liquid.
- Assemble the Dish: Continue to cook over medium heat, stirring constantly, as the water evaporates and the sugar begins to look dry and sandy.
- Cook to Perfection: Keep stirring as some of the sandy sugar begins to melt and turn glossy again, clinging to the nuts in a thick, bumpy crust.
- Finishing Touches: Remove from heat and quickly stir in the vanilla extract, then immediately pour the nuts onto the prepared parchment paper.
- Serve and Enjoy: Use two forks to quickly separate any clumped almonds and let them cool completely until the sugar shell is hard and crisp before serving.
A Contrast of Crunchy and Toasted Textures
The sensory experience of eating these Candied Almonds is truly unmatched. You first hit the hard, crystalline sugar shell which offers a loud, satisfying “crack” as you bite down. This is followed by the slightly softer, buttery, and toasted interior of the almond. The flavor starts with an intense hit of sweet cinnamon and vanilla, which is then balanced by the earthy, savory notes of the nut and that tiny hint of salt. It is a perfect loop of sweet, salty, and crunchy that keeps you coming back for more.
Pro Tips for Cooking Success
- Stir Constantly: Do not stop stirring during the sandy stage, or the sugar will burn on the bottom of the pan.
- Watch the Heat: If the sugar is melting too fast into a dark liquid caramel, turn the heat down slightly to allow the crystallization to happen.
- Separation is Key: Separate the nuts while they are still hot, once they cool, they will be fused together permanently.
- Don’t Overcook: Remove the pan from the heat as soon as the nuts look mostly covered and the sugar is bumpy; residual heat will do the rest.
What to Avoid for Best Results
- Pre-Roasted Nuts: These will often become over-toasted and bitter by the time the sugar is finished.
- Walking Away: Sugar can go from perfect to burnt and bitter in a matter of seconds.
- High Humidity: Making these on a very rainy or humid day can sometimes result in a sticky rather than crunchy shell.
Nutrition Facts
Servings: 8
Calories per serving: 240
Note: These are approximate values.
Preparation Time
Prep Time: 5 minutes
Cook Time: 15 minutes
Total Time: 20 minutes
Make-Ahead and Storage Tips
These are a fantastic make-ahead snack. Once completely cooled, store them in an airtight glass jar or a tin at room temperature. They will stay perfectly crunchy for up to 3 weeks. Avoid storing them in the refrigerator, as the moisture can cause the sugar shell to become sticky and soft. If you are gifting them, wait until the last minute to put them in bags to ensure they stay as fresh as possible.
How to Serve Your Candied Treats
Serve these in a small ceramic bowl as a centerpiece for a coffee table or a party spread. They are also incredible when chopped up and sprinkled over a goat cheese salad or folded into a batch of homemade vanilla fudge. For a cozy evening, serve them warm right after they have set for that authentic fairground experience.
Creative Leftover Transformations
If you have a handful left over, crush them into coarse pieces and use them as a crust for a cheesecake or a topping for a warm fruit crumble. You can also mix them into a homemade granola or trail mix for a sweet and spicy surprise.
Additional Tips for Flavor and Freshness
To keep your almonds tasting their best, make sure your raw nuts haven’t gone rancid before starting. You can also toss the finished nuts in a little bit of extra cinnamon-sugar right after they come out of the pan for an even more textured look.
Make It a Showstopper Presentation
For a beautiful gift, layer the candied almonds in a mason jar and tie it with a rustic twine ribbon and a stick of real cinnamon. The golden-brown, crystallized texture of the nuts looks stunning through clear glass and makes for a sophisticated, handcrafted present.
Variations to Try
- Spicy Cinnamon: Add 1/4 teaspoon of cayenne pepper for a “Mexican Hot Chocolate” vibe.
- Gingerbread Almonds: Use a mix of ginger, cloves, and nutmeg instead of just cinnamon.
- Citrus Crunch: Add the zest of an orange to the water and sugar mixture for a bright aroma.
- Salted Caramel Almonds: Increase the salt slightly and cook the sugar until it is more melted and glossy.
FAQ’s
Q1: Why did my sugar turn into a dry powder?
A1: That is actually a normal part of the process called the sandy stage; keep stirring and some of it will melt back onto the nuts.
Q2: Can I use a microwave?
A2: It is much harder to control the crystallization in a microwave; the stovetop method is much more reliable for the correct texture.
Q3: My nuts are sticky, what happened?
A3: They either didn’t cook long enough for the sugar to fully set, or they have been exposed to too much humidity.
Q4: Can I use white sugar or brown sugar?
A4: White granulated sugar gives the best “crunchy shell,” while brown sugar makes a softer, more caramel-like coating.
Q5: Do I need to peel the almonds?
A5: No, the skins of the almonds help the sugar to grip the nut, so keep them on for the best results.
Q6: Can I use this for other nuts?
A6: Absolutely, this method works perfectly for pecans, walnuts, and even peanuts.
Q7: How do I clean the pan afterward?
A7: Simply fill the pan with hot water and let it soak; the hardened sugar will dissolve on its own in a few minutes.
Q8: Is it okay if the almonds are salted?
A8: It is better to use unsalted so you can control the salt level yourself, but if you use salted, just omit the extra salt in the recipe.
Q9: Can I double the recipe?
A9: Yes, but make sure to use a very large pan so the almonds sit in a single layer for even cooking.
Q10: Why did my cinnamon turn black?
A10: The heat was likely too high; sugar and spices can burn quickly if the pan gets too hot.
Conclusion
Making your own Candied Almonds is a simple joy that yields a result far superior to anything you can buy in a store. From the festive aroma that fills your home to the addictive crunch of the final product, this recipe is a celebration of classic flavors and traditional techniques. This one’s a total game-changer for your holiday snacking, and I am certain your friends and family will be asking for the recipe. Let me tell you, it’s worth every bite, and I hope you enjoy every sweet, cinnamon-coated second of it.
PrintCandied Almonds

Authentic carnival-style candied almonds with a crunchy cinnamon-sugar shell and a toasted, nutty center.
Ingredients
- Raw Whole Almonds: 2 cups
- Granulated Sugar: 1 cup
- Water: 1/2 cup
- Ground Cinnamon: 1 tablespoon
- Vanilla Extract: 1 teaspoon
- Salt: 1/4 teaspoon
Instructions
- Line a large baking sheet with parchment paper.
- In a large, heavy skillet over medium heat, combine granulated sugar, water, and cinnamon. Stir until the sugar is dissolved and bubbling.
- Add the raw almonds and salt to the skillet, stirring to coat thoroughly.
- Continue to cook and stir constantly. The mixture will eventually become dry and ‘sandy’ as the water evaporates.
- Keep stirring until the sugar begins to melt slightly and turns glossy, clinging to the nuts in a thick, bumpy crust.
- Remove from heat and quickly stir in the vanilla extract.
- Immediately pour the almonds onto the parchment paper and separate them with forks.
- Allow to cool completely until the coating is hard and crunchy.
Notes
- Note: Do not stop stirring during the ‘sandy’ stage to prevent the sugar from burning.
- Raw almonds are essential as they toast during the cooking process.
- Store in an airtight glass jar at room temperature to maintain crunch.