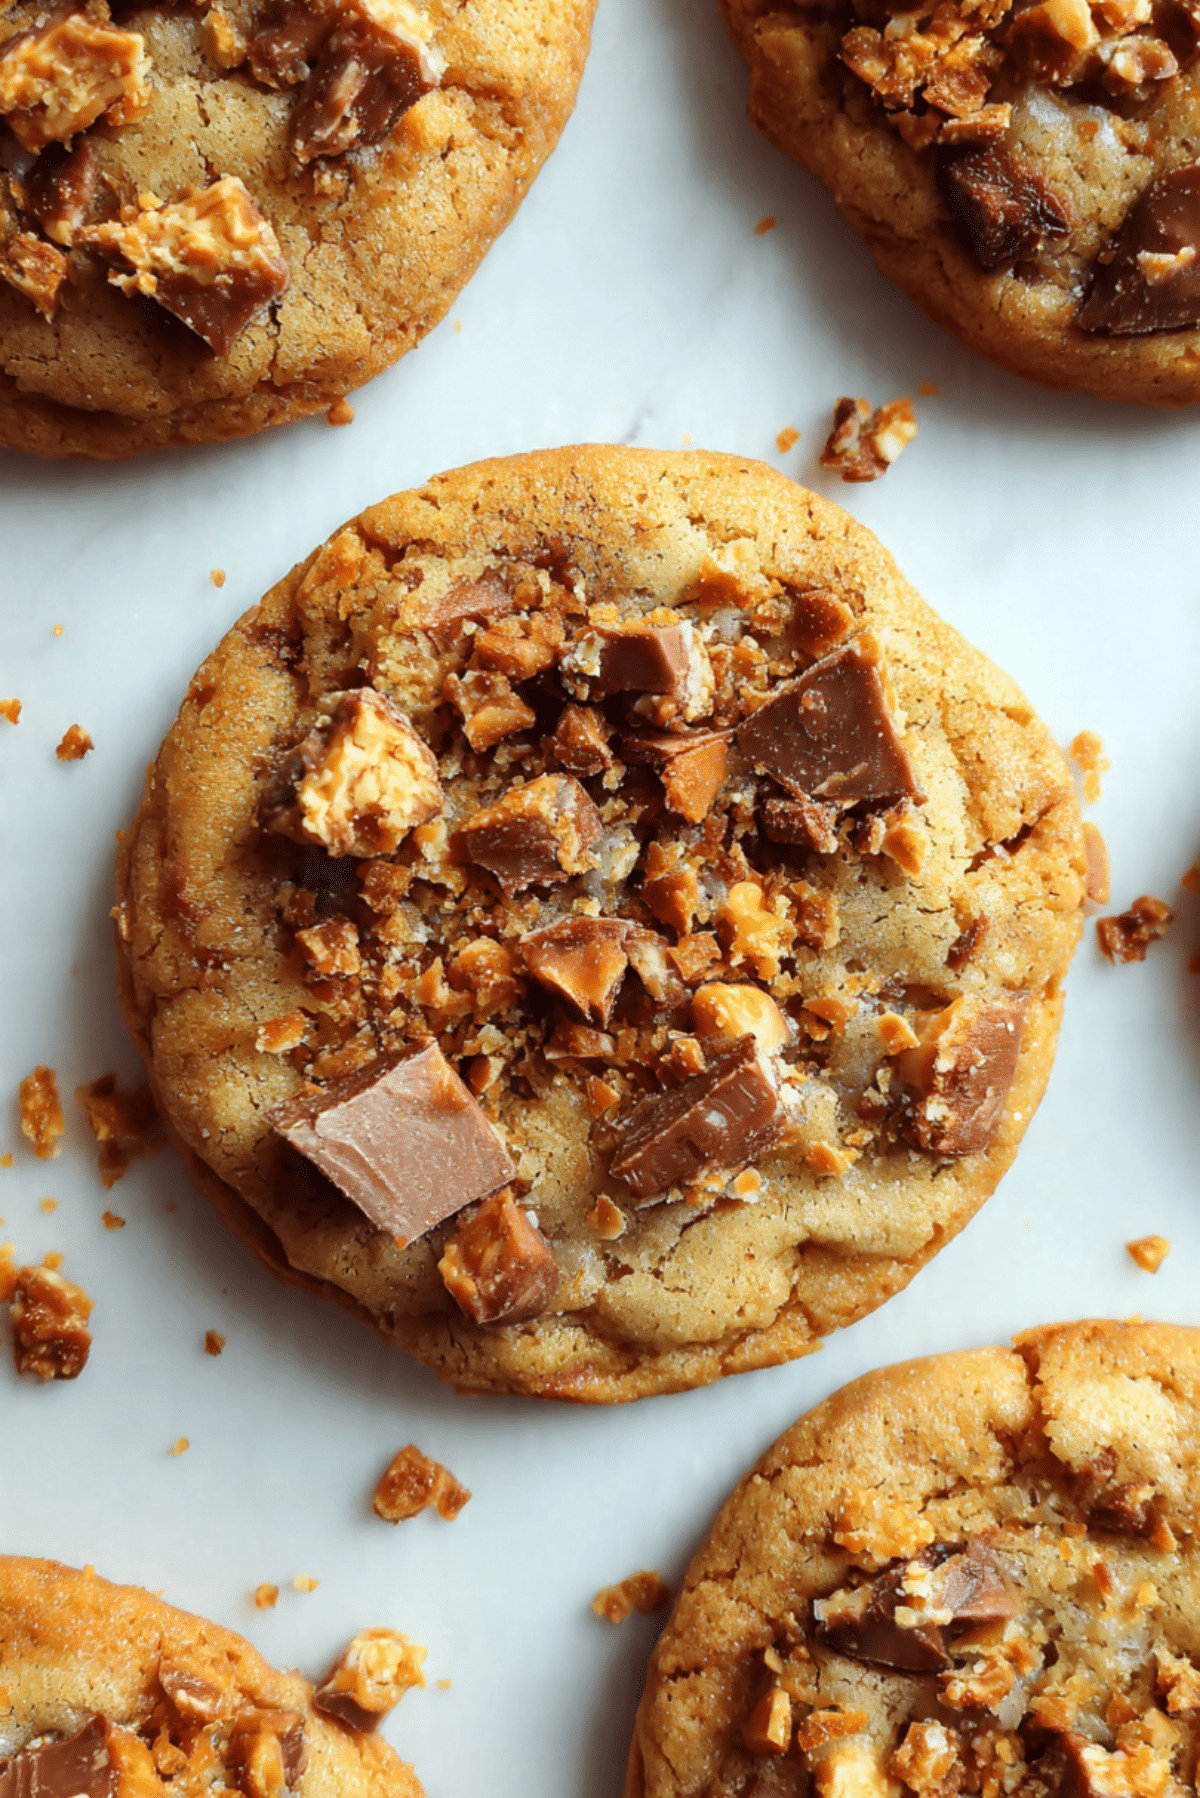
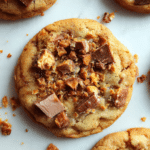
Butterfinger Cookies
There is something undeniably nostalgic about the crunch of a classic peanut butter candy bar, and these Butterfinger Cookies take that experience to a whole new level. Imagine a soft, buttery cookie base that practically melts in your mouth, only to be interrupted by the distinct, shatteringly crisp texture of crushed Butterfinger pieces. It is a texture lover’s dream come true. Trust me, you’re going to love this recipe because it strikes the perfect balance between a salty peanut kick and a sweet chocolate finish, making it an instant favorite for anyone who craves a bit of crunch in their sweets.
The Irresistible Rise of the Candy Bar Cookie
Candy bar inspired desserts have always held a special place in home kitchens, but the Butterfinger version stands out because of its unique honeycomb texture. These cookies became a sensation among bakers who wanted to replicate that “crispy, crunchy, peanut-buttery” sensation in a homemade format. While traditional chocolate chip cookies are great, the addition of these specific candy shards adds a layer of complexity and a vibrant orange hue that makes the tray look absolutely enticing. They are a staple at bake sales and family gatherings where people are looking for something just a little bit different from the standard fare.
Why This Recipe is a Total Game-Changer
Let me tell you, it’s worth every bite when you experience the way the candy pieces slightly soften in the oven while maintaining their signature snap.
Versatile: These cookies are just as appropriate for a casual after school snack as they are for a festive dessert platter.
Budget-Friendly: By using a standard cookie base and a few chopped candy bars, you create a gourmet tasting treat without a massive grocery bill.
Quick and Easy: There is no need for fancy equipment or complicated techniques, making this a perfect project for a busy weekend.
Customizable: You can experiment with adding extra chocolate chips or even a drizzle of melted peanut butter on top for added decadence.
Crowd-Pleasing: It is hard to find someone who doesn’t enjoy the classic combination of peanut butter and chocolate.
Make-Ahead Friendly: The dough actually benefits from a bit of time in the fridge, so you can prep it well before you plan to bake.
Great for Leftovers: Because of the sugar content in the candy, these cookies stay remarkably soft for days after they come out of the oven.
Insider Tips for the Perfect Crunch
To get that professional bakery look and feel, there are a few secrets you should keep in mind while you work. First, make sure you don’t over-crush the candy bars, as you want actual chunks of Butterfinger to bite into rather than just a fine dust that disappears into the dough. When you are mixing, add the candy pieces last and fold them in gently so you don’t break them down too much. Finally, for that picture perfect finish, press a few extra shards of the candy into the tops of the dough balls right before they go into the oven so the bright orange color is visible on top.
Essential Kitchen Tools for Success
Having the right gear on hand will make the process much more enjoyable and ensure your cookies turn out perfectly every time.
Electric Hand Mixer: This is vital for creaming the butter and sugar together until they are perfectly aerated.
Large Mixing Bowl: You will need plenty of space to fold in those bulky candy pieces without making a mess.
Silicone Baking Mat: These prevent the sugar in the candy bars from sticking to the pan and burning on the bottom.
Cookie Scoop: Using a scoop ensures that every cookie is exactly the same size, which leads to even baking throughout the batch.
Sharp Knife: A good knife is necessary for chopping the candy bars into those perfect, irregular chunks.
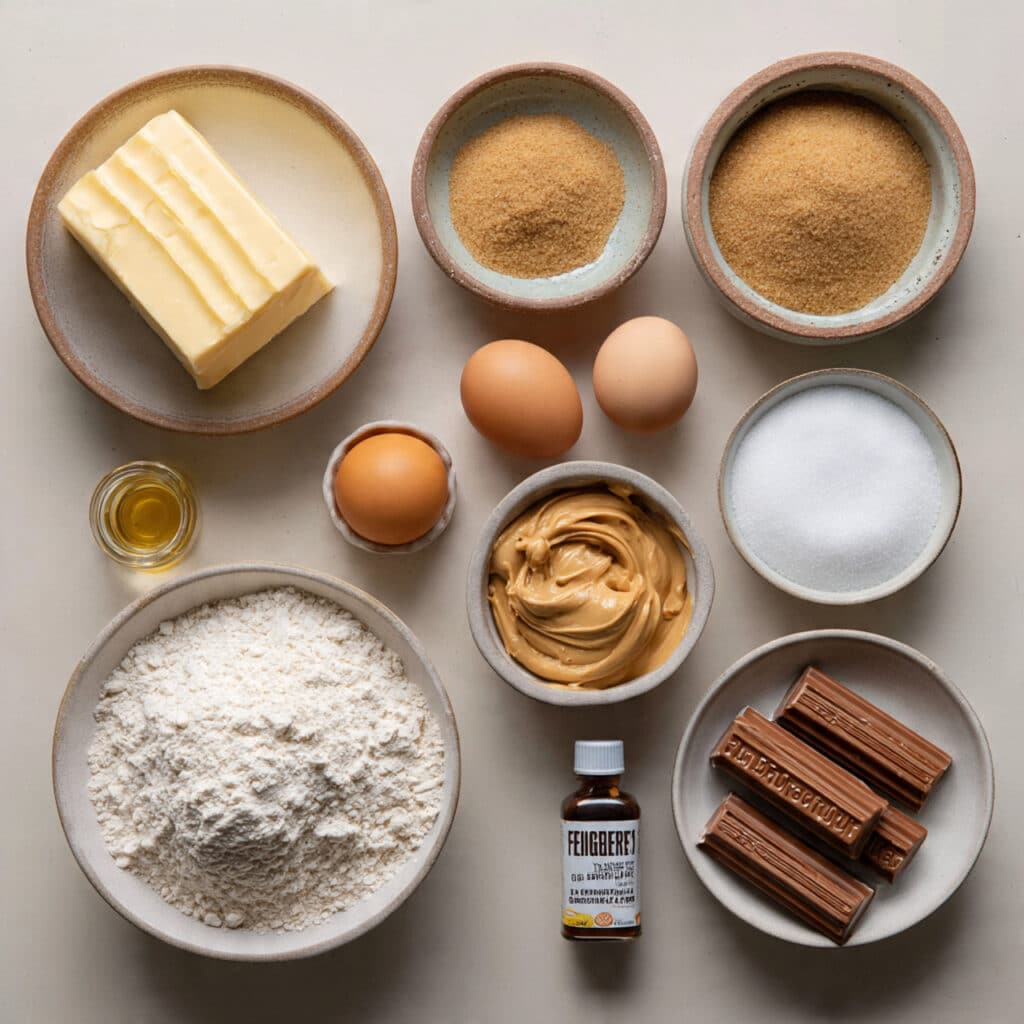
Ingredients You Will Need For Butterfinger Cookies
Each of these components plays a vital role in creating the ultimate chewy and crunchy cookie experience.
- Unsalted Butter: 1 cup of softened butter to create a rich, flavorful base that carries the peanut butter notes.
- Granulated Sugar: 3 quarters of a cup to help crisp up the edges of the cookies.
- Brown Sugar: 3 quarters of a cup of packed light brown sugar to ensure a soft and chewy center.
- Large Eggs: 2 eggs to provide structure and moisture to the dough.
- Vanilla Extract: 1 and a half teaspoons to enhance the sweet and salty flavors of the peanut butter.
- Creamy Peanut Butter: half a cup of smooth peanut butter to double down on that signature flavor profile.
- All Purpose Flour: 2 and a half cups to give the cookies the strength they need to hold all that candy.
- Baking Soda: 1 teaspoon to help the cookies rise and develop a beautiful golden color.
- Salt: half a teaspoon to cut through the sweetness and make the peanut butter pop.
- Butterfinger Candy Bars: 2 cups of coarsely chopped candy bars, which provide the star texture and flavor of the dish.
Flexible Ingredient Substitutions
Don’t let a missing ingredient stop you from enjoying these treats, as there are several ways to adapt the recipe.
Creamy Peanut Butter: Crunchy peanut butter for even more texture or almond butter for a slightly different nut profile.
Brown Sugar: Dark brown sugar can be used for a deeper, more molasses like flavor.
Unsalted Butter: A high quality margarine or vegan butter substitute works well in this specific dough.
Butterfinger Bars: Any similar honeycomb peanut butter candy will achieve a very similar result.
Key Ingredients Spotlight
Creamy Peanut Butter: Adding actual peanut butter to the dough itself ensures that the flavor isn’t just coming from the candy. It creates a cohesive taste that ties the whole cookie together.
Butterfinger Chunks: These are the heart of the recipe. They provide a unique “shatter” texture that you simply cannot get from chocolate chips or nuts alone.
Let’s Get Cooking
The process of making these cookies is straightforward and fills your entire home with an incredible aroma.
- Preheat Your Equipment: Get your oven ready at 350 degrees and line your pans with parchment or silicone mats.
- Combine Ingredients: Cream the butter, granulated sugar, and brown sugar together before adding the eggs, vanilla, and creamy peanut butter.
- Prepare Your Cooking Vessel: Sift together the flour, baking soda, and salt in a separate bowl before gradually mixing them into the wet batter.
- Assemble the Dish: Fold in the chopped Butterfinger pieces by hand, making sure they are distributed evenly throughout the thick dough.
- Cook to Perfection: Scoop rounded tablespoons onto your sheets and bake for 10 to 12 minutes until the edges are just golden.
- Finishing Touches: Let the cookies sit on the hot pan for five minutes to firm up before moving them to a rack.
- Serve and Enjoy: These are best served slightly warm when the candy is still a bit soft and the chocolate is melty.
Texture and Flavor Development
The magic of this cookie lies in the evolution of its texture as it cools. When warm, the center is incredibly soft and the candy pieces are tacky and sweet. Once they reach room temperature, the candy returns to its iconic crunch, providing a brilliant contrast to the tender, peanut butter infused crumb. The flavor is a sophisticated blend of salty roasted peanuts, sweet caramel like sugars, and a hint of milk chocolate.
Helpful Cooking Tips and Tricks
- Chill the dough for at least one hour if you prefer a thicker, less spread-out cookie.
- Use a food processor to pulse the candy bars if you want a more uniform distribution of peanut butter bits.
- Bang the cookie sheet on the counter halfway through baking to create those beautiful ripples and cracks on top.
What to Avoid
- Don’t overbake these, as they will continue to cook on the hot sheet and can become dry if left in the oven too long.
- Avoid using “natural” style peanut butter that separates, as the oil content can cause the cookies to spread too much.
- Do not chop the candy too small or you will lose the signature “Butterfinger” crunch that makes these special.
Nutrition Facts
Servings: 24 cookies
Calories per serving: 210
Note: These are approximate values.
Preparation Time
Prep Time: 20 minutes
Cook Time: 12 minutes
Total Time: 32 minutes
Make-Ahead and Storage Tips
The dough for these cookies keeps wonderfully in the refrigerator for up to three days, which actually helps the flavors meld together. Once baked, store them in an airtight container with a slice of bread to keep them soft for up to a week. You can also freeze the baked cookies for up to two months, making them a great standby for unexpected guests.
How to Serve
For a truly decadent experience, serve these cookies with a scoop of vanilla bean ice cream or even a glass of ice cold milk. They also make an incredible base for a homemade ice cream sandwich if you use a slightly larger scoop when baking.
Creative Leftover Transformations
If you find yourself with extras that have gotten a bit crunchy, crumble them up and use them as a crust for a peanut butter pie. You can also mix the crumbs into a batch of brownies for a “double candy” treat that is sure to impress.
Additional Tips
If you want to take the flavor over the top, sprinkle a tiny pinch of flaky sea salt on top of each cookie as soon as they come out of the oven. This enhances the peanut butter and chocolate flavors while adding a gourmet touch.
Make It a Showstopper
To make these look like they came from a high end bakery, drizzle them with a mixture of melted semi-sweet chocolate and a teaspoon of coconut oil. The glossy chocolate drizzle against the golden cookie and orange candy pieces creates a stunning visual contrast.
Variations to Try
- Double Chocolate Butterfinger: Add half a cup of cocoa powder to the dough for a chocolate-heavy version.
- White Chocolate Twist: Mix in half a cup of white chocolate chips to complement the peanut butter flavor.
- Butterfinger Blondies: Spread the dough into a 9×9 pan instead of scooping for a thick, chewy bar.
FAQ’s
- Can I use other candy bars?
Yes, though the texture will change significantly depending on what you choose. - Why did my cookies spread so much?
Your butter may have been too melted rather than just softened, or your oven might be too hot. - Can I make these gluten free?
Yes, a 1 to 1 gluten free flour blend works very well with this dough. - How many candy bars is 2 cups?
Generally, this is about 6 to 8 standard size bars or one large bag of “fun size” bars. - Do I need to refrigerate the dough?
It isn’t strictly necessary, but 30 minutes of chilling helps prevent spreading. - Can I use chunky peanut butter?
Absolutely, it will just add even more peanut texture to the final result. - Is there a substitute for the candy?
You can use peanut butter chips and crushed pretzels for a similar sweet and salty crunch. - Can I freeze the raw dough balls?
Yes, they freeze beautifully and can be baked straight from the freezer with an extra minute of bake time. - How do I chop the candy without it sticking?
Keep the candy bars in the fridge until right before you are ready to chop them. - Can I add nuts?
Roasted peanuts would be a fantastic addition to these cookies.
Conclusion
Butterfinger Cookies are the ultimate indulgence for anyone who appreciates the classic combination of peanut butter and chocolate. With their soft centers and shatteringly crisp candy inclusions, they offer a sensory experience that few other cookies can match. They are simple to prepare yet offer a complex flavor profile that feels truly special. Whether you are baking for a crowd or just treating yourself, these cookies are a guaranteed hit that will have everyone asking for the recipe.
PrintButterfinger Cookies
Soft and chewy peanut butter cookies loaded with crushed Butterfinger candy bar pieces for the ultimate sweet and salty crunch.
Ingredients
- 1 cup Unsalted Butter, softened
- 3/4 cup Granulated Sugar
- 3/4 cup Light Brown Sugar, packed
- 2 Large Eggs
- 1 1/2 tsp Vanilla Extract
- 1/2 cup Creamy Peanut Butter
- 2 1/2 cups All Purpose Flour
- 1 tsp Baking Soda
- 1/2 tsp Salt
- 2 cups Butterfinger Candy Bars, coarsely chopped
Instructions
- Preheat oven to 350°F and line baking sheets with parchment paper or silicone mats.
- In a large bowl, cream together softened butter, granulated sugar, and brown sugar until light and fluffy.
- Beat in the eggs, vanilla extract, and creamy peanut butter until well combined.
- In a separate bowl, whisk together flour, baking soda, and salt.
- Gradually add the dry ingredients to the wet mixture, mixing until just combined.
- Fold in the chopped Butterfinger pieces by hand.
- Scoop rounded tablespoons of dough onto the prepared baking sheets, spacing them 2 inches apart.
- Bake for 10 to 12 minutes or until edges are lightly golden.
- Allow cookies to cool on the baking sheet for 5 minutes before transferring to a wire rack to cool completely.
Notes
- Do not over-mix the dough once the candy is added to keep the chunks intact.
- For extra visual appeal, press a few reserved candy pieces into the tops of the cookies before baking.
- Avoid using natural peanut butter that requires stirring as it may affect the cookie spread.