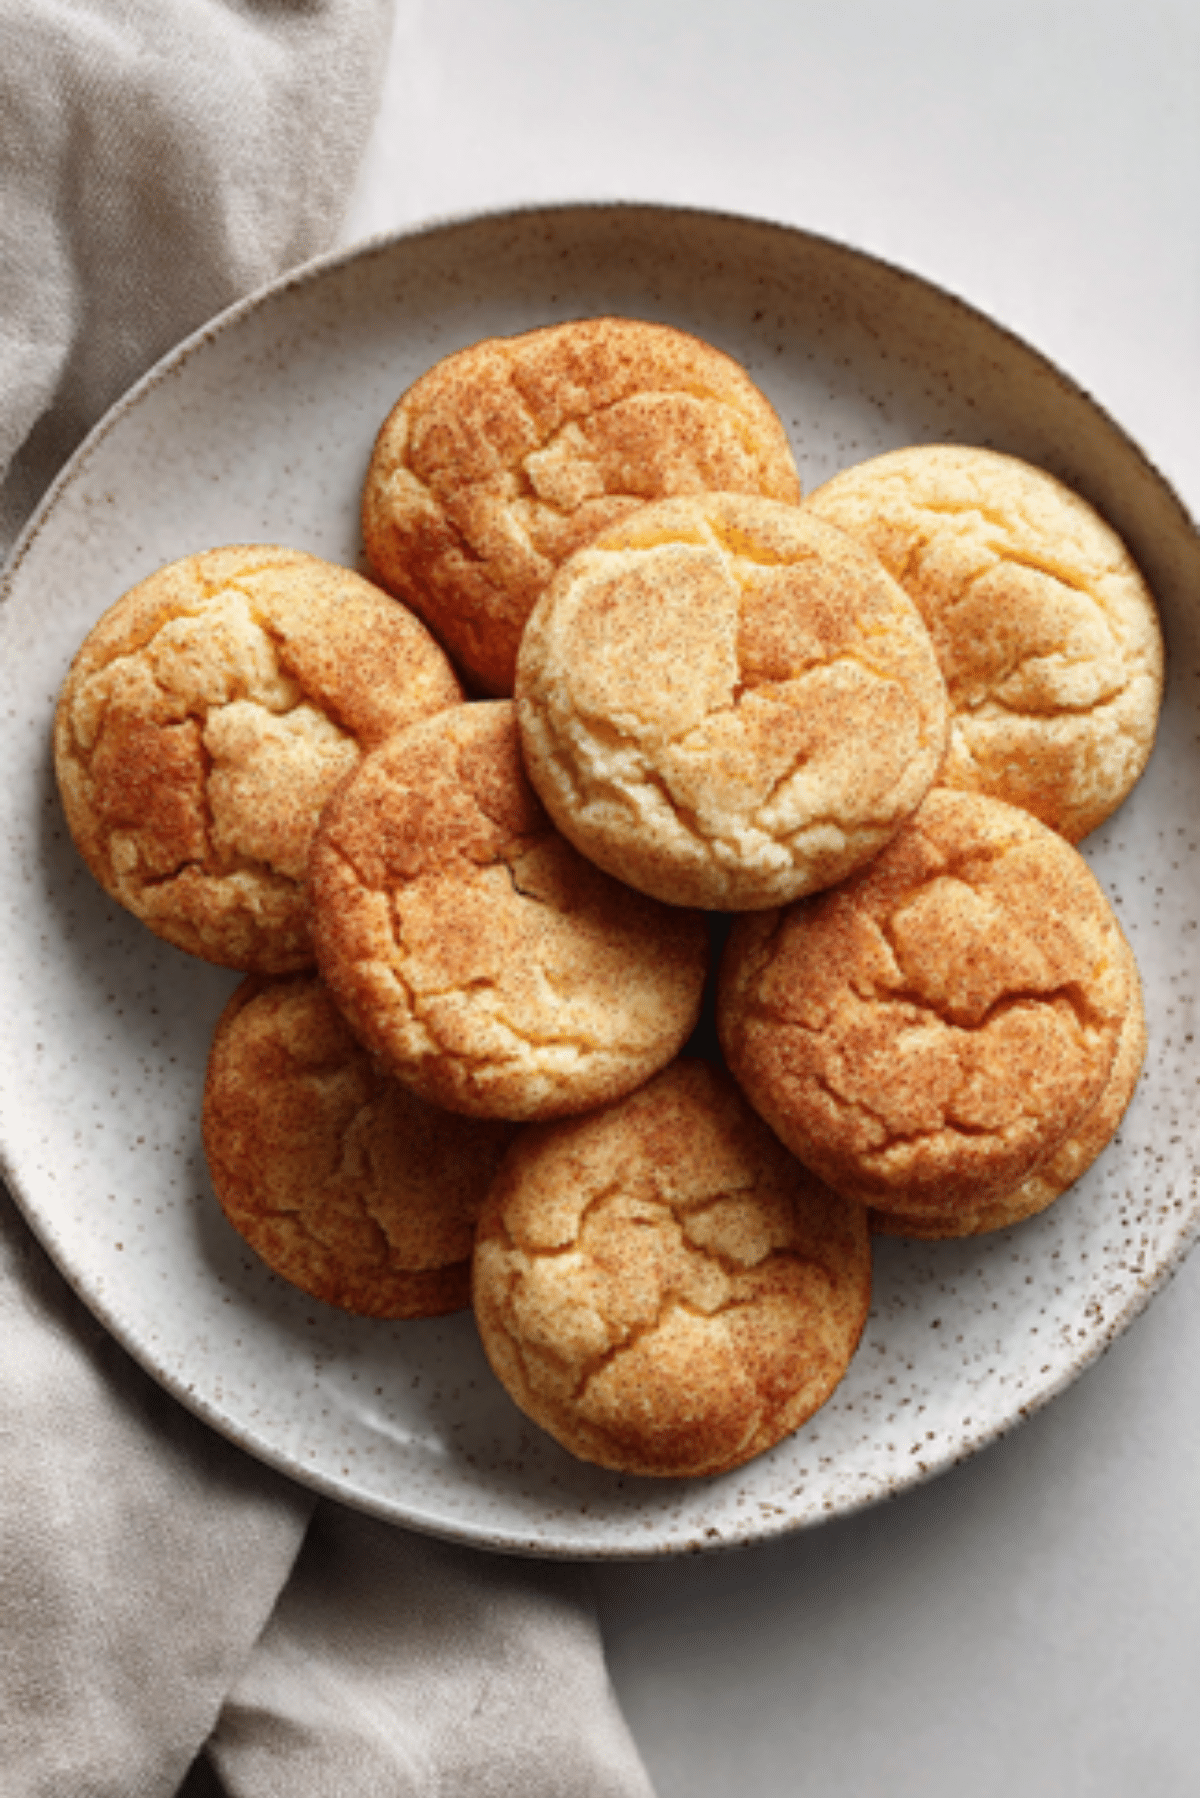
Brown Butter Snickerdoodles
There is a specific kind of magic that happens in a kitchen when the scent of warming cinnamon meets the deep, toasted aroma of browning butter. If you have ever felt that a standard cookie was missing a certain depth, let me tell you, this version is the ultimate answer. These brown butter snickerdoodles take everything you love about the classic childhood favorite and give it a sophisticated, nutty upgrade that lingers on the palate. The edges are perfectly crisp while the centers remain pillowy and soft, creating a texture contrast that is truly addictive.
Trust me, you’re going to love this recipe because browning the butter adds a complex toffee note that balances the tang of the cream of tartar beautifully. This one’s a total game changer for your cookie jar, and let me tell you, it’s worth every bite. Whether you are sharing these with friends over coffee or sneaking one late at night, they offer a warmth that feels like a cozy blanket for your soul. Once you try the nutty depth of the browned butter version, going back to regular butter just won’t feel the same.
The Evolution of a Cinnamon Classic
The snickerdoodle has a whimsical history that is as charming as its name, with many culinary historians tracing its roots back to 19th century German and Dutch immigrants in the United States. While the original recipes relied on cream of tartar to provide that signature tang and chewy leavening, the addition of browned butter is a modern twist that elevates the cookie into the realm of fine pastry. The name itself is thought to be a corruption of the German word Schneckennudeln, which translates to “snail noodles,” though the cookie we know today is purely American in its festive, cinnamon-coated spirit. By introducing the French technique of browning butter, we are essentially marrying Old World elegance with New World comfort.
Why These Cookies Are Your New Favorite Treat
Adding this recipe to your repertoire means you will always have a reliable, high impact dessert ready for any occasion. It uses simple ingredients but delivers a flavor profile that feels expensive and carefully crafted.
Versatile: These cookies are just as appropriate for a holiday gift box as they are for a simple Tuesday afternoon snack.
Budget-Friendly: You likely already have all the flour, sugar, and spices sitting in your pantry right now.
Quick and Easy: Aside from the quick step of browning the butter, the dough comes together in minutes without any complicated equipment.
Customizable: You can experiment with adding a touch of nutmeg or even a pinch of cardamom to the sugar coating for a unique twist.
Crowd-Pleasing: The familiar cinnamon sugar flavor is a universal favorite that appeals to people of all ages.
Make-Ahead Friendly: The dough balls can be rolled and frozen, allowing you to bake off just one or two cookies whenever the craving strikes.
Great for Leftovers: Unlike some cookies that dry out, these stay soft and chewy for several days if stored properly.
Tips for the Perfect Cookie Crinkle
To get those iconic cracks on the surface of your snickerdoodles, there are a few expert moves you should follow. First, ensure your browned butter has cooled slightly before mixing it with the sugars so you don’t accidentally melt the structure of the dough. Second, do not skip the cream of tartar, as it reacts with the baking soda to give the cookies their distinct lift and slightly acidic chew. Finally, when rolling the dough in the cinnamon sugar mixture, be generous. That coating creates a delicious crust that protects the soft interior while providing that hit of spice the moment the cookie hits your tongue.
Essential Tools for Your Kitchen
- Light Colored Saucepan: Essential for browning the butter so you can see the milk solids turn golden without burning them.
- Electric Hand Mixer or Stand Mixer: This helps incorporate the sugars and eggs into the butter for a smooth, uniform dough.
- Cookie Scoop: Using a scoop ensures every cookie is the same size, which leads to even baking across the tray.
- Wire Cooling Rack: Allowing air to circulate under the cookies prevents the bottoms from becoming soggy as they cool.
Ingredients You Will Need For Success
- Unsalted Butter: 1 cup (225 grams) This will be browned to create the nutty base of the cookie.
- Granulated Sugar: 1.5 cups (300 grams) Used both in the dough and for the classic sparkly coating.
- Large Eggs: 2 units These provide the structure and moisture needed for a rich, chewy dough.
- Vanilla Extract: 2 teaspoons A high quality extract adds a floral sweetness that complements the brown butter.
- All-Purpose Flour: 2.75 cups (345 grams) The foundation of the cookie that holds everything together.
- Cream of Tartar: 2 teaspoons The secret ingredient that provides the signature tang and chewiness.
- Baking Soda: 1 teaspoon This works with the cream of tartar to help the cookies rise and crackle.
- Kosher Salt: 1/2 teaspoon A vital addition to balance the sweetness and highlight the nutty butter.
- Ground Cinnamon: 2 tablespoons Used exclusively for the coating to give that warm, spicy punch.
Flexible Ingredient Substitutions
Cream of Tartar: If you are in a pinch, you can replace both the cream of tartar and the baking soda with 2 teaspoons of baking powder, though the flavor will be slightly less tangy.
Granulated Sugar: You can use a bit of light brown sugar in the dough for an even chewier, more caramel-like texture.
Vanilla Extract: Vanilla bean paste is a wonderful upgrade if you want to see those beautiful little black specks throughout your cookies.
Ground Cinnamon: For a deeper flavor, try using Ceylon cinnamon or mixing in a tiny bit of ground ginger.
Spotlight on Key Ingredients
Brown Butter: The star of the show, which provides an aromatic, toasted quality that elevates the cookies from simple to gourmet.
Cinnamon Sugar Coating: This simple mixture of spice and sugar creates the classic aesthetic and the first burst of flavor in every bite.

Welcome to the Cooking Process
Let’s get the oven preheated and start browning that butter. The kitchen is about to smell incredible, and the process is as rewarding as the final result.
- Preheat Your Equipment: Set your oven to 350°F (175°C) and line two large baking sheets with parchment paper or silicone mats.
- Combine Ingredients: In a medium saucepan, melt the butter over medium heat, whisking until it foams, browns, and smells like toasted nuts, then let it cool.
- Prepare Your Cooking Vessel: In a large bowl, cream the cooled brown butter with 1 cup of the granulated sugar until the mixture is pale and fluffy.
- Assemble the Dish: Add the eggs one at a time, followed by the vanilla, then slowly mix in the flour, cream of tartar, baking soda, and salt.
- Cook to Perfection: Mix the remaining sugar with the cinnamon in a small bowl, then roll the dough into 1 inch balls and coat them thoroughly in the spice mixture.
- Finishing Touches: Place the balls 2 inches apart on the prepared sheets and bake for 10 minutes until the edges are set but the centers look slightly soft.
- Serve and Enjoy: Let the cookies cool on the pan for 5 minutes before moving them to a wire rack to cool completely for the best texture.
A Symphony of Texture and Flavor
As you bite into a warm snickerdoodle, your palate is first greeted by the crunch of the cinnamon sugar crust. This quickly gives way to a center that is incredibly soft, almost like a dense cake, but with the chewiness of a classic cookie. The brown butter provides a lingering toffee finish that dances with the bright, slightly tangy note from the cream of tartar. It is a sophisticated balance of flavors that makes it impossible to stop at just one.
Helpful Cooking Tips and Tricks
- Chill the dough for 30 minutes if your kitchen is warm, as this prevents the cookies from spreading too thin in the oven.
- Don’t over-bake these cookies; they should still look a little “underdone” in the middle when you pull them out to ensure they stay soft.
- Use a spoon to scrape every single brown bit out of the butter saucepan, as those bits contain the most concentrated flavor.
Common Pitfalls and How to Fix Them
- Flat Cookies: This usually happens if the butter was too hot when mixed with the sugar or if your baking soda is expired. Ensure the butter is cool to the touch.
- Tough Texture: Avoid over-mixing the dough once you add the flour, as this develops too much gluten and makes the cookies bread-like.
- Lack of Tang: Make sure your cream of tartar is fresh, as it is the key to that specific snickerdoodle profile.
Nutrition Facts
Servings: 24
Calories per serving: 185
Note: These are approximate values.
Preparation Time
Prep Time: 20 minutes
Cook Time: 10 minutes
Total Time: 30 minutes
Make-Ahead and Storage Tips
These cookies store exceptionally well in an airtight container at room temperature for up to 5 days. For longer storage, you can freeze the baked cookies for up to 3 months. If you prefer baking fresh, roll the dough into balls and freeze them on a tray before transferring them to a bag; you can bake them directly from frozen by adding 2 minutes to the cook time.
How to Serve
Serve these cookies slightly warm for the ultimate experience, perhaps with a cold glass of milk or a hot cup of chai tea. They also make an incredible base for an ice cream sandwich if you pair them with a high quality vanilla bean ice cream.
Creative Leftover Transformations
If the cookies get a little crunchy after a few days, crumble them over a bowl of Greek yogurt or use them as a topping for an apple crisp. You can also pulse them in a food processor to make a unique cookie crust for a cheesecake.
Additional Tips for Success
For an extra sparkly look, use coarse sanding sugar mixed with the cinnamon for the coating. The larger crystals catch the light and provide a more pronounced crunch on the exterior of the cookie.
Make It a Showstopper
When placing the cookies on a serving platter, dust them with a tiny bit of extra cinnamon through a fine mesh strainer. Pairing them with a few sticks of whole cinnamon and some star anise on the plate creates a beautiful, rustic aesthetic.
Variations to Try
- Pumpkin Spice Snickerdoodles: Replace the cinnamon in the coating with a pumpkin pie spice blend for an autumnal feel.
- Chocolate Chip Snickerdoodles: Fold in a half cup of mini dark chocolate chips for a rich, melty surprise.
- Salted Brown Butter: Sprinkle a tiny pinch of flaky sea salt over the cookies immediately after they come out of the oven to enhance the nutty butter.
FAQ’s
- Do I have to use cream of tartar?
It is essential for the traditional flavor and texture, but baking powder can work as a substitute in a pinch. - Can I use salted butter?
Yes, but reduce the added kosher salt to just a tiny pinch to keep the flavors balanced. - Why did my butter turn dark so fast?
The milk solids brown quickly once the water evaporates, so keep the heat on medium and whisk constantly. - How do I keep them soft?
Store them with a small piece of white bread in the container; the cookies will absorb the moisture from the bread. - Can I make these gluten free?
A high quality 1 to 1 gluten free flour blend usually works well with this specific dough. - Should I flatten the dough balls?
No, they will naturally spread into the perfect thick shape as they bake. - Can I use a microwave to brown the butter?
It is not recommended, as you cannot see the color change easily and it can splatter or burn quickly. - What if I don’t have a mixer?
A sturdy wooden spoon and some elbow grease will work just fine for creaming the butter and sugar. - Can I double the recipe?
Absolutely, this recipe scales up perfectly for large gatherings or bake sales. - Why are my cookies dry?
You likely measured your flour by scooping the measuring cup into the bag, which packs it down. Use the “spoon and level” method for accuracy.
Conclusion
Mastering the brown butter snickerdoodle is a journey into the heart of comfort baking. The combination of old fashioned simplicity and modern flavor depth makes these cookies a standout choice for any baker. Warm up your oven, brown that butter, and get ready to enjoy a cookie that truly feels like home.
PrintBrown Butter Snickerdoodles
A sophisticated twist on the classic snickerdoodle featuring aromatic browned butter for a nutty, toffee-like depth and a soft, pillowy center.
Ingredients
- 1 cup (225 grams) unsalted butter
- 1.5 cups (300 grams) granulated sugar, divided
- 2 large eggs
- 2 teaspoons vanilla extract
- 2.75 cups (345 grams) all-purpose flour
- 2 teaspoons cream of tartar
- 1 teaspoon baking soda
- 1/2 teaspoon kosher salt
- 2 tablespoons ground cinnamon
Instructions
- Preheat oven to 350°F (175°C) and line baking sheets with parchment paper.
- In a saucepan over medium heat, melt the butter and whisk until it browns and smells nutty, then pour into a bowl to cool.
- In a large mixing bowl, cream the cooled brown butter with 1 cup of the sugar until light and fluffy.
- Beat in the eggs one at a time, then stir in the vanilla extract.
- In a separate bowl, whisk together the flour, cream of tartar, baking soda, and salt.
- Gradually add the dry ingredients to the wet ingredients until a soft dough forms.
- In a small bowl, combine the remaining 1/2 cup of sugar and the cinnamon.
- Roll dough into 1-inch balls and coat generously in the cinnamon-sugar mixture.
- Place on baking sheets 2 inches apart and bake for 10 minutes until edges are set.
- Cool on the pan for 5 minutes before transferring to a wire rack.
Notes
- Do not over-bake; the centers should still look slightly soft when removed from the oven.
- Ensure the browned butter has cooled to room temperature before creaming with sugar.
- Scrape all the brown bits from the pan into your dough for maximum flavor.