Baked Alaska
If there’s one dessert that can steal the spotlight at any gathering, it’s Baked Alaska. With layers of cool, creamy ice cream, soft sponge cake, and a billowy blanket of toasted meringue, this treat is the ultimate contrast of hot and cold, soft and crisp, light and rich. Cutting into it is like revealing a sweet surprise — and let me tell you, it’s always a showstopper.
Behind the Recipe
Baked Alaska was always a bit of a mystery to me growing up. It looked so dramatic — like something from a fancy restaurant or old-school culinary show. But once I finally tried making it, I realized just how approachable it could be. With a little planning and a good torch (or hot oven), it turns into a dessert that’s both playful and elegant. It’s now my go-to for birthdays, celebrations, or anytime I want to wow a crowd.
Recipe Origin or Trivia
Baked Alaska has roots going all the way back to the 19th century. The name was coined at Delmonico’s restaurant in New York to celebrate the U.S. acquisition of Alaska. But similar desserts featuring ice cream insulated by meringue existed even earlier in France and China. The magic lies in the meringue’s ability to insulate the frozen interior, letting you bake or torch the outside without melting the inside. It’s science, history, and dessert — all in one.
Why You’ll Love Baked Alaska
This dessert has it all: drama, flavor, texture, and that wow-factor moment when you serve it.
Versatile: Use any combination of ice cream flavors and cake bases.
Budget-Friendly: Made from basic ingredients — cake, ice cream, and egg whites.
Quick and Easy: Once the components are prepped, assembly is simple.
Customizable: Mix and match flavors, shapes, and even colors.
Crowd-Pleasing: It’s part dessert, part performance — and everyone loves it.
Make-Ahead Friendly: Prepare it in advance and just torch before serving.
Great for Leftovers: Freeze and enjoy slice by slice over several days.
Chef’s Pro Tips for Perfect Results
To nail the perfect Baked Alaska, a few small tricks go a long way:
- Use a chilled metal bowl to help the ice cream set quickly and evenly.
- Line your bowl with plastic wrap so it’s easy to unmold.
- Whip the meringue to stiff peaks for the best structure.
- Toast the meringue quickly with a blowtorch or a very hot oven.
- Serve immediately after toasting for the full hot-cold contrast.
Kitchen Tools You’ll Need
This dessert is more about prep than fancy gear, but here’s what helps:
Mixing bowls: For assembling and whipping the meringue.
Plastic wrap: To line the bowl and release the ice cream dome easily.
Serrated knife: For slicing cleanly through frozen layers.
Electric mixer: To get that fluffy meringue just right.
Blowtorch or broiler: For that signature golden finish.
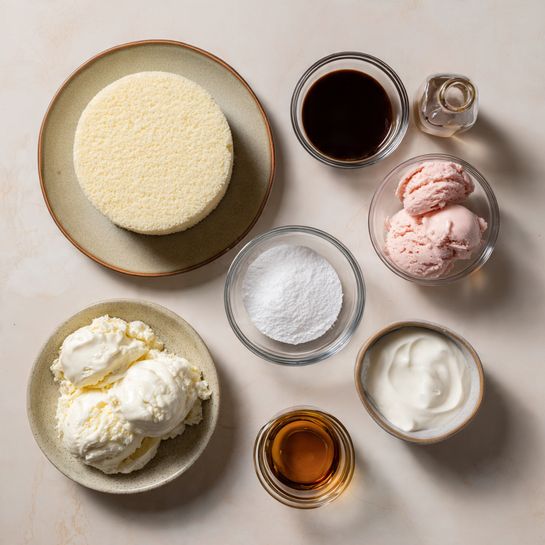
Ingredients in Baked Alaska
Every layer plays a role — from the base to the center to the topping.
- Sponge cake: 1 round 9-inch layer. Light and sturdy base for the dessert.
- Chocolate ice cream: 1 pint. Rich, creamy center layer.
- Strawberry ice cream: 1 pint. Adds fruity contrast and color.
- Egg whites: 4 large. Whipped into a fluffy meringue cloud.
- Granulated sugar: ¾ cup. Stabilizes and sweetens the meringue.
- Cream of tartar: ¼ teaspoon. Helps the egg whites whip to firm peaks.
- Vanilla extract: 1 teaspoon. Adds warmth to the meringue.
Ingredient Substitutions
This recipe is super flexible — switch it up however you like.
Sponge cake: Use pound cake or brownies for a richer base.
Ice cream: Any flavor combo — vanilla, raspberry, pistachio, caramel.
Cream of tartar: Use 1 teaspoon of lemon juice instead.
Granulated sugar: Replace with superfine sugar for quicker dissolving.
Ingredient Spotlight
Meringue: The protective layer that holds everything together, keeps the ice cream from melting, and adds sweet, toasted flavor.
Sponge Cake: The solid base that absorbs flavor and provides contrast to the creamy center.
Instructions for Making Baked Alaska
This dessert is assembled in layers and then crowned with a dramatic finish. It’s easier than it looks — here’s how to build it.
- Preheat Your Equipment:
No need to preheat just yet, but place a metal bowl in the freezer to chill. - Combine Ingredients:
Line a chilled bowl with plastic wrap. Let the ice cream soften slightly. Spread the strawberry ice cream evenly in the bottom of the bowl, pressing down to create a smooth layer. Freeze for 15 minutes. Repeat with chocolate ice cream, pressing it on top of the first layer. Freeze until firm, at least 1 hour. - Prepare Your Cooking Vessel:
Place the sponge cake layer on a serving platter. Unmold the ice cream dome and place it on top of the cake. - Assemble the Dish:
In a clean bowl, beat egg whites with cream of tartar until foamy. Gradually add sugar and vanilla extract, beating to stiff, glossy peaks. - Cook to Perfection:
Cover the ice cream dome and cake entirely with meringue, sealing all the edges. Use a spatula to create swoops and peaks. - Finishing Touches:
Use a kitchen torch to toast the meringue until golden brown, or place under a broiler for 1 to 2 minutes, watching closely. - Serve and Enjoy:
Slice with a hot knife and serve immediately for that perfect mix of cold center and warm topping.
Texture & Flavor Secrets
What makes Baked Alaska special is the contrast — the firm cake base, the creamy frozen center, and the warm, crisp exterior. Each layer complements the next, creating a dessert that’s both comforting and exciting.
Cooking Tips & Tricks
Baked Alaska is all about precision and timing. Here are a few ways to get it just right:
- Use a serrated knife dipped in hot water for clean slices.
- Chill between each step to keep layers neat and solid.
- Don’t skimp on meringue — a thick layer insulates better.
What to Avoid
Here are a few common missteps to steer clear of:
- Melting ice cream: Work quickly and refreeze if needed during assembly.
- Runny meringue: Beat until stiff peaks form, or it won’t hold.
- Thin meringue layer: It needs to fully coat the ice cream to prevent melting.
Nutrition Facts
Servings: 10
Calories per serving: 320
Note: These are approximate values.
Preparation Time
Prep Time: 30 minutes
Cook Time: 2 minutes
Total Time: 32 minutes (plus freezing time)
Make-Ahead and Storage Tips
You can build the entire cake ahead and store it in the freezer for up to 3 days, uncovered or lightly covered with plastic wrap. Just add the meringue and torch right before serving. Leftovers can be refrozen, but the texture is best fresh.
How to Serve Baked Alaska
Slice and serve immediately after toasting the meringue. It’s perfect on its own, but a drizzle of chocolate or berry sauce adds a little something extra. Pair it with espresso or a scoop of contrasting fruit sorbet for a plated dessert vibe.
Creative Leftover Transformations
If you somehow have leftovers:
- Refreeze individual slices in airtight containers.
- Use chopped pieces in ice cream sundaes.
- Cube and layer into parfaits with fruit and whipped cream.
Additional Tips
- Keep a kitchen torch on hand — it gives the best control and visual drama.
- For extra color, swirl food coloring into the meringue before torching.
- Let the cake sit for 2–3 minutes after toasting for easier slicing.
Make It a Showstopper
Use a star tip to pipe the meringue for elegant peaks. Add edible gold flakes or a dusting of powdered sugar after toasting. Serve on a chilled platter to slow melting and keep the focus on that stunning slice.
Variations to Try
- Mini Baked Alaskas: Use ramekins for individual servings.
- Tropical Twist: Use mango and coconut ice cream with a sponge base.
- Chocolate Lovers: Layer chocolate cake, chocolate chip ice cream, and fudge swirl.
- Berry Bliss: Raspberry sorbet and lemon ice cream make a tart combo.
- S’mores Version: Graham cracker base with chocolate and marshmallow layers.
FAQ’s
Q1: Can I use store-bought cake?
A1: Yes, sponge or pound cake from the bakery works perfectly.
Q2: Do I need a kitchen torch?
A2: It helps, but a broiler will work if you watch closely.
Q3: How long can it stay frozen?
A3: Up to 3 days, fully assembled but un-toasted.
Q4: Can I make it with dairy-free ice cream?
A4: Yes! Just use your favorite non-dairy options.
Q5: Why did my meringue collapse?
A5: It likely wasn’t whipped to stiff peaks or was overbeaten.
Q6: Can I skip the sponge cake base?
A6: You can, but the cake gives structure and contrast.
Q7: Can I use a loaf pan instead of a bowl?
A7: Yes, it’ll just have a different shape — still delicious.
Q8: Can I toast the meringue ahead of time?
A8: Best to toast right before serving for texture and appearance.
Q9: Can I flavor the meringue?
A9: Absolutely — try almond or citrus extracts for a twist.
Q10: How do I keep it from melting too fast?
A10: Work quickly and serve immediately after toasting.
Conclusion
Baked Alaska is the kind of dessert that brings smiles and gasps the moment it hits the table. With its toasty top, creamy center, and nostalgic cake base, it’s a delicious contradiction that somehow works perfectly. Trust me — it’s worth every bite.
PrintBaked Alaska
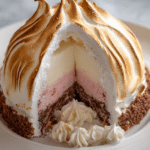
Baked Alaska is a stunning dessert with layers of ice cream over sponge cake, all wrapped in sweet toasted meringue. A dramatic treat that combines hot and cold in every slice.
Ingredients
- 1 round 9-inch sponge cake layer
- 1 pint chocolate ice cream
- 1 pint strawberry ice cream
- 4 large egg whites
- ¾ cup granulated sugar
- ¼ teaspoon cream of tartar
- 1 teaspoon vanilla extract
Instructions
- Line a chilled bowl with plastic wrap. Layer softened strawberry ice cream, freeze 15 minutes, then layer chocolate ice cream on top. Freeze until firm.
- Place the sponge cake on a serving platter. Unmold the ice cream dome onto the cake layer.
- In a clean bowl, beat egg whites with cream of tartar until foamy. Add sugar gradually and vanilla, beating to stiff, glossy peaks.
- Spread meringue over the entire dome, sealing all edges. Create peaks with a spatula for texture.
- Use a kitchen torch to toast the meringue until golden, or place under a broiler for 1–2 minutes, watching closely.
- Slice with a hot knife and serve immediately.
Notes
- Use plastic wrap for easy unmolding of ice cream layers.
- Work quickly to prevent melting during assembly.
- Use a serrated knife dipped in warm water for clean slicing.
- Serve immediately after toasting the meringue for best texture contrast.