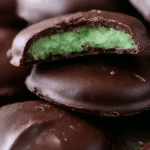
Homemade Chocolate Covered Mint Patties
Close your eyes and imagine biting into a silky, dark chocolate shell only to be greeted by a cool, creamy mint center that melts on your tongue. That’s the magic of homemade chocolate covered mint patties — a refreshing treat that strikes the perfect balance between indulgent and invigorating. The crisp snap of chocolate, the velvety texture of peppermint fondant, and that burst of chill make these little discs of joy simply irresistible.
Behind the Recipe
The idea for these mint patties came from a holiday memory. As a kid, I remember sneaking into the kitchen during winter evenings just to steal a couple of those shiny-wrapped mint chocolates from the candy bowl. Fast forward to today, and I wanted to recreate that nostalgic moment — but better. These are made from scratch, crafted with love, and they taste like something you’d find in a high-end chocolate shop.
Recipe Origin or Trivia
Mint patties have been a classic in American confections for decades, often found in holiday tins and after-dinner trays. Inspired by the iconic York Peppermint Patties, this homemade version dials up the freshness and creaminess. Peppermint candies date back to the early 1800s, but the chocolate-coated kind started gaining popularity in the 20th century as a favorite palate cleanser and sweet indulgence all in one.
Why You’ll Love Homemade Chocolate Covered Mint Patties
Let me tell you, these treats check all the boxes. Here’s why you’ll fall in love:
Versatile: Serve them chilled after dinner, add them to gift boxes, or crumble them over desserts.
Budget-Friendly: Made with pantry staples, these cost a fraction of store-bought versions.
Quick and Easy: No baking required and only a few steps to sweet success.
Customizable: Use white chocolate, dark chocolate, or even add a splash of natural food coloring to the filling.
Crowd-Pleasing: These always disappear fast at parties and potlucks.
Make-Ahead Friendly: You can prepare them days in advance and they’ll still taste amazing.
Great for Leftovers: Chop them up and mix into ice cream, brownies, or cookies.
PrintHomemade Chocolate Covered Mint Patties
Cool, creamy, and coated in rich dark chocolate, these homemade mint patties are a delightful treat for any occasion. Easy to make and irresistibly refreshing!
- Prep Time: 30 minutes
- Cook Time: 10 minutes
- Total Time: 40 minutes
- Yield: 30 patties
- Category: Dessert
- Method: No-Bake
- Cuisine: American
- Diet: Vegetarian
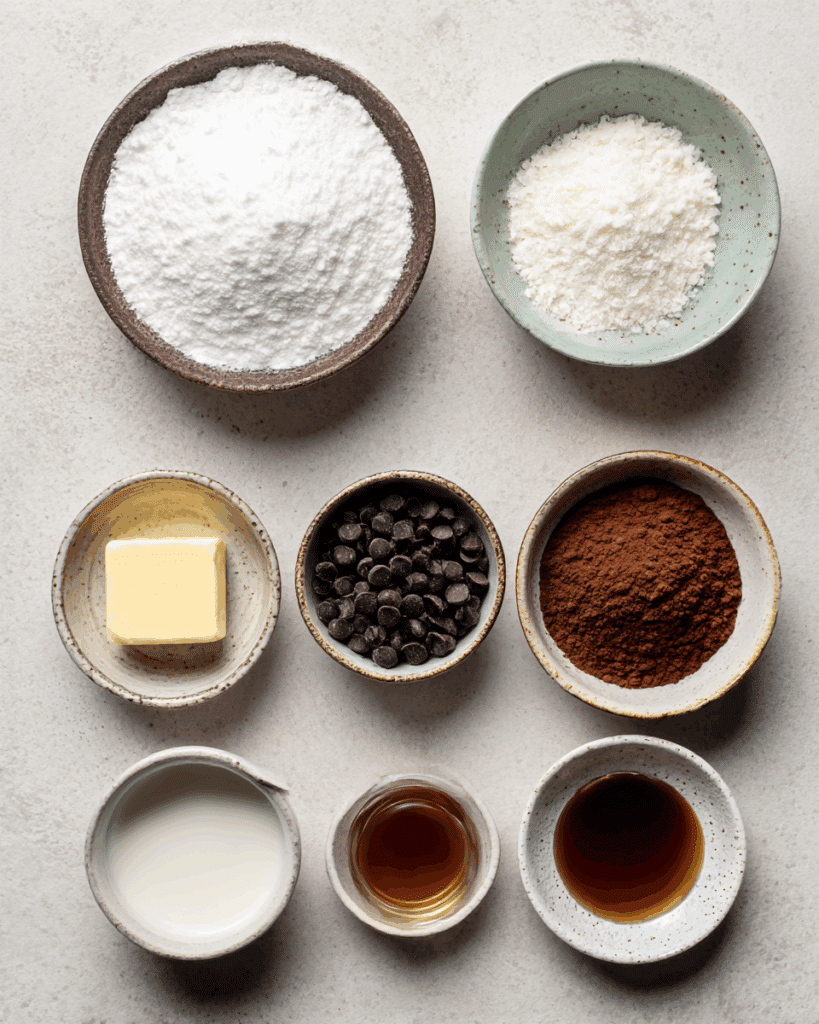
Ingredients
- Powdered Sugar: 4 cups – forms the creamy yet firm base of the mint filling.
- Sweetened Condensed Milk: ⅓ cup – binds the sugar and creates a smooth texture.
- Peppermint Extract: 1½ teaspoons – gives that refreshing, cool mint flavor.
- Vanilla Extract: ½ teaspoon – adds a warm background note to balance the mint.
- Salt: A pinch – cuts through the sweetness and enhances flavors.
- Dark Chocolate Chips or Chopped Chocolate: 2 cups – rich, slightly bitter coating that complements the sweet mint.
- Coconut Oil or Shortening: 2 teaspoons – thins the chocolate for a silky dip and glossy finish.
Instructions
- Preheat Your Equipment: Prepare a baking sheet lined with parchment paper and clear space in your fridge.
- Combine Ingredients: In a large mixing bowl, blend powdered sugar, condensed milk, peppermint extract, vanilla extract, and salt until a dough forms.
- Prepare Your Cooking Vessel: Set up a double boiler or use a microwave-safe bowl for melting chocolate.
- Assemble the Dish: Roll the dough to ¼ inch thick, cut rounds, and place on parchment paper.
- Cook to Perfection: Chill rounds for 30 minutes, then melt chocolate with coconut oil.
- Finishing Touches: Dip patties in chocolate and place on parchment to set.
- Serve and Enjoy: Let chocolate harden, then serve chilled or at room temperature.
Notes
- Chill dough before cutting for easy shaping.
- Use high-quality chocolate for best results.
- Decorate with crushed peppermint or chocolate drizzle.
Nutrition
- Serving Size: 1 patty
- Calories: 120
- Sugar: 18g
- Sodium: 20mg
- Fat: 4g
- Saturated Fat: 3g
- Unsaturated Fat: 1g
- Trans Fat: 0g
- Carbohydrates: 22g
- Fiber: 1g
- Protein: 1g
- Cholesterol: 2mg
Chef’s Pro Tips for Perfect Results
When it comes to candy making, the devil is in the details. Here are a few tricks I swear by:
- Always chill the mint discs before dipping to keep their shape and texture intact.
- Use high-quality chocolate for a richer snap and smoother coating.
- Add a tiny pinch of salt to the filling to balance the sweetness.
- A fork or dipping tool makes coating them in chocolate easier and cleaner.
- Let the patties set on parchment paper to avoid sticking or flattening.
Kitchen Tools You’ll Need
No fancy gadgets needed, just a few essentials to make these minty marvels:
Mixing Bowl: To combine and knead the peppermint filling.
Electric Mixer or Hand Mixer: For smooth, creamy filling texture.
Measuring Cups and Spoons: Accuracy is key in candy making.
Rolling Pin: Helps to evenly flatten the peppermint dough.
Round Cookie Cutter: For uniform, bite-sized patties.
Double Boiler or Microwave-Safe Bowl: To melt the chocolate gently.
Fork or Dipping Tool: To coat each patty with chocolate smoothly.
Parchment Paper: For setting patties without sticking.
Ingredients in Homemade Chocolate Covered Mint Patties
Every bite is a perfect dance of ingredients coming together in harmony. Here’s what you’ll need:
- Powdered Sugar: 4 cups – forms the creamy yet firm base of the mint filling.
- Sweetened Condensed Milk: ⅓ cup – binds the sugar and creates a smooth texture.
- Peppermint Extract: 1½ teaspoons – gives that refreshing, cool mint flavor.
- Vanilla Extract: ½ teaspoon – adds a warm background note to balance the mint.
- Salt: A pinch – cuts through the sweetness and enhances flavors.
- Dark Chocolate Chips or Chopped Chocolate: 2 cups – rich, slightly bitter coating that complements the sweet mint.
- Coconut Oil or Shortening: 2 teaspoons – thins the chocolate for a silky dip and glossy finish.
Ingredient Substitutions
Need to switch things up? Here’s how you can adapt:
Powdered Sugar: Use a sugar-free confectioners’ blend for a lower-calorie option.
Sweetened Condensed Milk: Try coconut condensed milk for a dairy-free version.
Peppermint Extract: Mint extract or spearmint extract work too, but adjust to taste.
Dark Chocolate: Use milk or white chocolate if preferred.
Coconut Oil: Butter or vegetable shortening can also help thin the chocolate.
Ingredient Spotlight
Peppermint Extract: This is what makes the filling burst with fresh flavor. Just a small amount delivers that icy-cool finish that mint lovers crave.
Dark Chocolate: Its slight bitterness is the perfect counterpoint to the sweet, creamy filling, creating a balanced, sophisticated flavor profile.
Instructions for Making Homemade Chocolate Covered Mint Patties
This recipe is fun to make and even more fun to eat. Here’s how to bring these minty bites to life:
- Preheat Your Equipment:
No oven needed, but prepare a baking sheet lined with parchment paper and clear space in your fridge. - Combine Ingredients:
In a large mixing bowl, blend the powdered sugar, condensed milk, peppermint extract, vanilla extract, and salt until a dough forms. - Prepare Your Cooking Vessel:
If melting chocolate on the stove, set up a double boiler. If using a microwave, grab a microwave-safe bowl. - Assemble the Dish:
Roll the peppermint dough between parchment paper to about ¼ inch thickness. Use a cookie cutter to cut out rounds. Place them on the prepared baking sheet. - Cook to Perfection:
Chill the rounds in the refrigerator for at least 30 minutes. Meanwhile, melt the chocolate with coconut oil until smooth and glossy. - Finishing Touches:
Dip each mint round into the melted chocolate, coating it fully. Use a fork to lift and let excess chocolate drip off before placing back on parchment. - Serve and Enjoy:
Let them set until the chocolate is firm, then serve chilled or at room temperature.
Texture & Flavor Secrets
These mint patties offer a luxurious contrast: a soft, creamy center with a cool, melt-in-your-mouth sensation paired with a crisp outer chocolate shell. The peppermint flavor bursts forward with each bite, softened by the warm depth of dark chocolate and a hint of vanilla.
Cooking Tips & Tricks
Just a few extra insights to elevate your candy-making game:
- Chill the dough slightly before cutting to prevent sticking.
- If chocolate thickens while dipping, rewarm gently.
- Sprinkle crushed peppermint or drizzle extra chocolate on top for decoration.
What to Avoid
Candy making is delicate. Here’s what to steer clear of:
- Too much peppermint extract: It can become overpowering and medicinal.
- Overheating chocolate: Causes it to seize or become grainy.
- Skipping the chilling step: Warm patties will melt or deform during dipping.
Nutrition Facts
Servings: 30
Calories per serving: 120
Note: These are approximate values.
Preparation Time
Prep Time: 30 minutes
Cook Time: 10 minutes
Total Time: 40 minutes
Make-Ahead and Storage Tips
These mint patties are incredibly storage-friendly. You can make them days in advance and keep them chilled in an airtight container. They also freeze beautifully — just place parchment between layers. To serve, bring to room temp or enjoy cold straight from the fridge. They hold their shape and flavor like champs.
How to Serve Homemade Chocolate Covered Mint Patties
Get creative when serving! Arrange them in a festive tin for gifts, place on a dessert platter with cookies and fruits, or crumble over ice cream for a minty topping. They’re great with coffee or as an elegant finish to a dinner party.
Creative Leftover Transformations
Leftovers? That’s a lucky day. Here’s what to do:
- Chop and mix into cookie dough or brownie batter.
- Fold into whipped cream or mousse for mint-chocolate magic.
- Blend into milkshakes for a frosty, minty twist.
Additional Tips
Want to take it a step further?
- Add a drop of green food coloring for a classic minty hue.
- Top with a sprinkle of crushed candy cane for a festive touch.
- Store them in mini cupcake liners for presentation and ease.
Make It a Showstopper
Presentation matters! Stack them neatly in glass jars, wrap with ribbon, or use gold foil candy wrappers for a professional, giftable look. A sprinkle of sea salt on top adds visual appeal and flavor contrast.
Variations to Try
- White Chocolate Coating: Swap the dark for something sweeter and creamier.
- Layered Patties: Add a thin layer of caramel or peanut butter for extra richness.
- Infused Mint: Use fresh mint leaves to infuse your condensed milk for a natural touch.
- Chocolate Mint Swirls: Mix chocolate into half the dough and marble it.
- Mini Patties: Use a smaller cutter for bite-sized party versions.
FAQ’s
Q1: Can I make these vegan?
A1: Yes, use coconut condensed milk and dairy-free chocolate for a delicious vegan version.
Q2: How long do they last?
A2: Up to 2 weeks in the fridge or 3 months in the freezer.
Q3: Can I use milk chocolate?
A3: Absolutely, it will make the flavor slightly sweeter and creamier.
Q4: Is food coloring necessary?
A4: Not at all, it’s purely optional for appearance.
Q5: My dough is too sticky, what should I do?
A5: Add more powdered sugar a tablespoon at a time until manageable.
Q6: Can I shape them differently?
A6: Sure, hearts or squares add a fun twist, especially for holidays.
Q7: Do I need a candy thermometer?
A7: No thermometer required since we’re not tempering or cooking sugar.
Q8: Can I double the recipe?
A8: Yes, just make sure to chill in batches so nothing melts prematurely.
Q9: What kind of chocolate is best?
A9: Use high-quality baking chocolate or couverture chocolate for best results.
Q10: How can I prevent bloom on chocolate?
A10: Store in a cool, dry place and avoid temperature changes to keep them shiny.
Conclusion
Homemade Chocolate Covered Mint Patties are more than just a treat — they’re a mini escape wrapped in chocolate. Cool, creamy, crisp, and undeniably satisfying, they’re sure to become a favorite in your kitchen. Whether you’re gifting them, sharing them, or sneaking a few for yourself, trust me, they’re worth every bite.